#  Commercial Flat Work Quick Start
# Overview
If you're strapped for time and just want a quick, step-by-step introduction to some Phoenix basics, follow the Commercial Flat Work Quick Start guide below. For more info, check out the complete user guide, or try out the search bar to find a particular term.
For this Quick Start Guide, you'll need a few files to get started. Grab those here, and we'll tell you where to use them later on in the guide.
| Name | Download |
|---|---|
| Phoenix Library | phoenix-library.phxlib |
| CSV Order | orders.csv |
# Installation
To install Phoenix, double-click the .dmg (on a Mac) or .exe (on a PC) file, and follow the installation wizard prompts. Installation is a breeze!
# Basic Concepts
There are some basic concepts you need to understand about Phoenix. The ones below are very brief but help describe the concepts of the software. For more detailed info, check out Key Concepts.
# Products

A Product is a piece of artwork that needs to be printed. Products come in different types, like a flat, folded, tiled, or bound. Products also have specific properties, like quantity, height, width, and what stock it needs to be printed on. For our guide, we’ll be working with flat products without artwork, represented by the ‘Height’ and ‘Width’ (also known as blank size).
# Layouts
A layout is a representation of the actual printed layout or press form. Layouts are assigned a stock and can also be assigned a press. The layouts in Phoenix are interactive, meaning you can always edit what is on a layout to add, remove, edit, and rearrange products and production marks.
# Projects
Projects are the native files that are used in Phoenix. A project consists of everything involved in that particular order/job/project, including the products, layouts, marks, and any assigned properties.
# Things and Stocks
Phoenix creates a model of your production environment, including the presses and stocks you use. This allows your production capabilities, including costs, to be factored in to determine the most cost effective layout and stock choices.
# Creating your first project
# Importing the Library
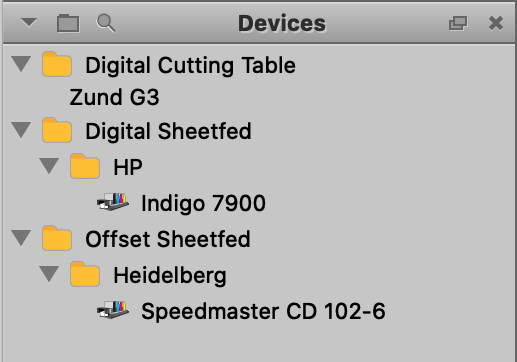
The first thing we need to do is to load the Phoenix library that you downloaded from above so that Phoenix will include a sample production environment (with a predefined press and stock). Open Phoenix, and navigate to Preferences. On a Mac, Preferences can be found in the Phoenix menu. On a PC, go to Edit and then select Preferences. From there, click on Diagnostics, and then Import Libraries. Select okay, choose the .phxlib file you downloaded earlier, and click OK once it's loaded. Phoenix will close down. Open Phoenix back up, and confirm you see the ’40 Offset’ press in the ‘Things’ panel as well as ‘18pt SBS’ in the ‘Stocks’ panel (see screenshots below). If everything looks good, now we're ready to create a project!


# Create a project
To create a new project, go to File > New project (or press Command or Control and "N"). This will create a new project and display a prompt for what you want to name the project.

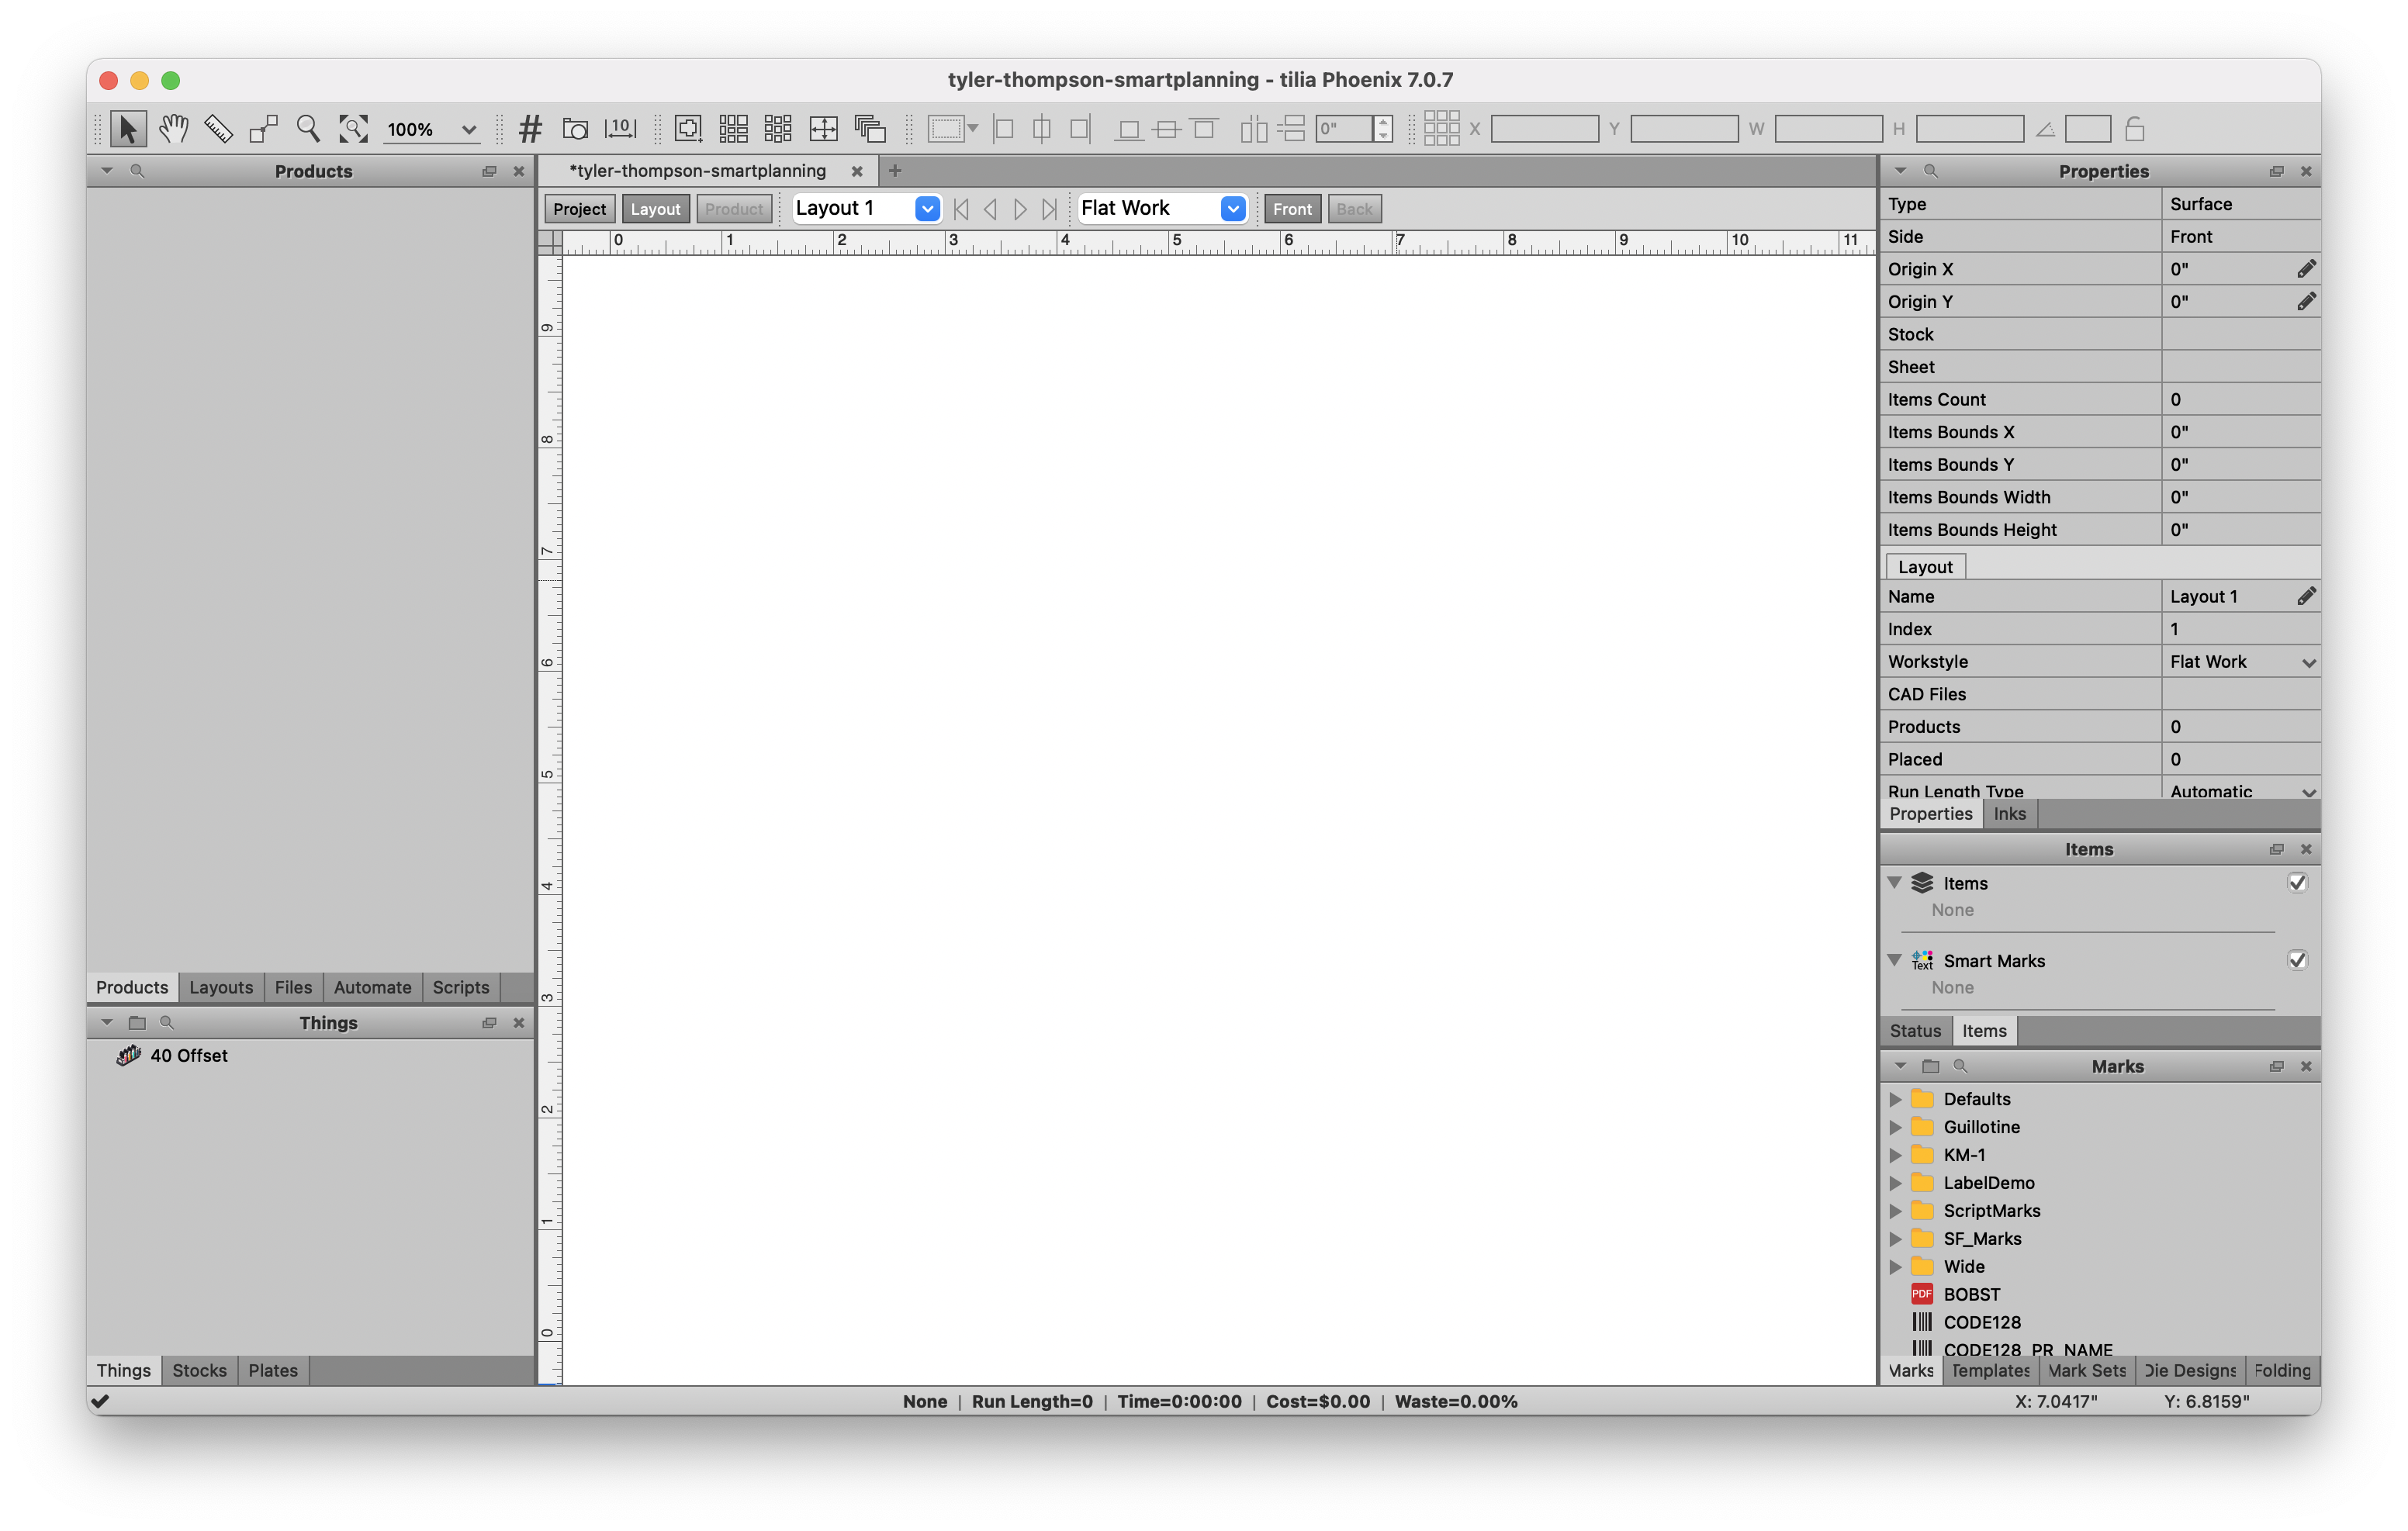
Set the filename to “test-job-smartplanning“ and leave the rest of the fields blank. These fields can be used to add additional information to the project, but are not necessary. Now click "OK". You should now see a blank layout like the screenshot below.
# Add Products with CSV
Now we want to add products to the project. Phoenix has the ability to import products using CSV file. This CSV has the product parameters already predefined, making for fewer steps in Phoenix. Phoenix can map data from the CSV into any product property (don’t worry, this is already done for you!)
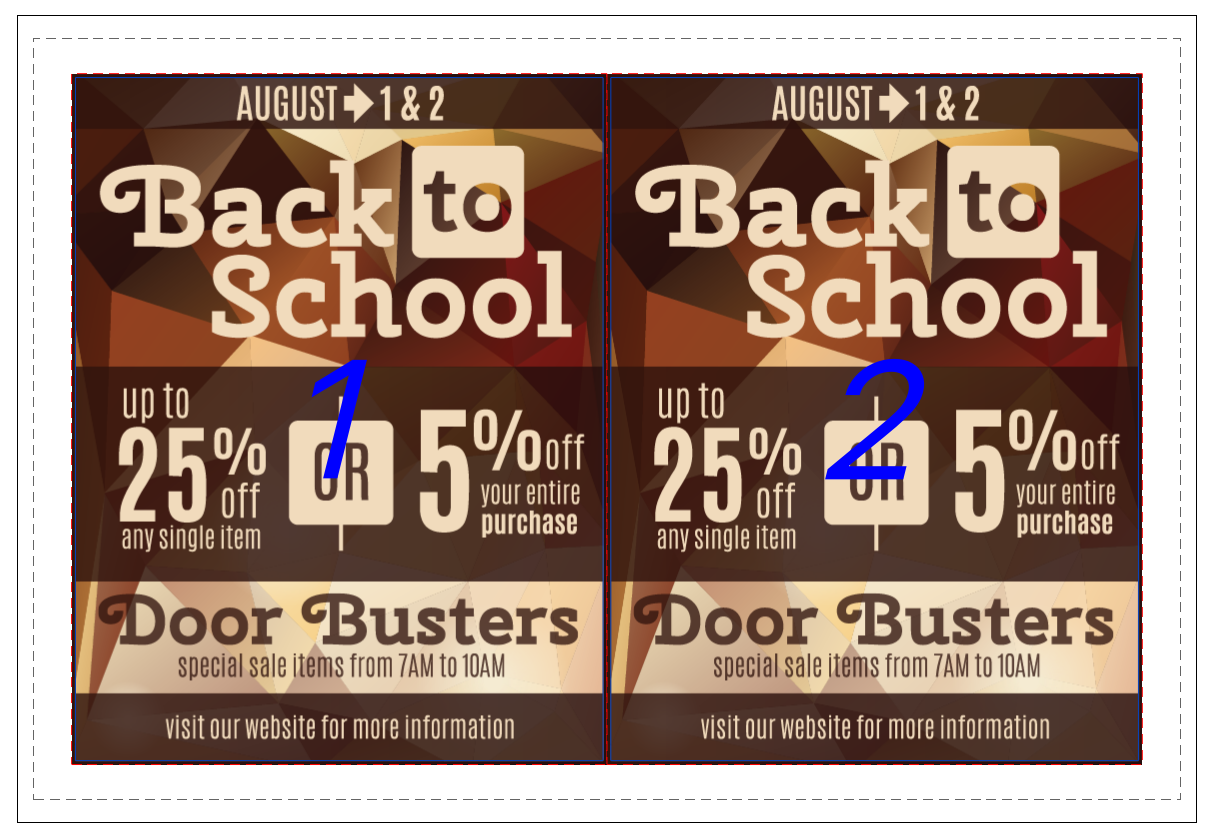
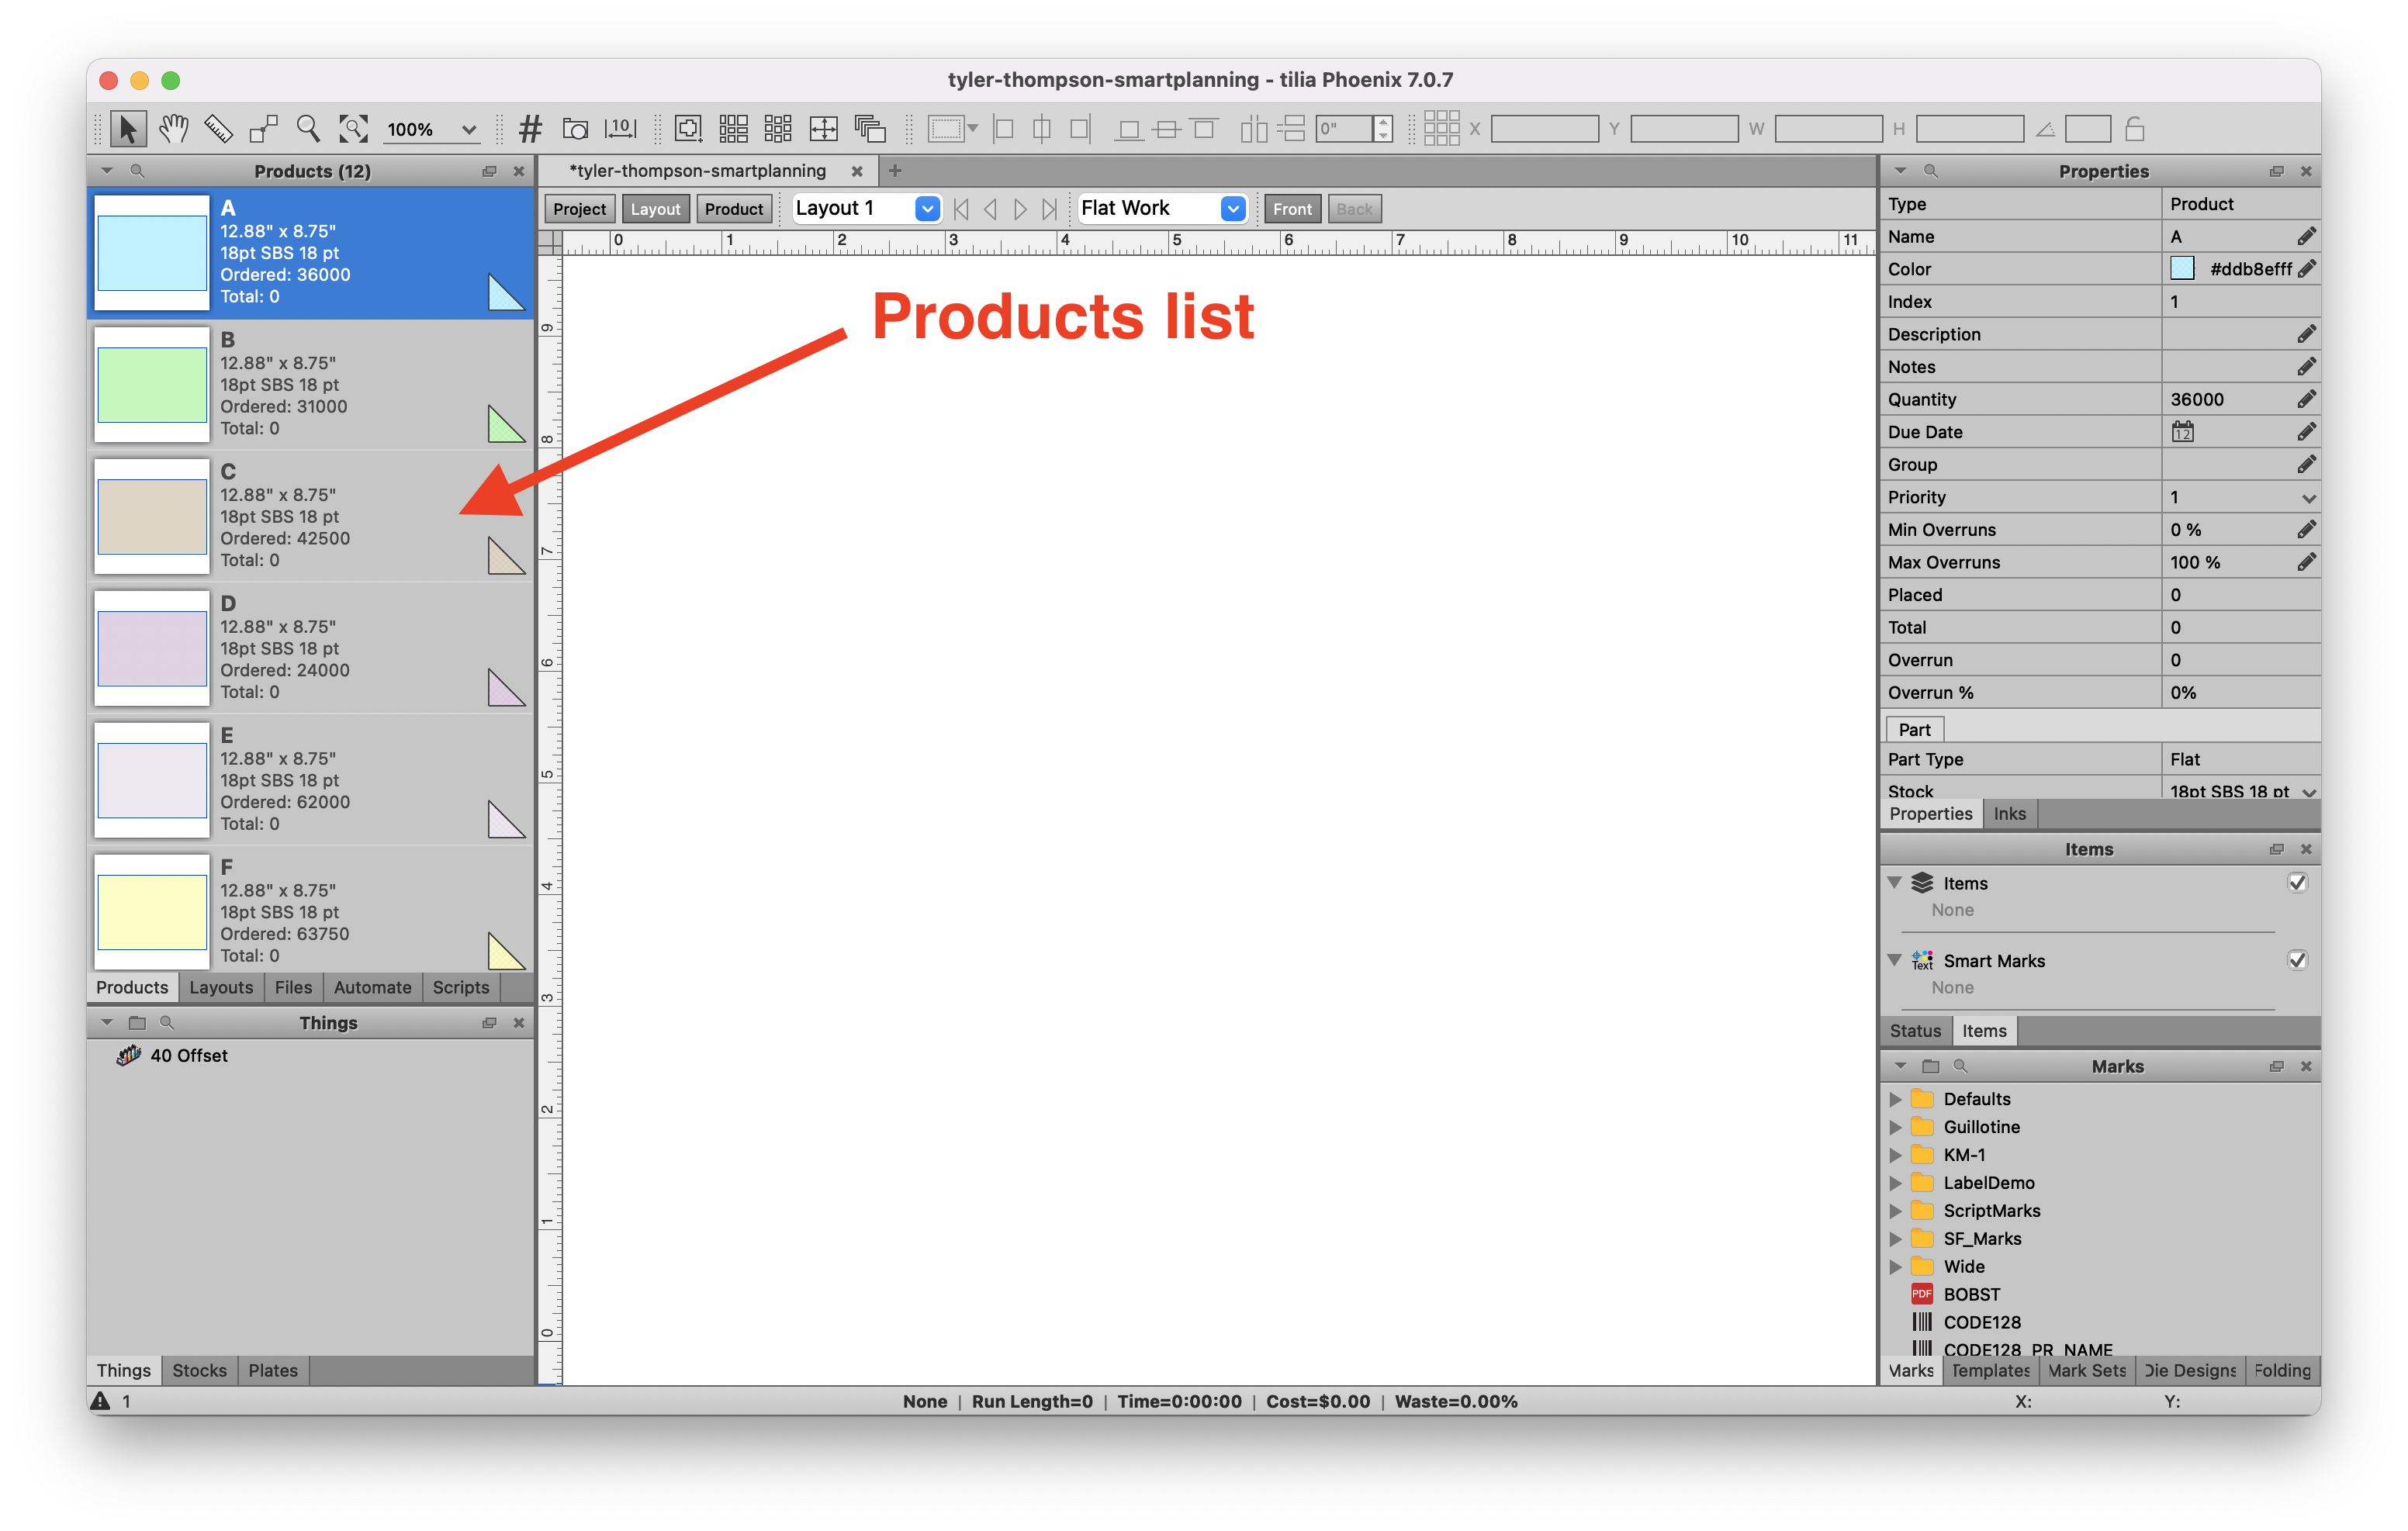
To import the products, drag the orders.csv file into Phoenix to import the products (just drop the csv file on the blank canvas in Phoenix - if anything pops up, click ‘OK'). You'll notice the parameters are all mapped correctly, and the order quantity, name, height, width, and stock are properly assigned. You will see the products displayed in the Products panel on the left side of the application window. You should see the list of products in you panel similar to the screenshot below:
Now the products have been added to the project, and we're ready to start planning!
# Run Imposition AI (part 1 - straight forms)
Now, Phoenix knows what stock the products need to be placed on since the information was provided in the CSV file. Phoenix also knows your production capabilities since the press and stock is already predefined. So, we are now ready to intelligently find the best plan.
Navigate to the Window menu at the top of the application and choose Imposition AI.
Click the "Plan" button at the top of the Imposition AI window, and then choose the following settings:
- Profiles: Single Plan
- Products: Select All
- Things: 40 Offset
- Sheets/Rolls: Select All
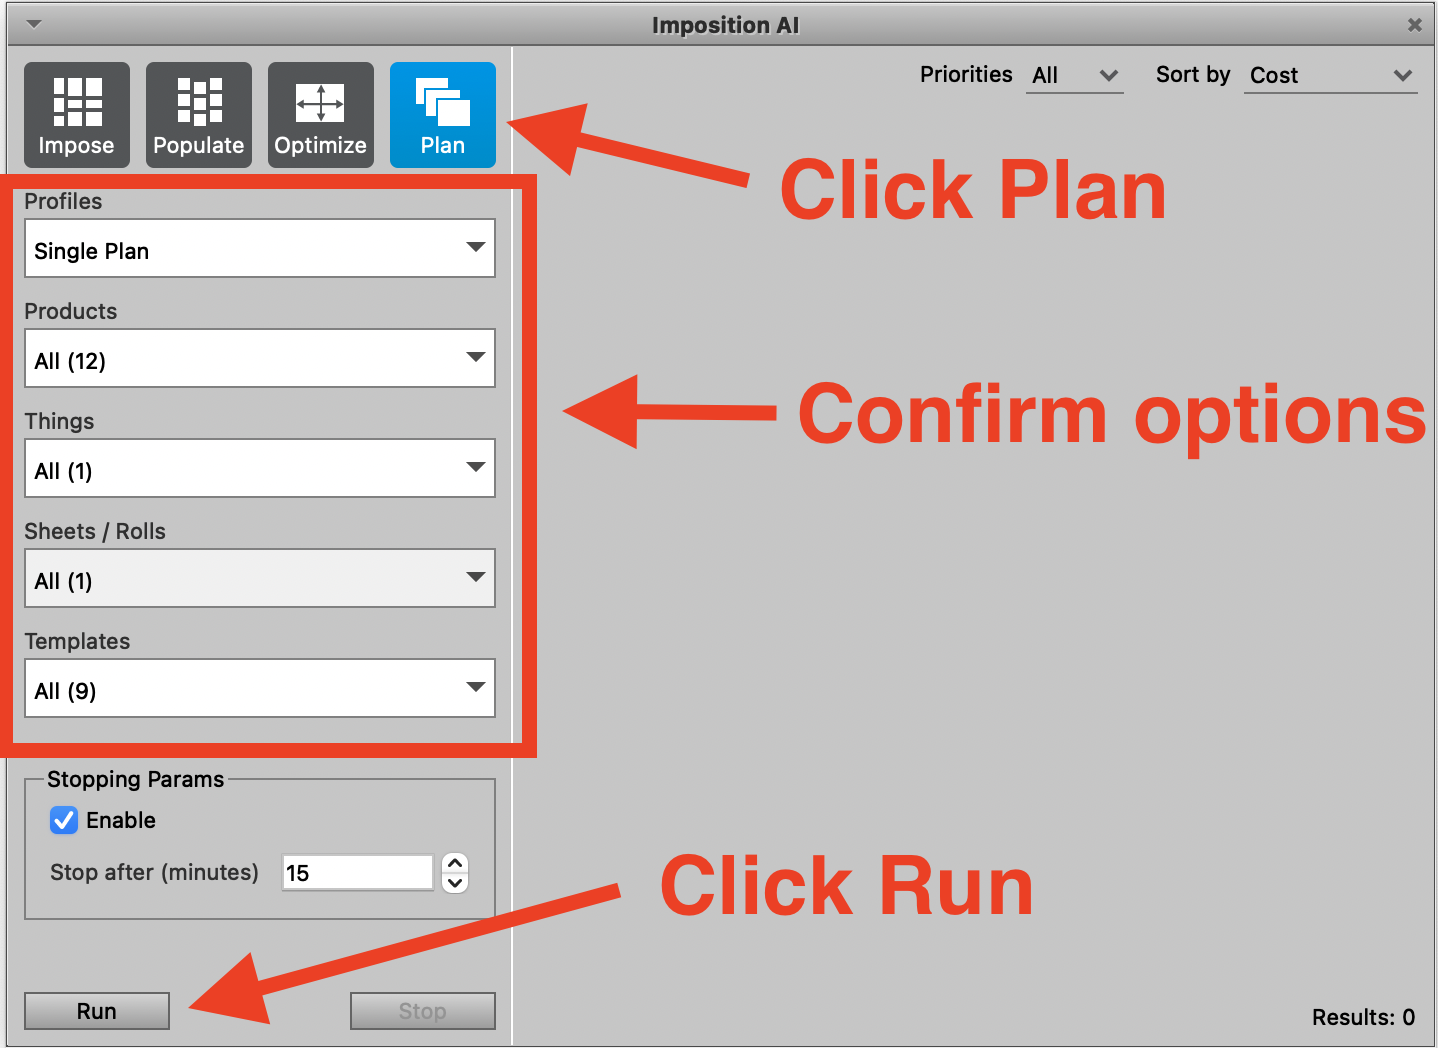
Now click Run. Phoenix uses the parameters above to calculate results for the ’40 Offset' press. You should see one result:
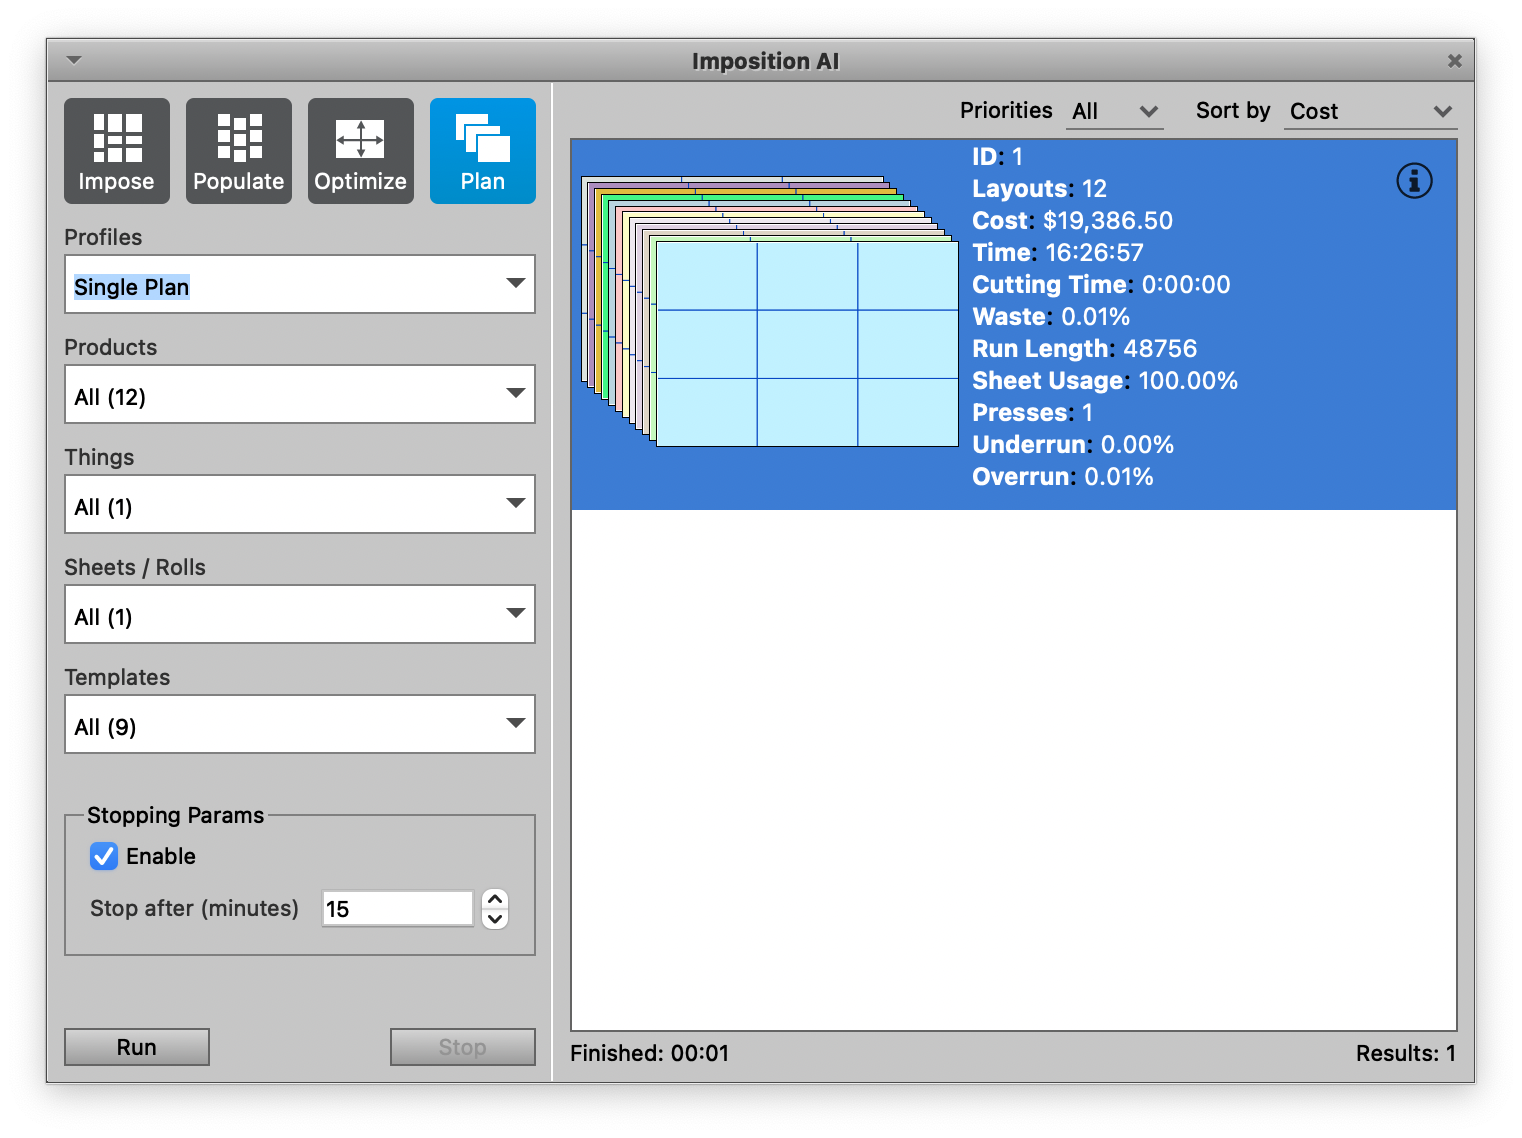
Double-click to apply this result.
Now you will see that Phoenix shows you the Project view. This view reports the details about the Project with production costing and time information.
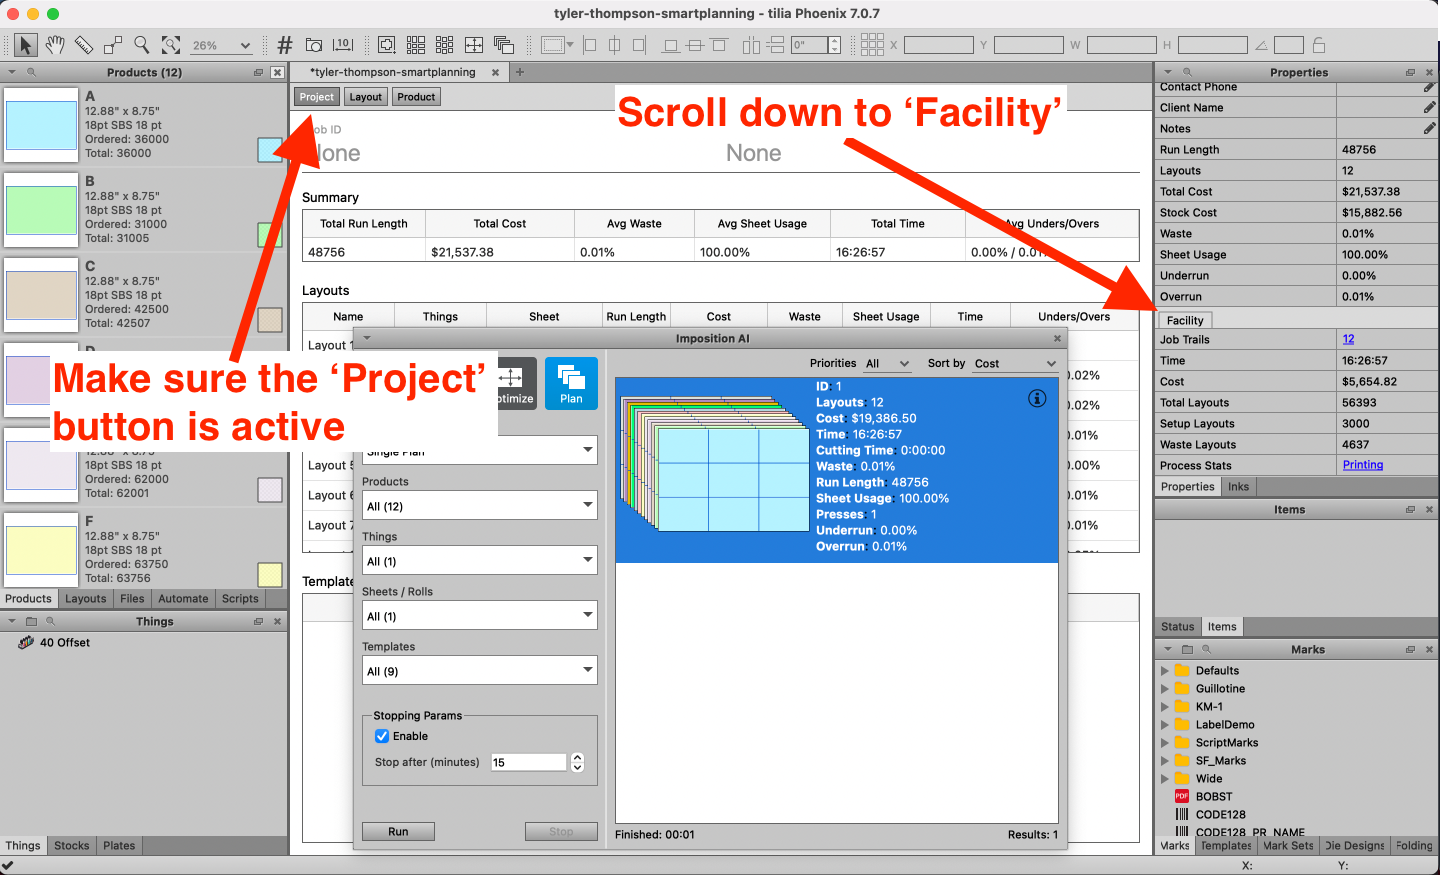
Look at the ‘Properties’ panel on the right hand side. Scroll down to the ‘Facility’ section and take a screenshot of your screen.
Note the 'Total Cost‘ (above facility tab), 'Stock Cost' (above facility tab), 'Total Layouts’ (below facility tab) and 'Time' (below facility tab) properties. Your results should match the results below. Make sure your screenshot looks similar to the below screenshot:
# Run Imposition AI (part 2 - combo forms)
Now, let’s let Phoenix calculate the best way to run these orders considering combo (mixed) forms.
Go back to the Imposition AI window (if you closed it, navigate to the Window menu at the top of the application and choose Imposition AI).
Again, click the "Plan" button to make sure Plan is active at the top of the Imposition AI window, and then change the Profile to ‘Combo Plan’. Your settings should be set as follows:
- Profiles: Combo Plan
- Products: Select All
- Things: 40 Offset
- Sheets/Rolls: Select All

Now click Run. Phoenix uses the parameters above to begin searching for the best possible plan using the stock and press specified. Allow Phoenix to generate the results — the list is sorted by cost by default, so the top result in the list will be the most cost-effective:
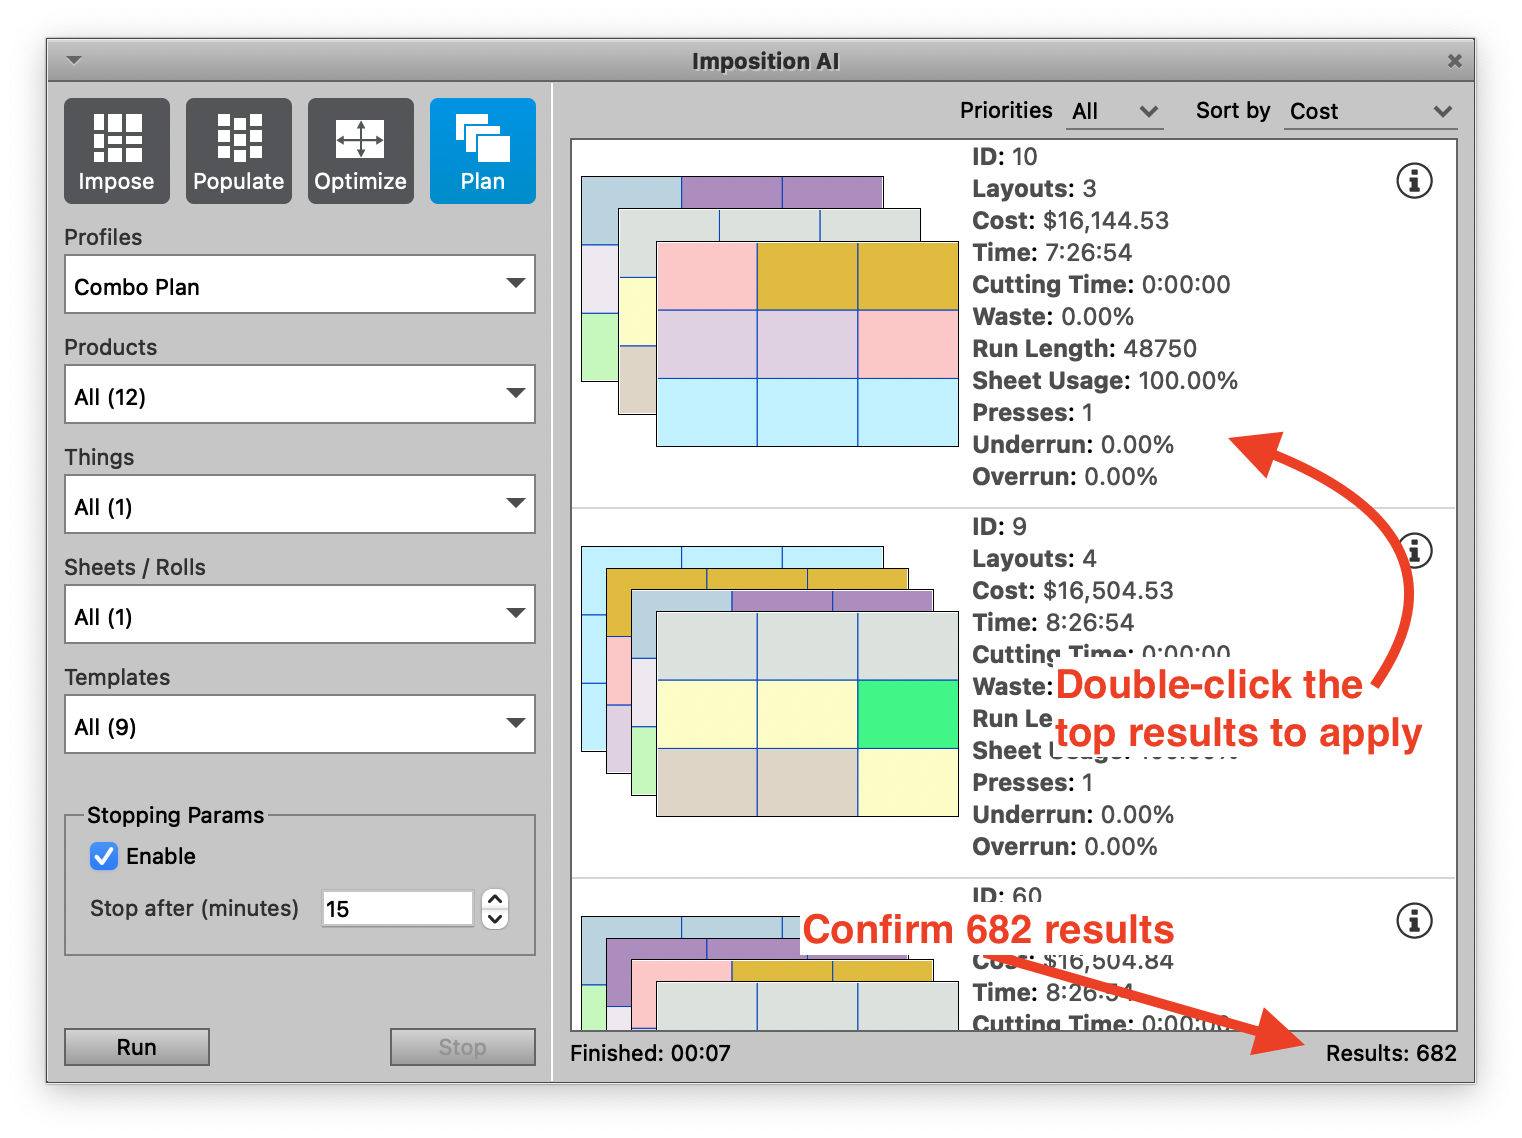
Double-click to apply the top result after the algorithm finishes searching. Phoenix will show you the Project view. Look at the ‘Properties’ panel on the right hand side. Scroll down to the ‘Facility’ section and take a screenshot of your screen.
Note the 'Total Cost‘ (above facility tab), 'Stock Cost' (above facility tab), 'Total Layouts’ (below facility tab) and 'Time' (below facility tab) properties. Your results should match the results below. Make sure your screenshot looks similar to the below screenshot:

# Run Imposition AI (part 3 - Combo + 56 Offset)
For the final part of the guide, we will use Phoenix to evaluate the same job running on a larger, 7-color press.
# Adding a New Press
In Phoenix, a 'Thing' (or plural 'things') is a physical object or process that is used in a production flow when transforming a product part and/or component into a final product. A 'Thing' could be a piece of equipment such as a digital press or a die- cutting device, or it could be a manual resource that would perform a task such as diemaking or hemming/sewing a banner.
Presses consist of the following:
- Speed and cost information used by estimation + ganging
- Min/max sheet constraints used by ganging
- Media template (optional)
- Gripper, sheet placement, content and image margins
- Press-specific marks (optional)
There are different types of Presses available within Phoenix:
- Digital, both Sheet-fed and Web-fed
- Offset, both Sheet-fed and Web-fed
- Wide Format, both Flatbed and Roll-fed
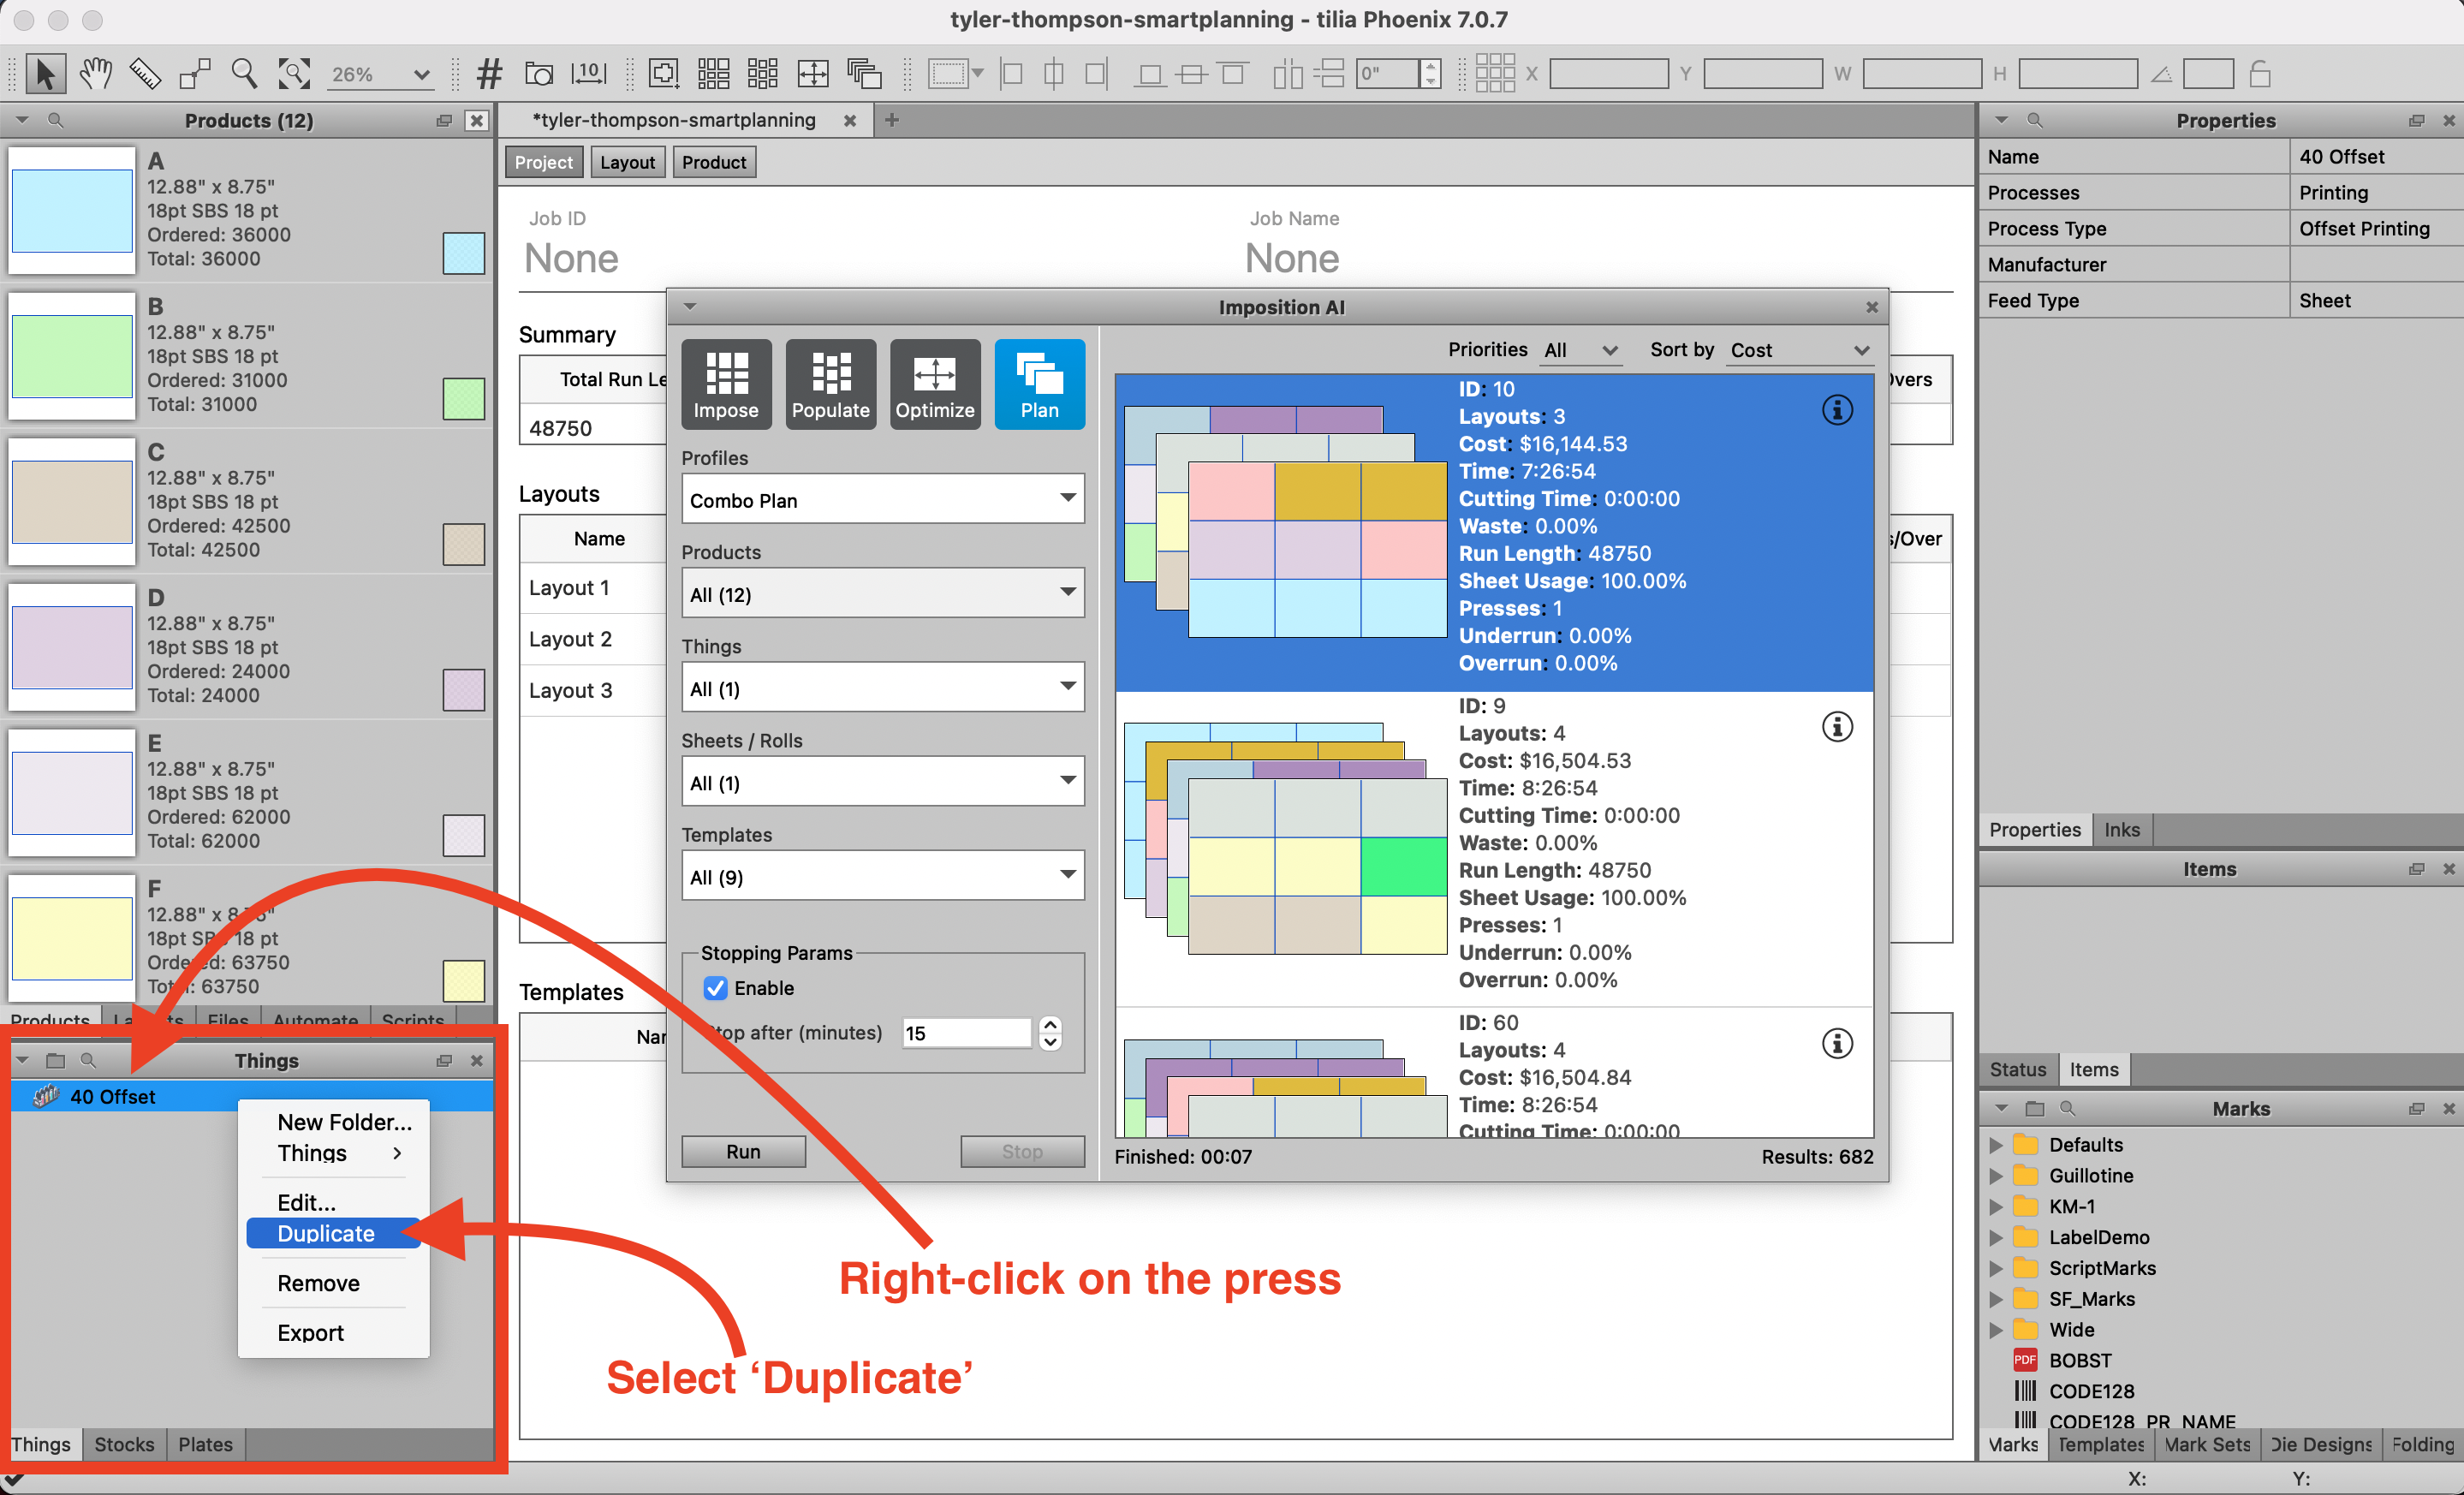
For the guide, we will be duplicating and modifying the existing Sheet-fed Offset Press ‘Thing’ (’40 Offset’). To duplicate the existing press, right-click on the press named ’40 Offset’ in the Things panel, and select ‘Duplicate’
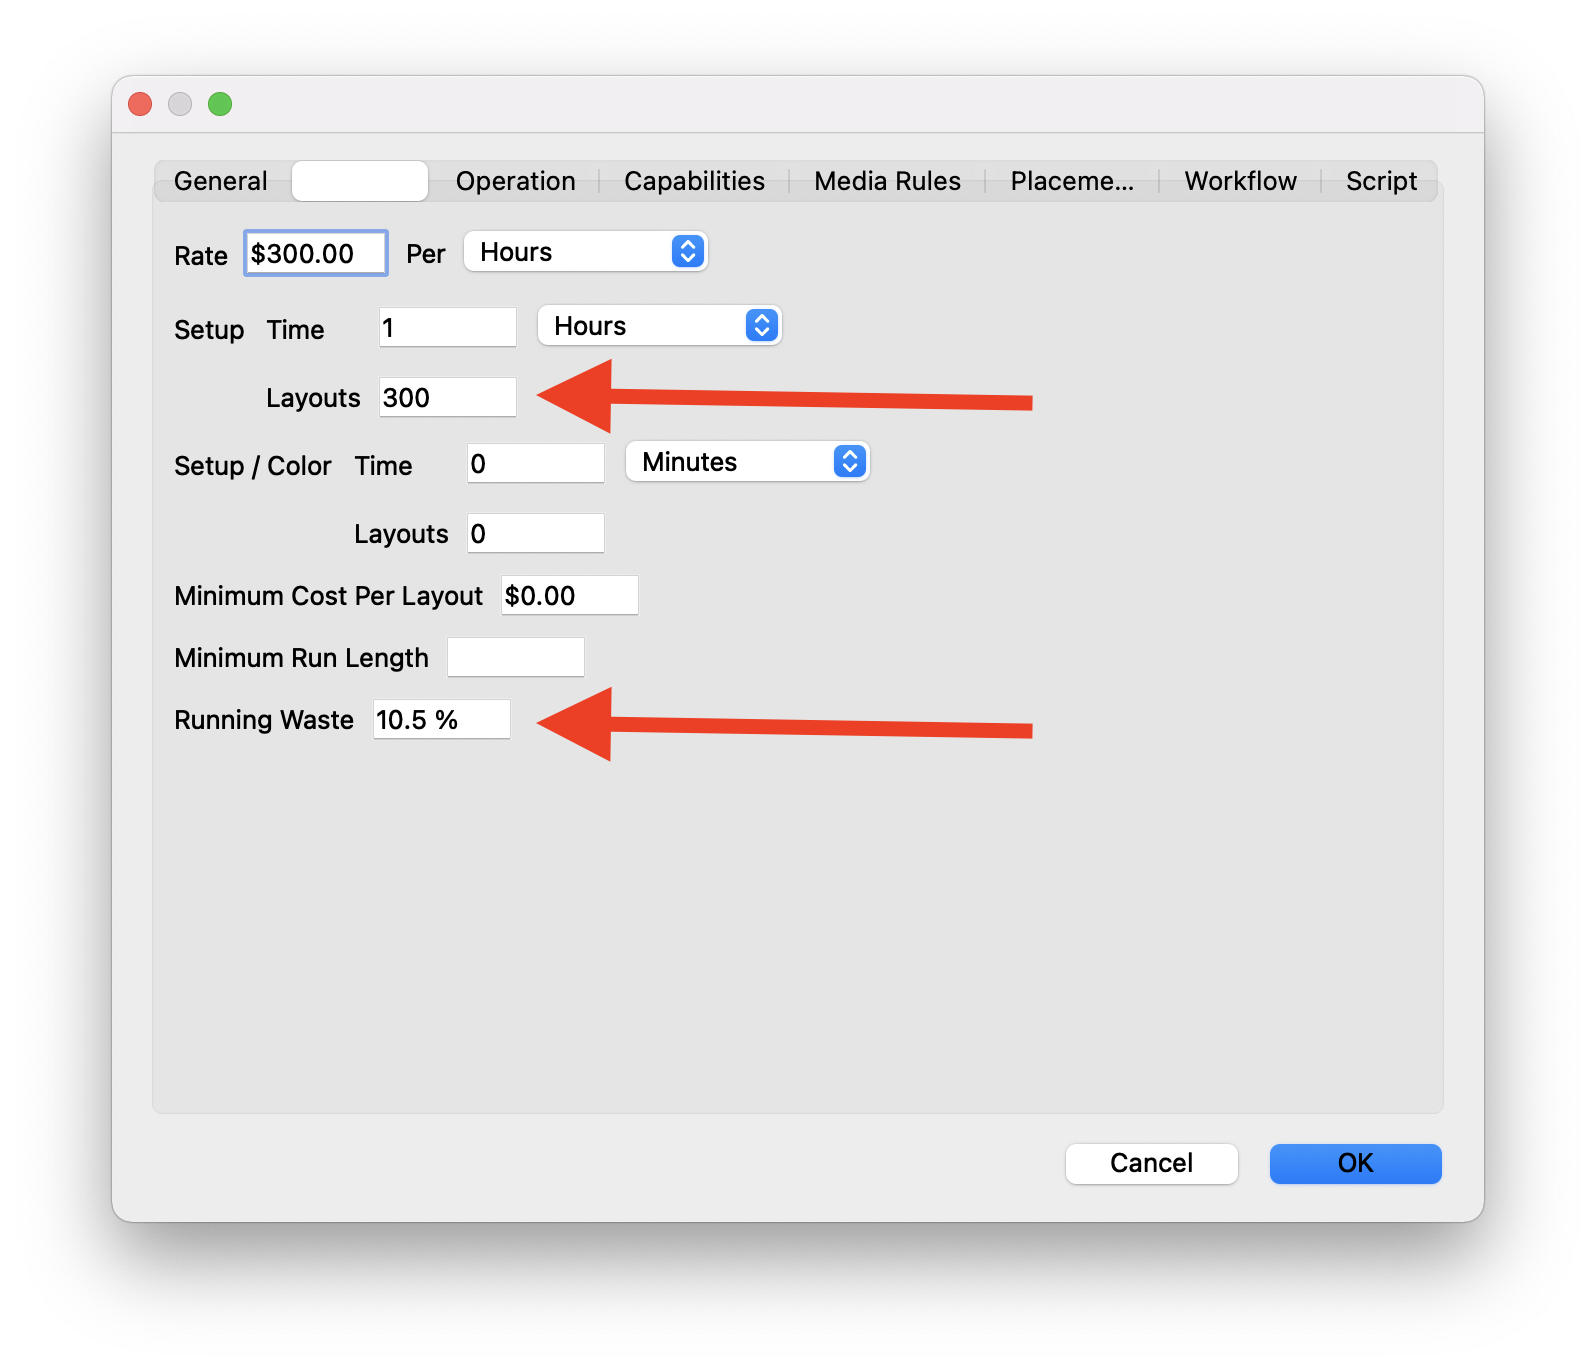
After duplicating, double-click on the new duplicated press to edit the press settings. Use the following values to update the fields to match our new press settings:
General:
- Rename the press to 56 Offset
- Change ‘Number of Units’ to 7

Costing:
- Change 'Setup Layouts’ to 300 (this is for make ready sheets)
- Change ‘Running Waste’ to 10.5% (scrap %)
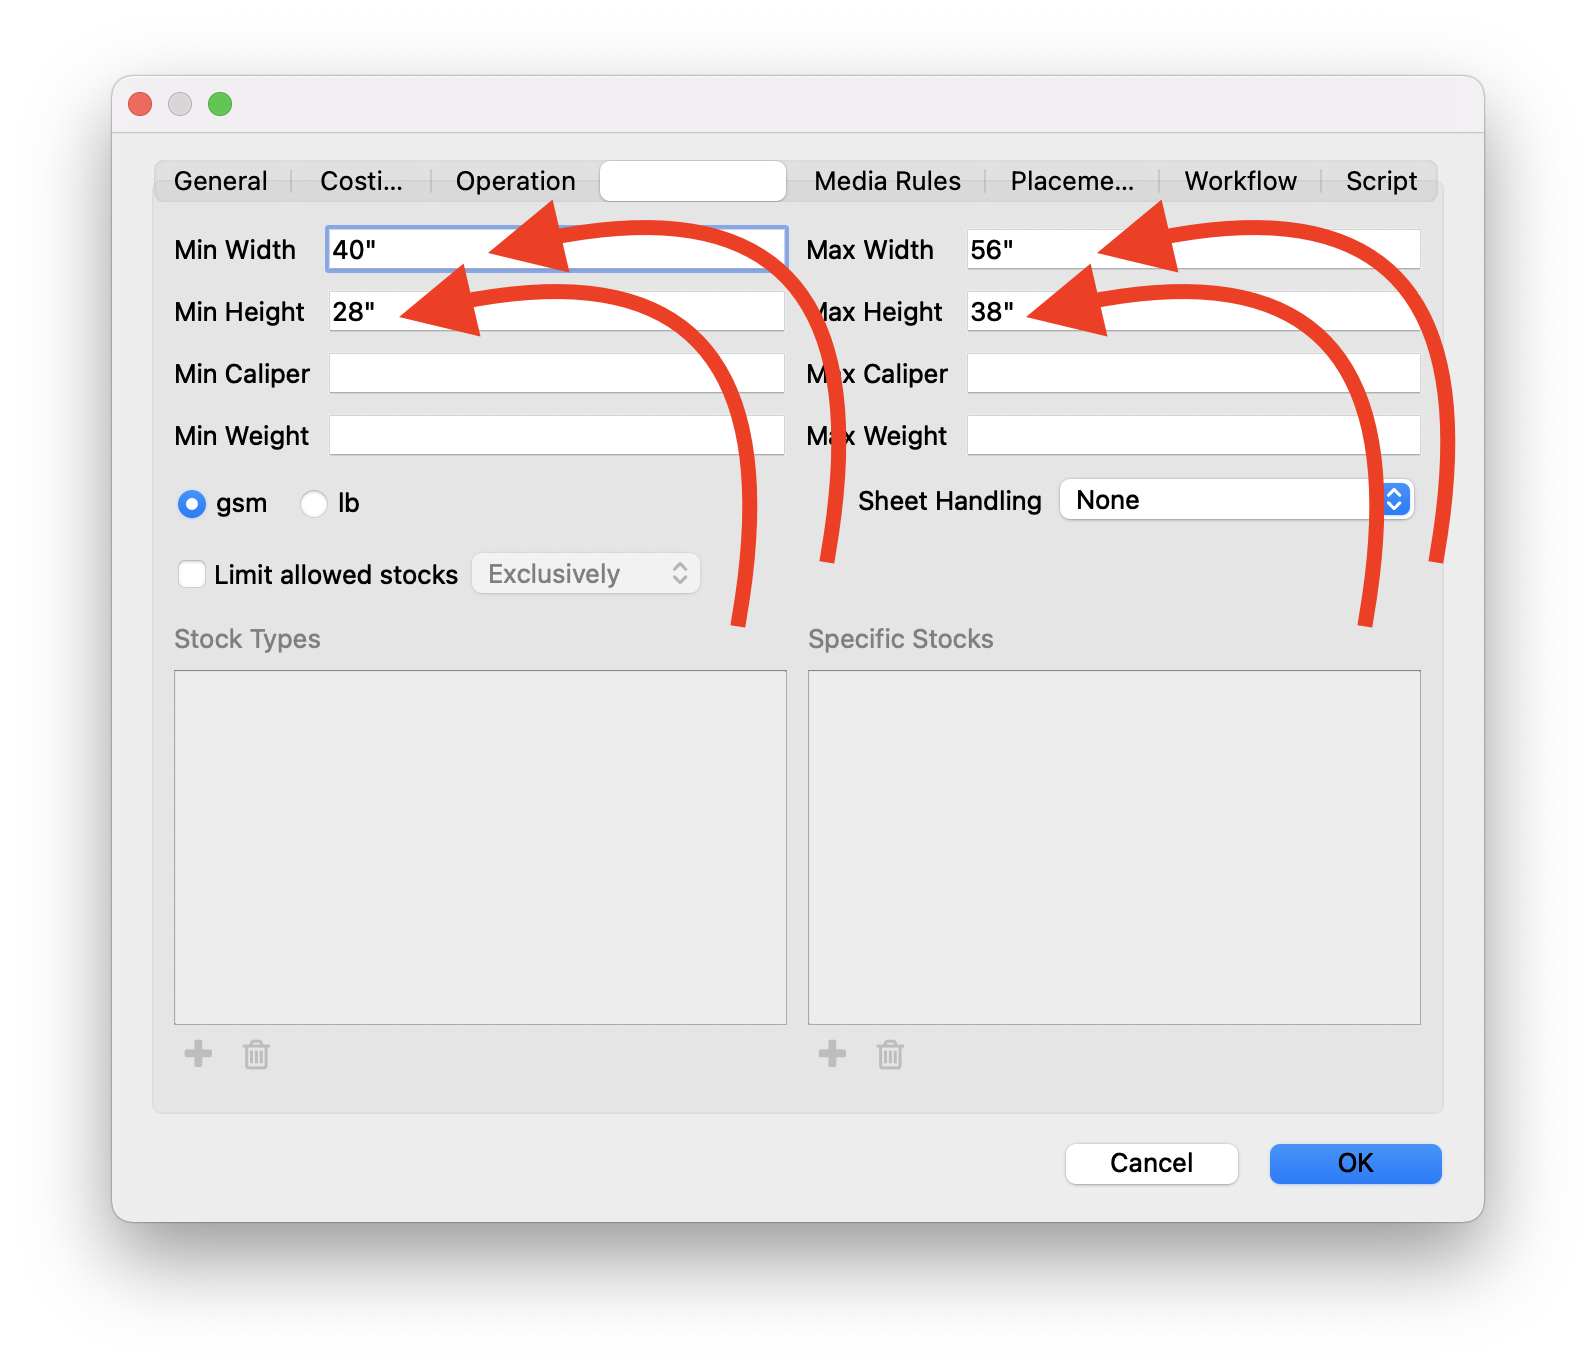
Capabilities:
- Change ‘Min Width’ to 40”
- Change ‘Min Height’ to 28”
- Change ‘Max Width’ to 56”
- Change ‘Max Height’ to 38”
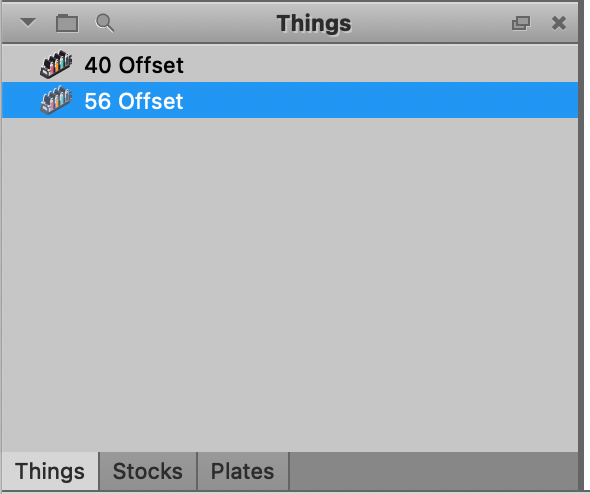
Click ‘OK‘ to save the new press settings. You will now see a new ‘Thing’ named ’56 Offset’ in the ‘Things’ panel.
Now, let’s use Phoenix to calculate the best way to run these orders considering combo forms on our new 7-color 56 Offset press.
Go back to the Imposition AI window (if you closed it, navigate to the Window menu at the top of the application and choose Imposition AI). Again, click "Plan" to make sure the Plan tool is active at the top of the Imposition AI window, and set the Profile to ‘Combo Plan’. Make sure to use the ’56 Offset’ press! Your settings should be set as follows (see screenshot):
- Profiles: Combo Plan
- Products: Select All
- Things: 56 Offset
- Sheets/Rolls: Select All

Now click Run. Phoenix uses the parameters above to begin searching for the best possible plan using the stock and press specified. Allow Phoenix to generate the results — this one is more complicated so may take slightly longer to find the best results; the top result in the list will be the most cost-effective.
After clicking Run, Phoenix will display results on the right side of the window. Double-click to apply the top result after the algorithm finishes searching.
Look at the ‘Properties’ panel on the right hand side (just like the above exercises). Scroll down to the ‘Facility’ and take a screenshot of your screen.
Note the 'Total Cost‘ (above facility tab), 'Stock Cost' (above facility tab), 'Total Layouts’ (below facility tab) and 'Time' (below facility tab) properties.
Now that we've seen the ways to make layouts and how Imposition AI works, the only thing left to do is export our production files.
Go to the File menu, click on "Export for Printing" and choose "Imposed PDF..." In the resulting export dialog, choose the Factory Default PDF Export and click OK. Now choose where to save your PDF.
You can similiarly export a file for cutting if you need to create a die or send a cutting PDF, CF2, DXF, or ZCC file downstream.
Lastly, export a PDF report of the project. Go to the File menu, click on Export Report and choose PDF... You can modify the settings if you'd like, and then click OK to create a report. Save the report, and then open it.
Here you can see the details of the project. On the first page you can see total run length, cost, waste, sheet usage, and more, along with a breakdown of each layout. After the overview, there is a layout by layout breakdown with a preview of the layout, followed by an overview of each product in the project.
# Learn more in our complete user guide
We hope you learned something in this incredibly quick overview of making a project, but there is so much more to Phoenix! For example, you can:
- Automate Phoenix with hotfolders, Enfocus Switch, or our REST API
- Create and edit custom marks
- Work with multipage artwork
- Control bleed overlaps
- ...and so much more!
Get a jump start on Phoenix with our demo library and files!
| Demo Library | Download .phxlib (opens new window) |
| Demo Files | Download .zip (opens new window) |
Check out our Phoenix Webinars (opens new window) to see how we use these demo files.