#  Corrugated Quick Start
# Overview
If you're strapped for time and just want a quick, step-by-step introduction to some Phoenix basics, follow the steps below. For more info, check out the complete user guide, or try out the search bar to find a particular term.
For this Quick Start Guide, you'll need a few files to get started. Grab those here, and we'll tell you where to use them later on in the guide.
# Quickstart Files
Download these files to your desktop and unzip.
Quickstart for Corrugated Assets.zip
Contents:
- Folder containing example artwork
- Phoenix Quickstart Library
- Example Order CSV file
⚠️ Preserve the names and structure of the contents of this folder. Changing names or folder structure will disrupt the flow of this guide.
# Installation
To install Phoenix, double-click the .dmg (on a Mac) or .exe (on a PC) file, and follow the installation wizard prompts. Installation is a breeze!
# Licensing
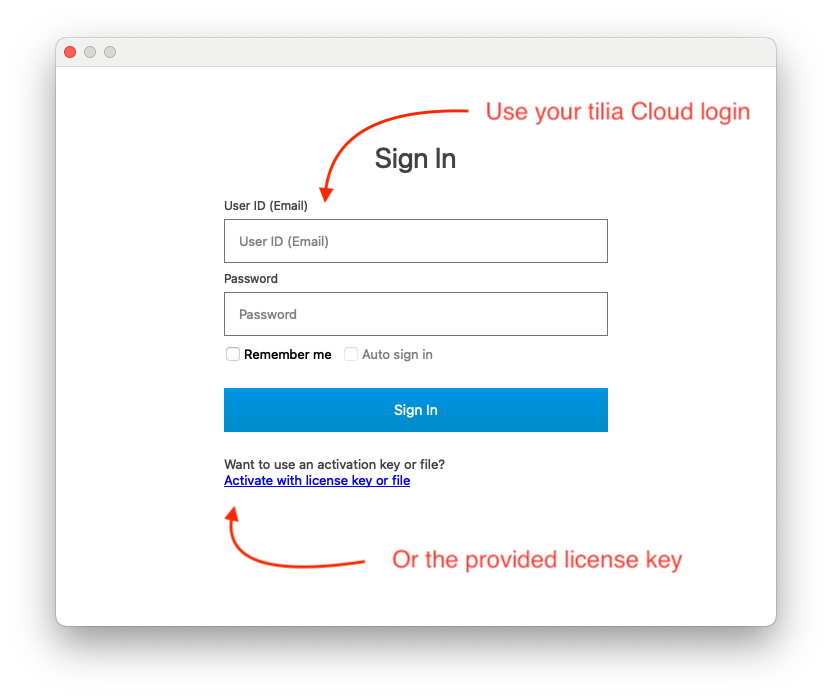
Use the provided license key or tilia Cloud credentials to license Phoenix. If you were provided a 25 digit license key in the format XXXXX-XXXXX-XXXXX-XXXXX-XXXXX be sure to click the blue link on this window. you can copy and paste the license key into the license key field.
# Basic Concepts
There are some basic concepts you need to understand about Phoenix. The ones below are very brief, so for more detailed info, check out Key Concepts.
# Products
A Product is a piece of artwork or CAD file that needs estimated, planned, imposed, or printed. Products come in different types, like a flat, folded, tiled, or bound. Folding cartons are considered flat products so we will focus on those for this guide.
Products have specific properties, like quantity, height, width, and what stock it needs to be printed on.
# Layouts
A layout is a representation of the actual production form. This is what will be exported to go to the RIP. Layouts are assigned a stock and can also be assigned a press. The layouts in Phoenix are interactive, meaning you can always edit what is on a layout to add, remove, edit, and rearrange products and marks.
# Projects
Projects are the native files that are used in Phoenix. A project consists of everything involved in that particular order/job/project, including the products, layouts, marks, and any assigned properties.
# Things, Plates, and Stocks
You model your production environment, including the presses, stocks, plates, and die cutting equipment, in Phoenix. This allows your production capabilities, including costs, to be factored in to determine the most cost effective layout and stock choices.
# Creating your first project
# Loading the Library
Phoenix stores configurations in Phoenix Libraries. Let’s load a pre-built library so that you can follow along with this guide.
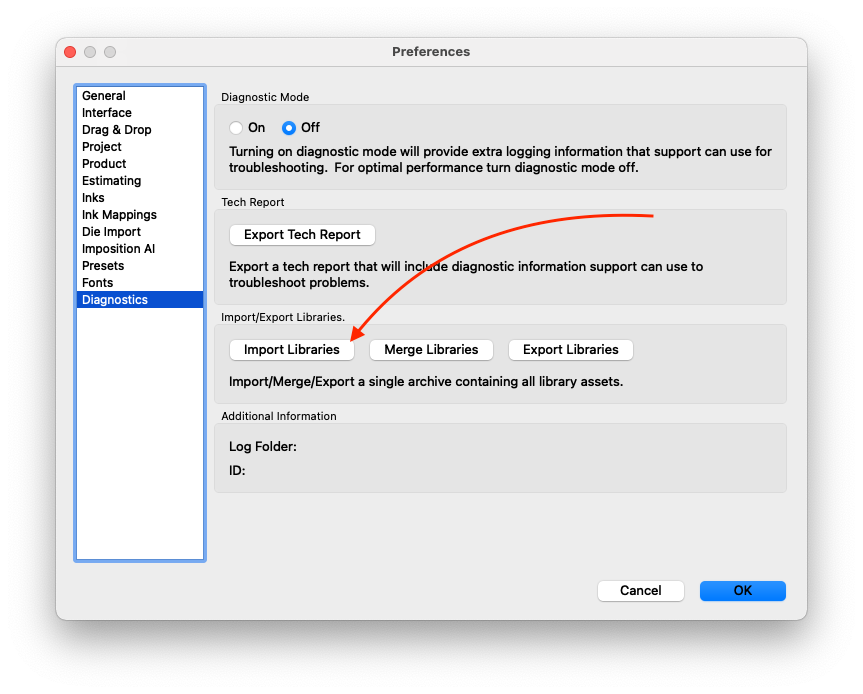
Open Phoenix, and navigate to Preferences. On a Mac, Preferences can be found in the Phoenix menu. On a PC, go to Edit and then select Preferences. From there, click on Diagnostics in the left hand panel, and then click Import Libraries.
Select okay, choose the .phxlib file from the .ZIP file you downloaded earlier, and click OK once it's loaded. Phoenix will close down. Open it back up, and now we're ready to create a project!
# Create a project
To create a new project, go to File > New project (or press Command or Control and "N"). This will create a new project, and prompt you for additional project information. It is best-practice to fill out the project properties.
Set the filename to "GettingStarted" and leave the rest of the fields blank. These fields can be used to add additional information to the project, but are not necessary. Now click "OK". You should now see a blank layout like the screenshot below.
![]()
# Add Products
Let’s start adding products to this project. We can do this by simply dragging and dropping the products you downloaded earlier into Phoenix.
After dragging and dropping, you will see the products displayed in the Products panel on the left side of the window. The products have been given some default properties, so let's modify them to make sure they're set properly.
Click on the first product to select it. Notice the Properties panel on the right side of the screen. It now is displaying the properties for the product you have selected - things like Quantity, Stock, and Grain Direction. Let's specify a Quantity of 400 and a Grain Direction as Horizontal.
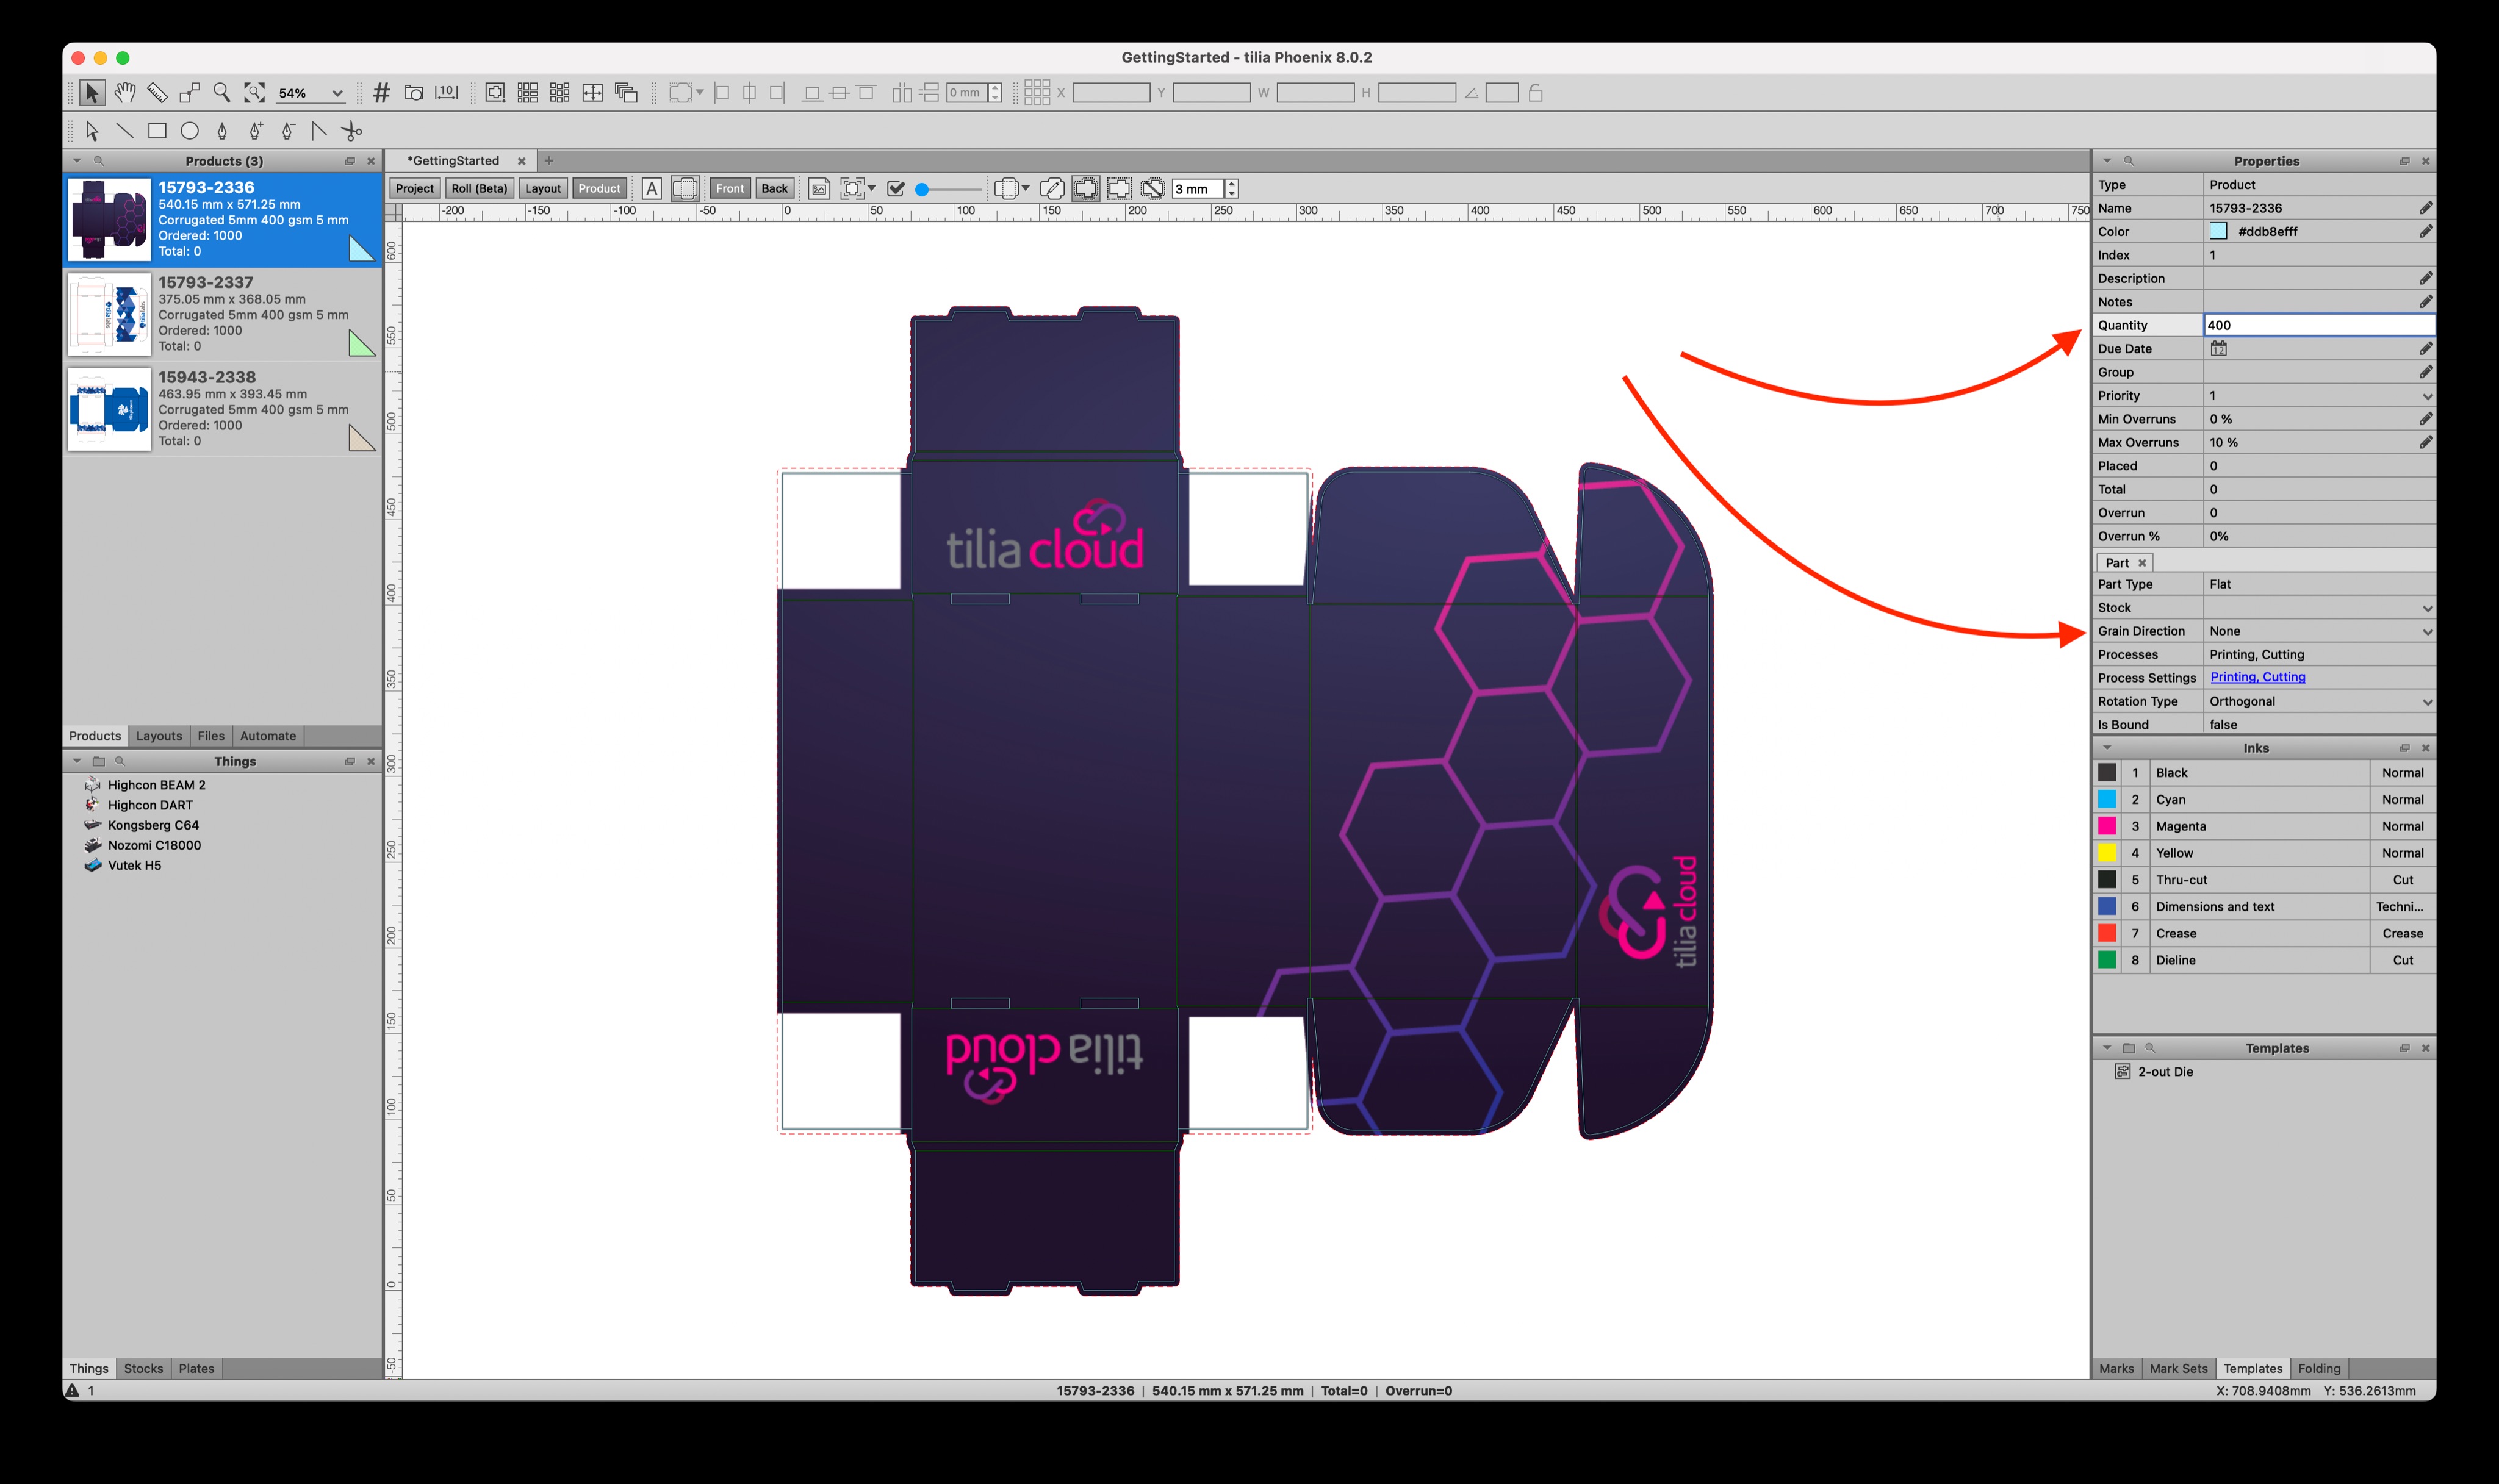
Product Properties with the “✎” pencil icon are editable. For a full list of product properties, visit General Properties (opens new window) in the full user guide.
☝️ Pro Tip
Certain product properties like Grain Direction can be set to default values by navigating to Preferences > Product and clicking on the Default Properties tab.
Change the quantity ordered and grain direction for the other products to match the first product. Note that you can also select multiple products at once to change parameters for multiple products at the same time. Now the products have been added to the project, and we're ready to create a layout.
# PDF Spot Color and Layer Mapping
Did you notice how Phoenix automatically created a shape for our products? This happened behind the scenes using a process called Tool Type Mapping (more on that here). Phoenix is looking for inks or layers in the PDF to define things like cut and crease lines.
You can see how Phoenix mapped the layers in our files by visiting Libraries > Tool Types... in the menu bar.
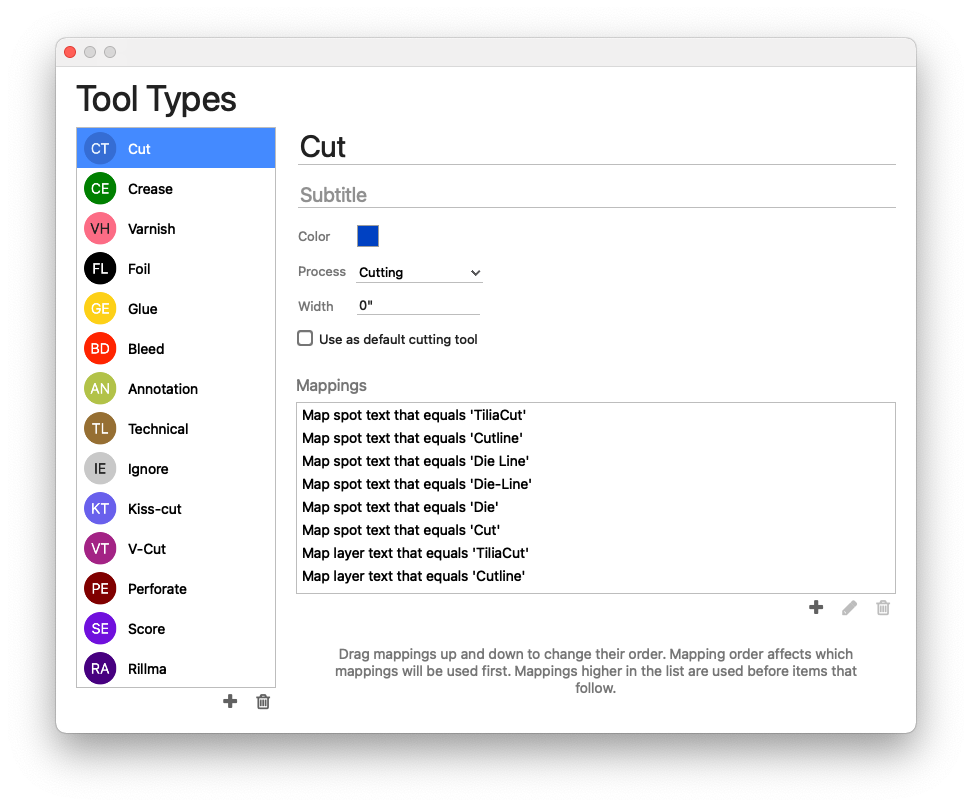
Phoenix found inks called “Cut” and “Crease” in our example PDFs and automatically mapped those for us. Use the Tool Types Library in your own workflow when you need to add, delete, or edit these mappings.
# Creating our first layout
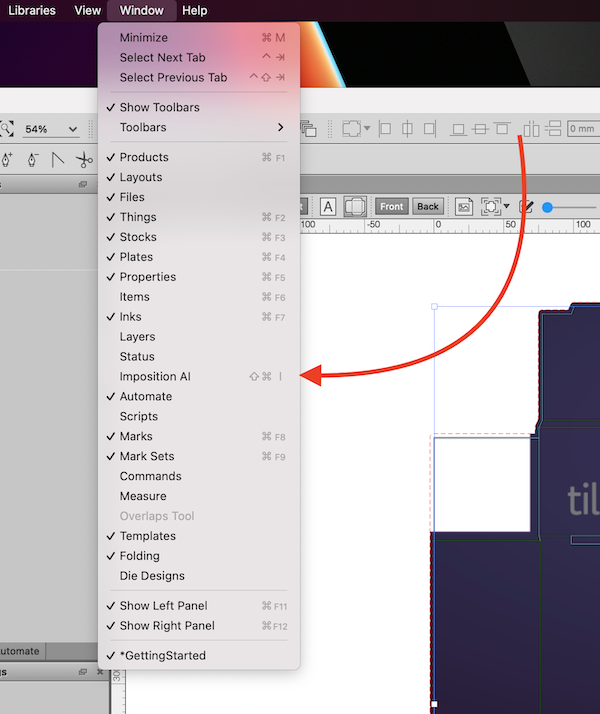
Let’s start building layouts! The tool inside Phoenix for automatically generating layouts is called Imposition AI. You can open Imposition AI by navigating to Window > Imposition AI or by using the shortcut Command/Crtl + Shift + I.
Your screen should now look like this:
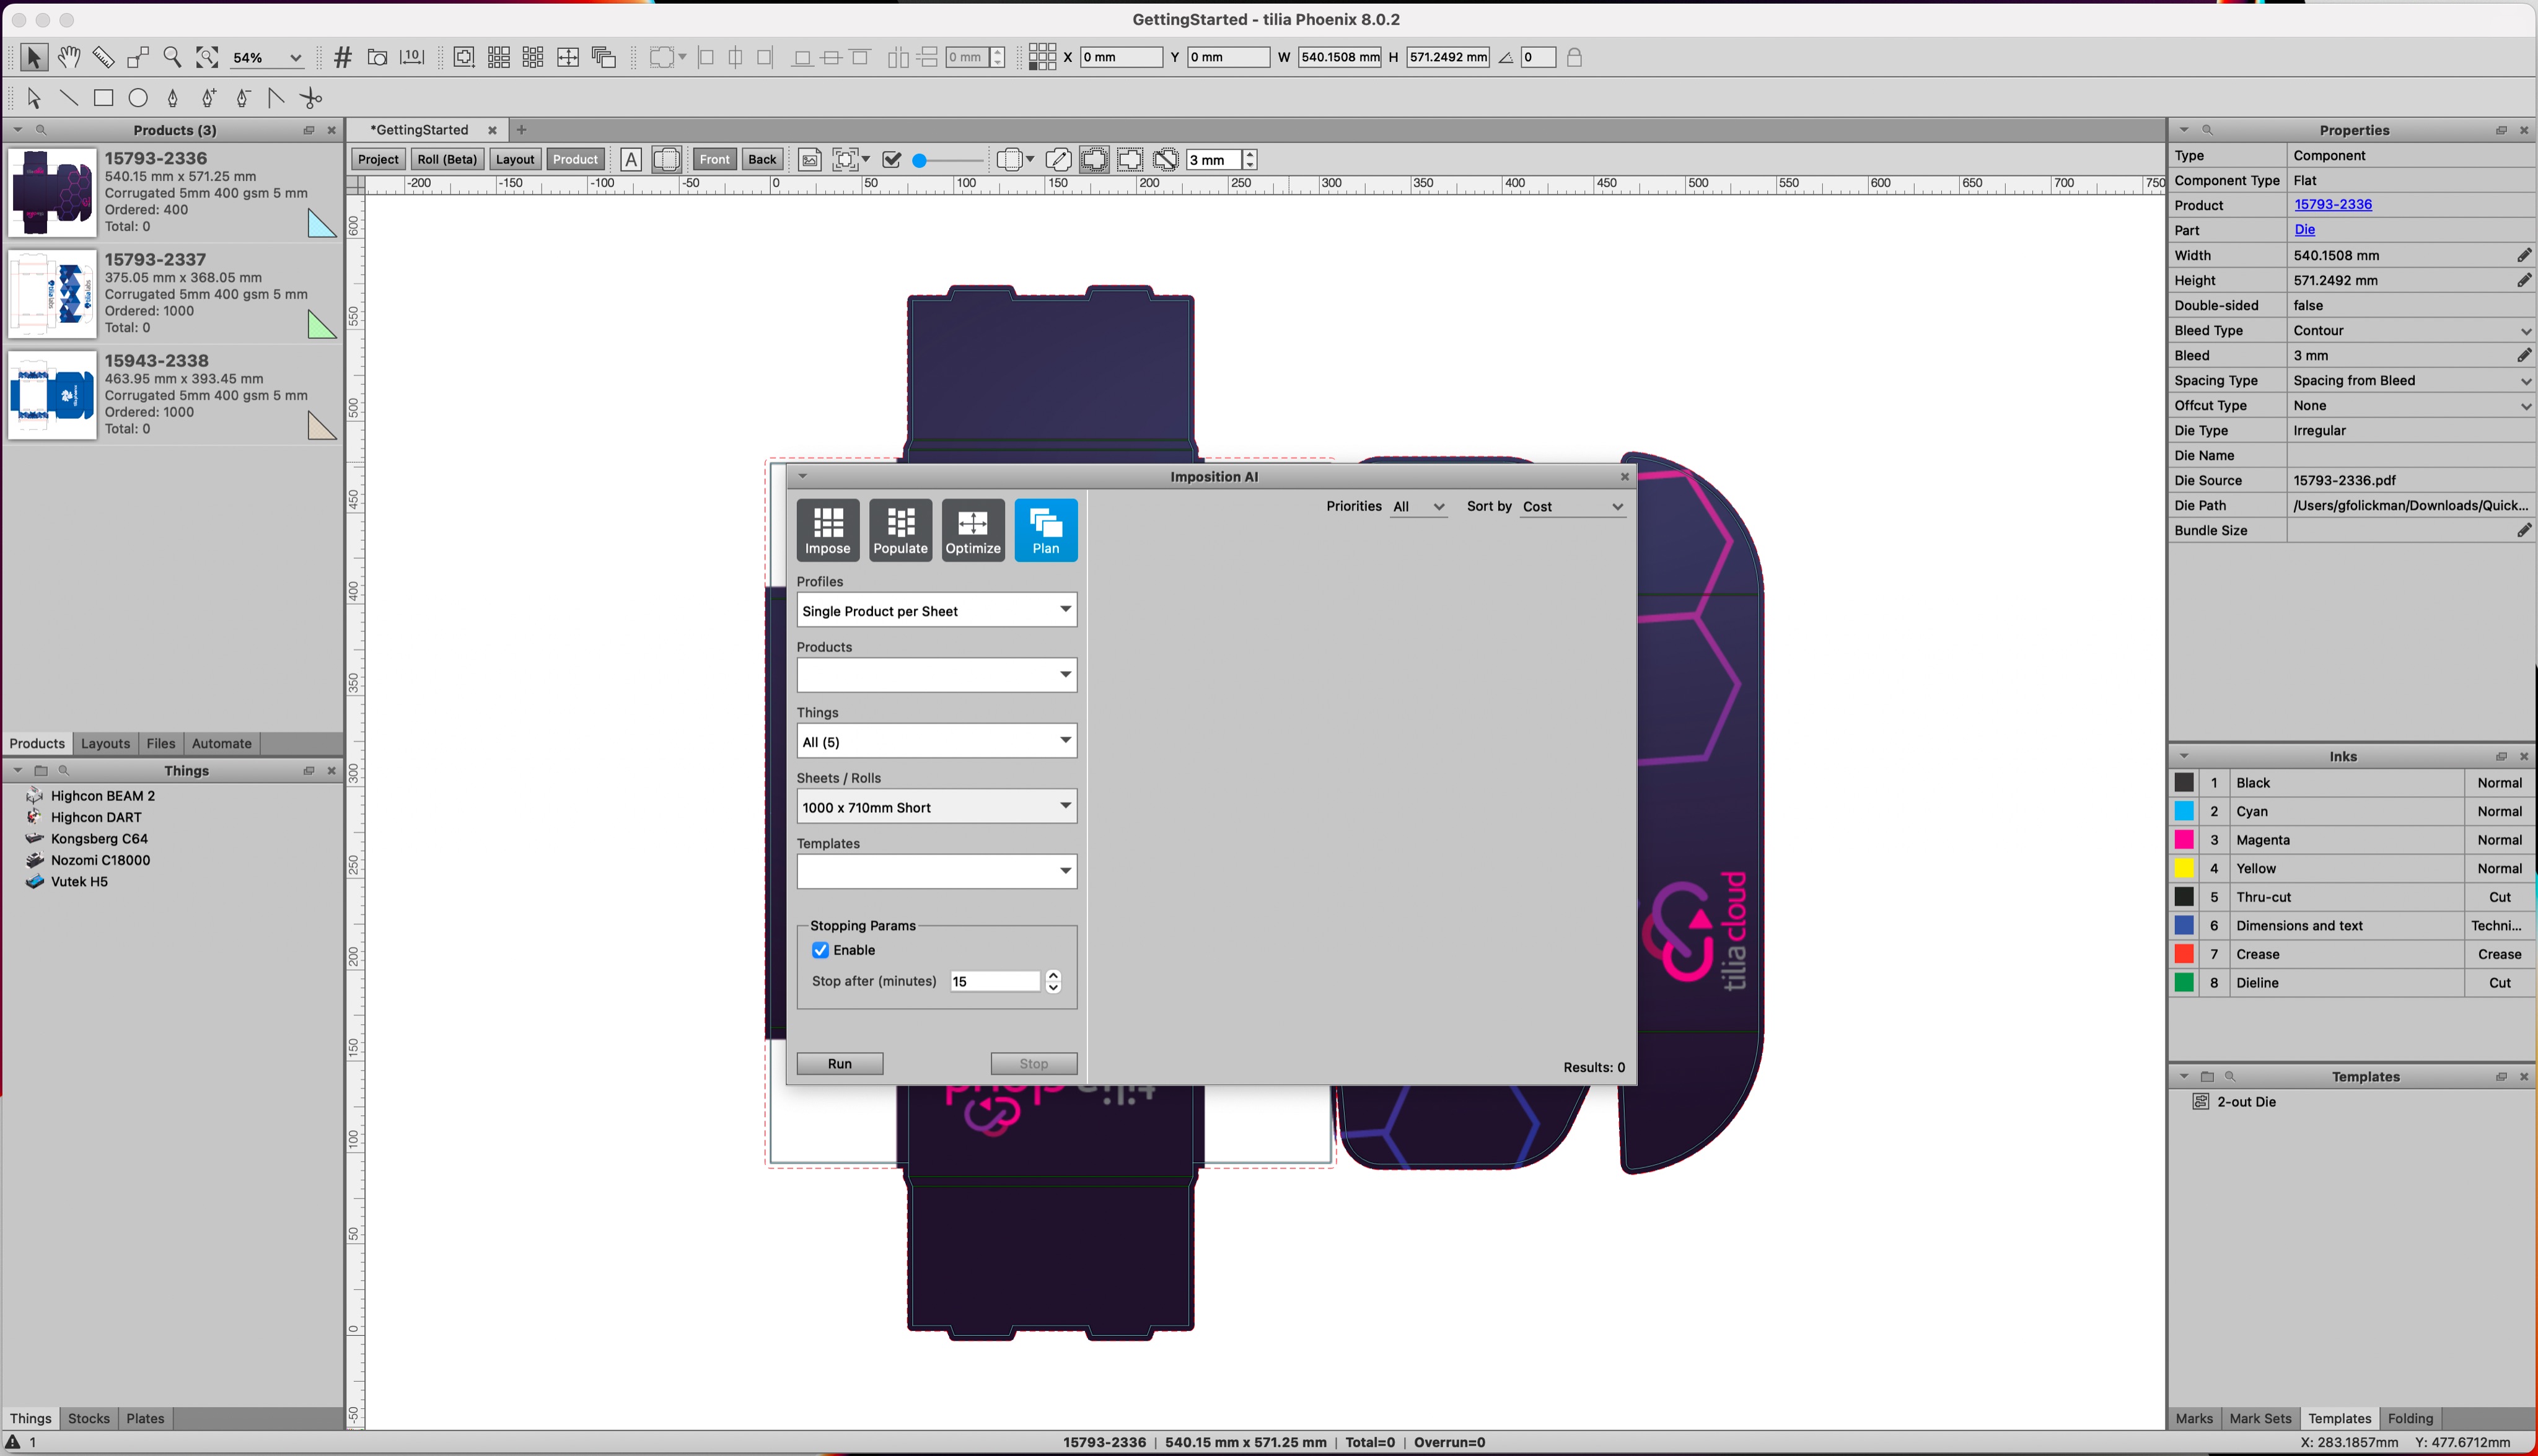
Before proceeding, there are four boxes at the top of the Imposition AI window labelled: Impose, Populate, Optimize, and Plan. Make sure Plan is selected by clicking it. The box will highlight in blue.

Next, select an Imposition AI profile from the Profiles dropdox. Profiles are customizable recipes that instruct Phoenix how to generate layouts and what rules to follow. More on these in a bit.
For this first example, select the profile called “Single Product per Sheet.”
Next, select the Products dropdown and click “Select All.” This will tell Phoenix to make layouts from all products in the project. You could also select individual products for certain cases but for now let’s select them all.
Up next is the Things dropdown. We will cover Things in more detail with you in training but for now, just select the Thing called “Vutek H5.”
From the Sheets dropdown, click the “Select All” checkbox. One exciting feature of Phoenix is its ability to select the most optimal sheet size for a set of orders. You can also select a specific size from this list.
Finally, you can ignore the Templates dropdown for now. We can populate this list later with existing steel rule dies that match the size and shape of our products.
To recap, your Imposition AI menu should look like this:

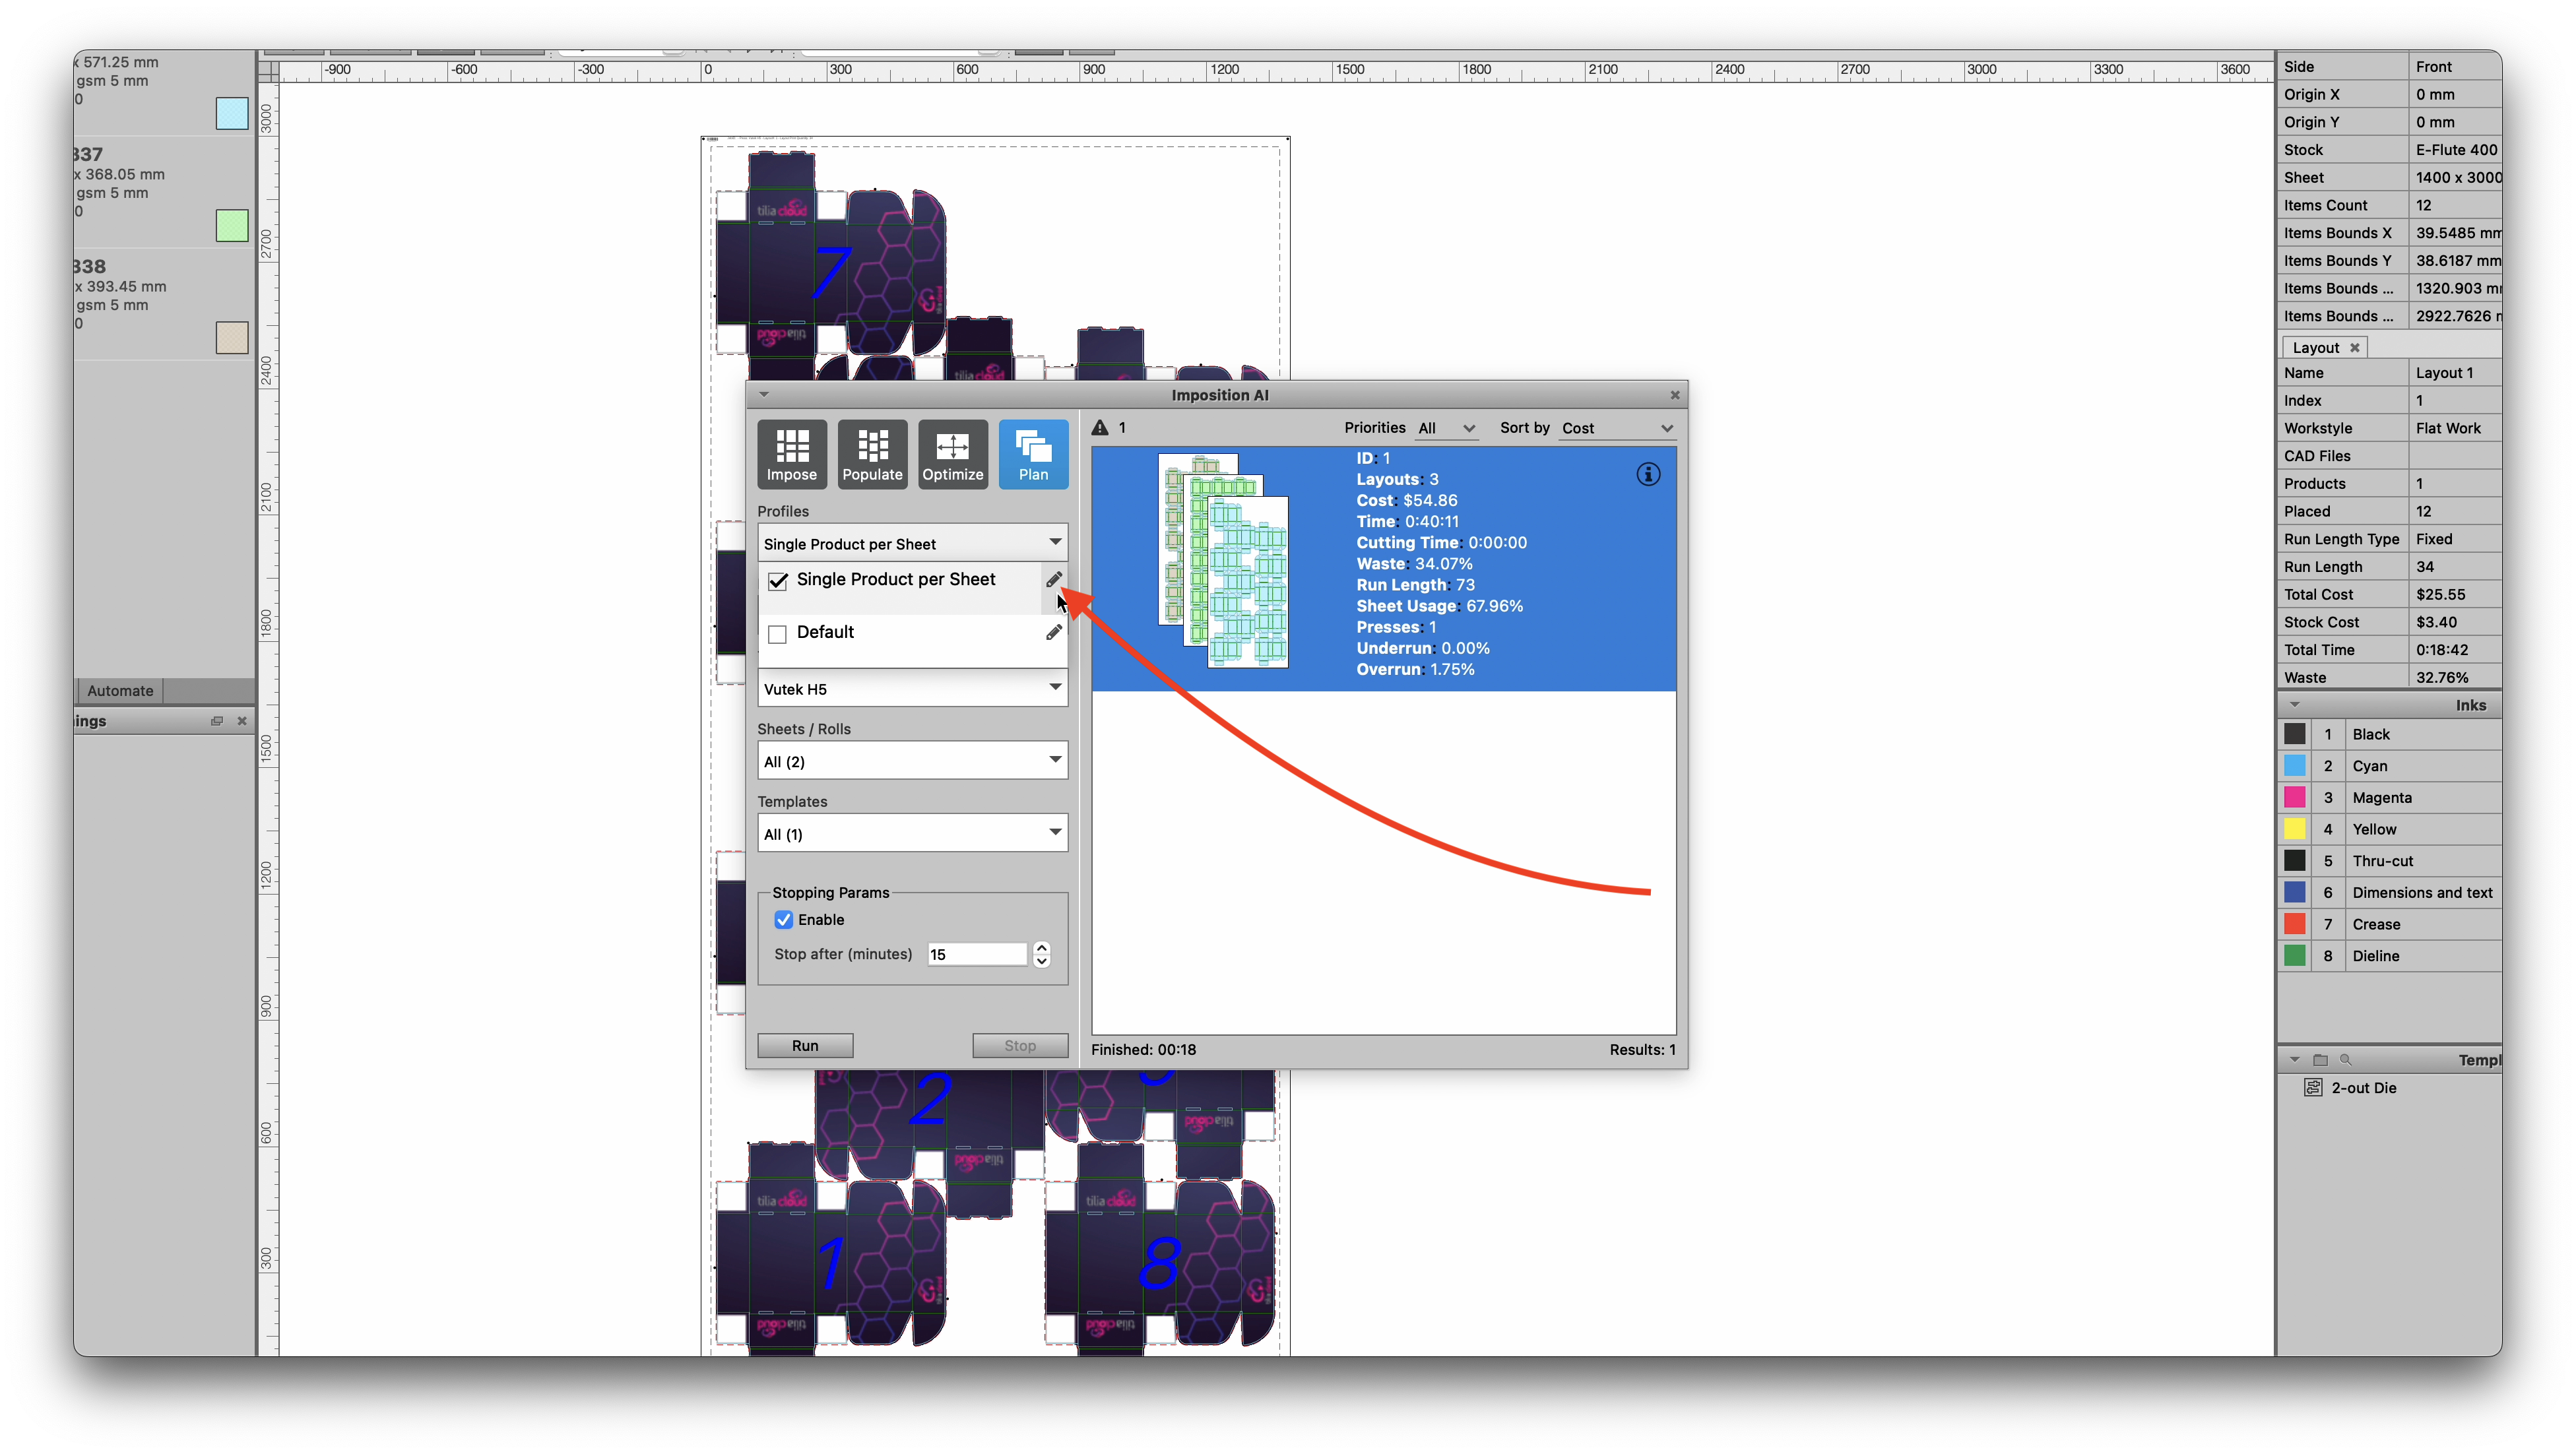
Click the Run button and after a few moments, Imposition AI should return one result. View this result in more detail by clicking the (i) button. Double click the the result in the Imposition AI window to apply this result.

After double clicking to apply the results, you can close your Imposition AI window or move it out of the way. You will be looking at the job summary screen. Click the Layout tab at the top of the Project workspace to view the individual layouts.
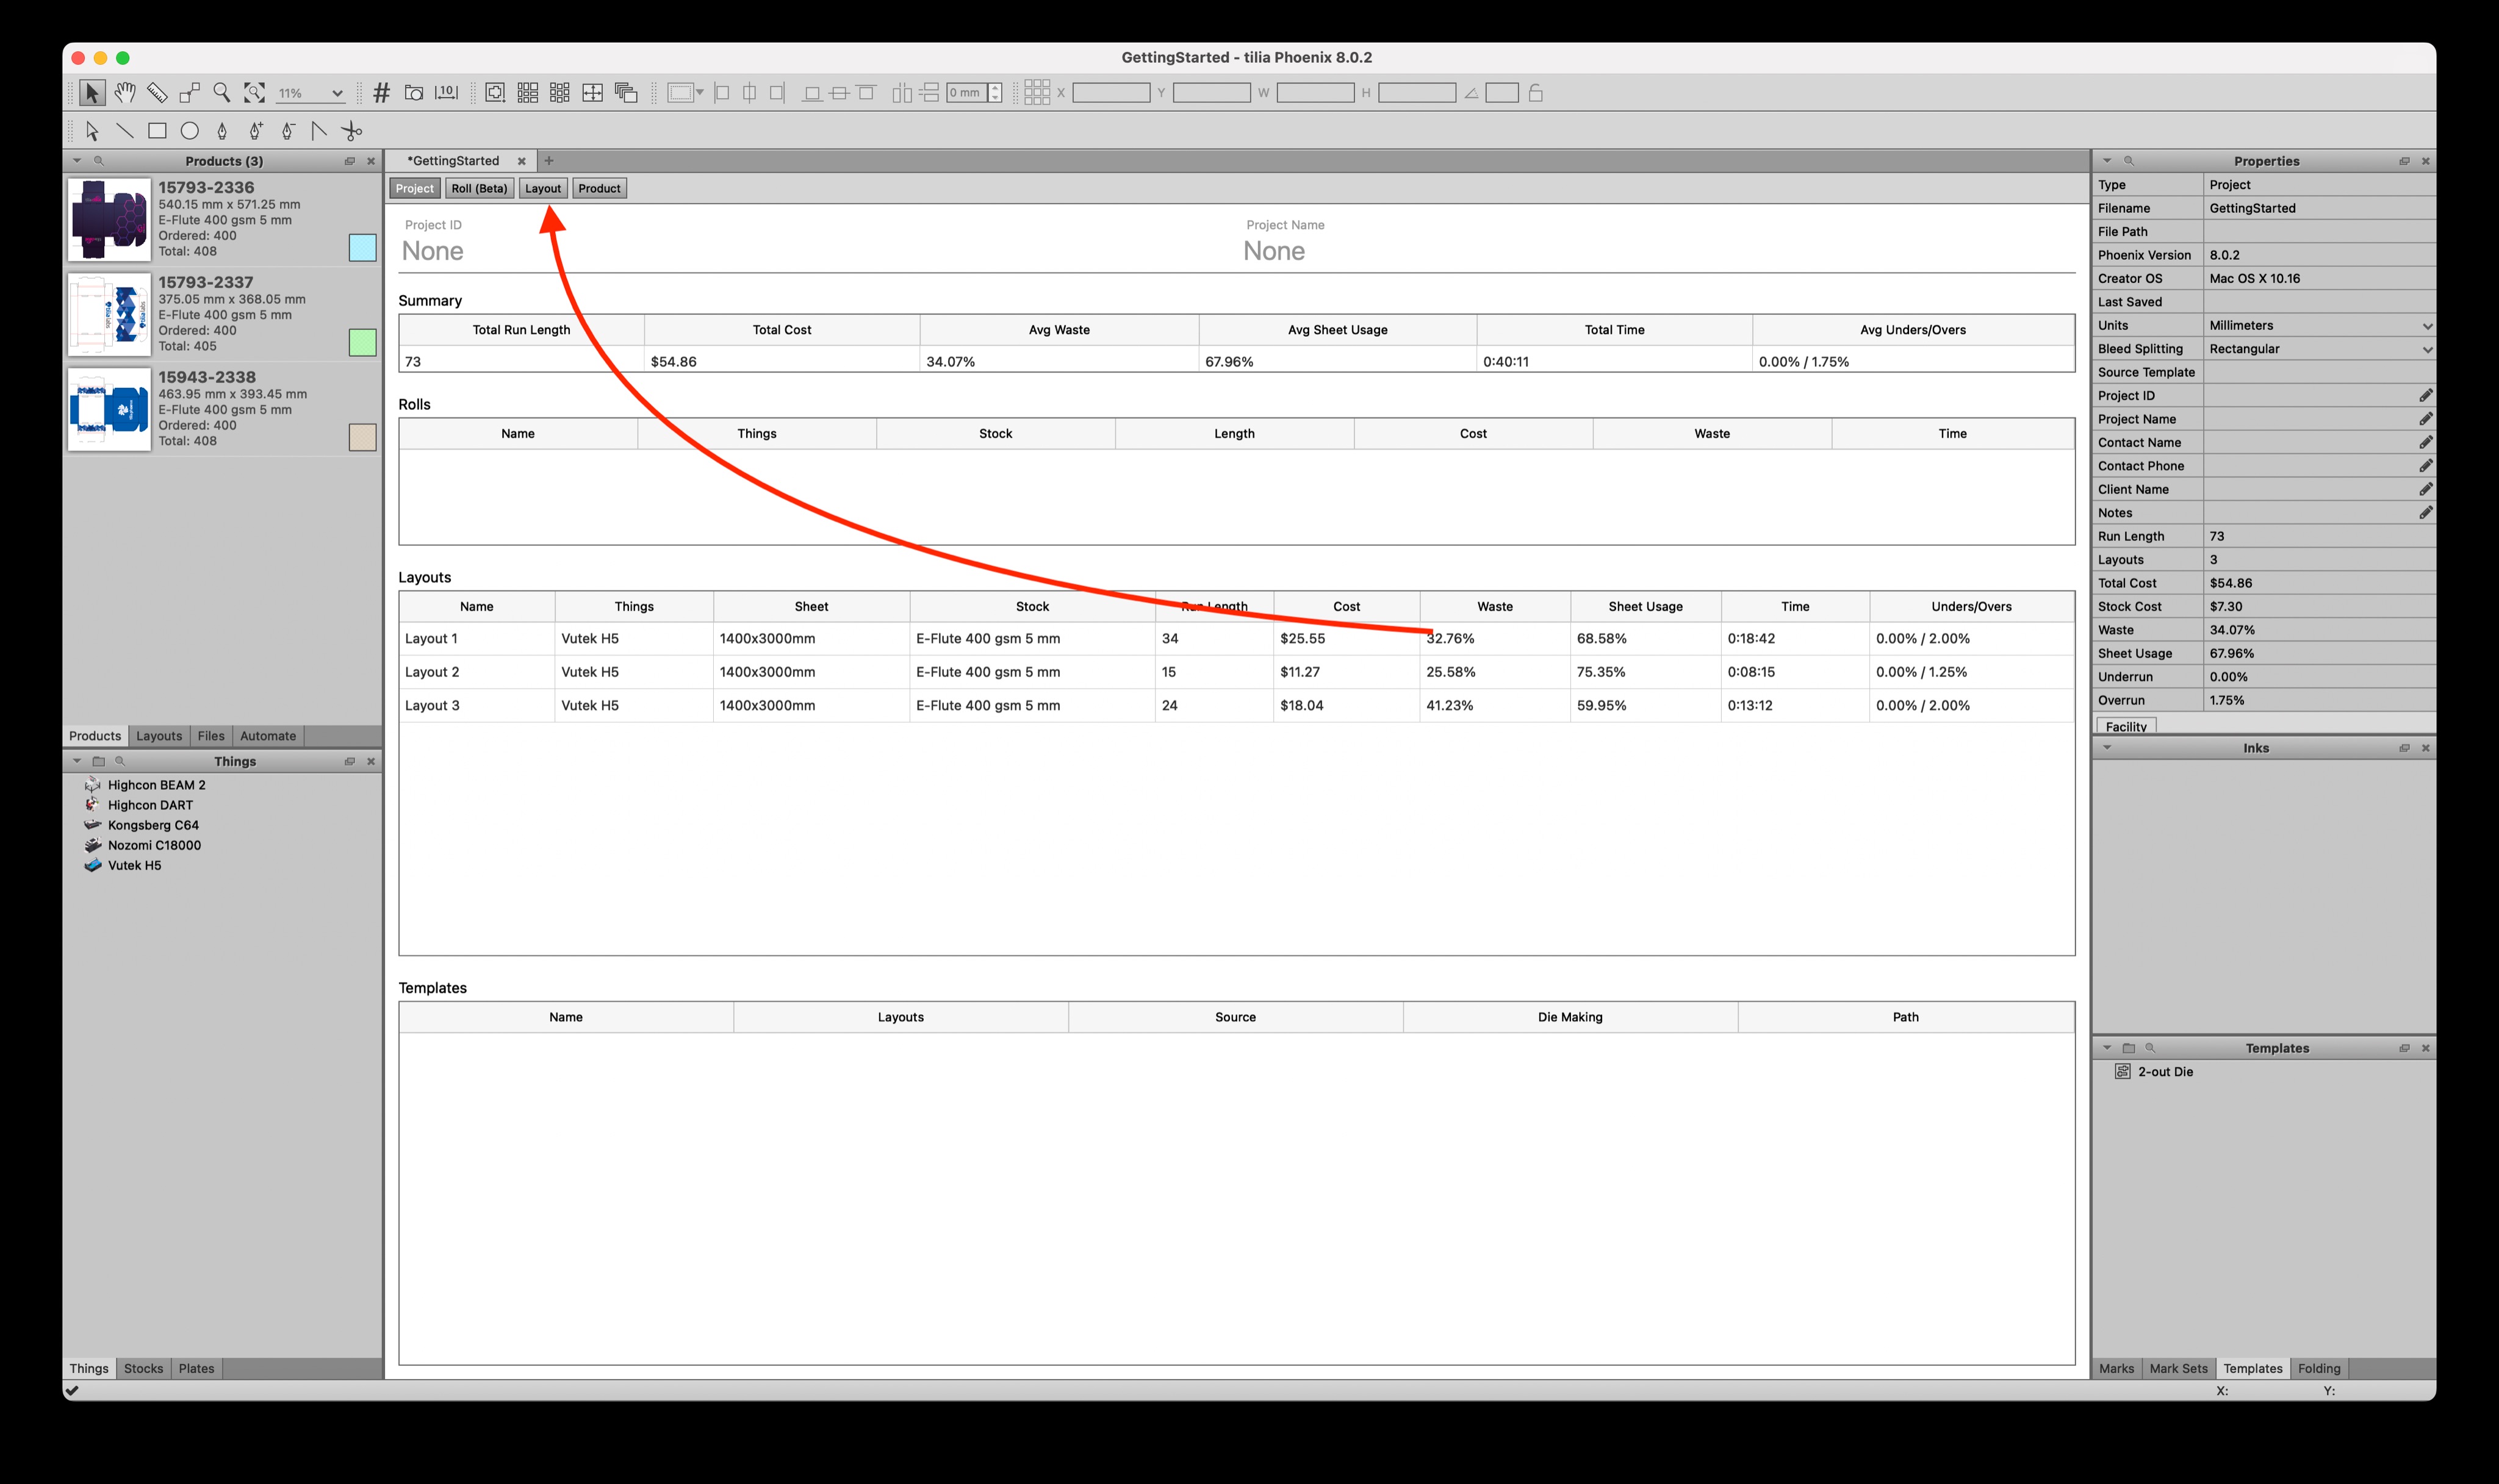
Scroll through your layouts using the left and right arrow buttons or pick a specific layout by using the dropdown list.

Finally, export the print files as a high res PDF, cutting file as a PDF / ZCC / DXF / CFF2, and a PDF report file. You can find all these exports in the File Menu.

Congratulations! You have created and exported your first layouts! If you are struggling at all, don’t hesitate to reach out for help. Otherwise, let’s take things one step further.
# Creating Ganged Layouts in Phoenix
The power behind Phoenix is its ability to look at different products and optimize material by ganging things together. This reduces waste and press time.
We will continue to use our current GettingStarted project. Open the Imposition AI window again (Window > Imposition AI) and let’s take a closer look at Profiles.
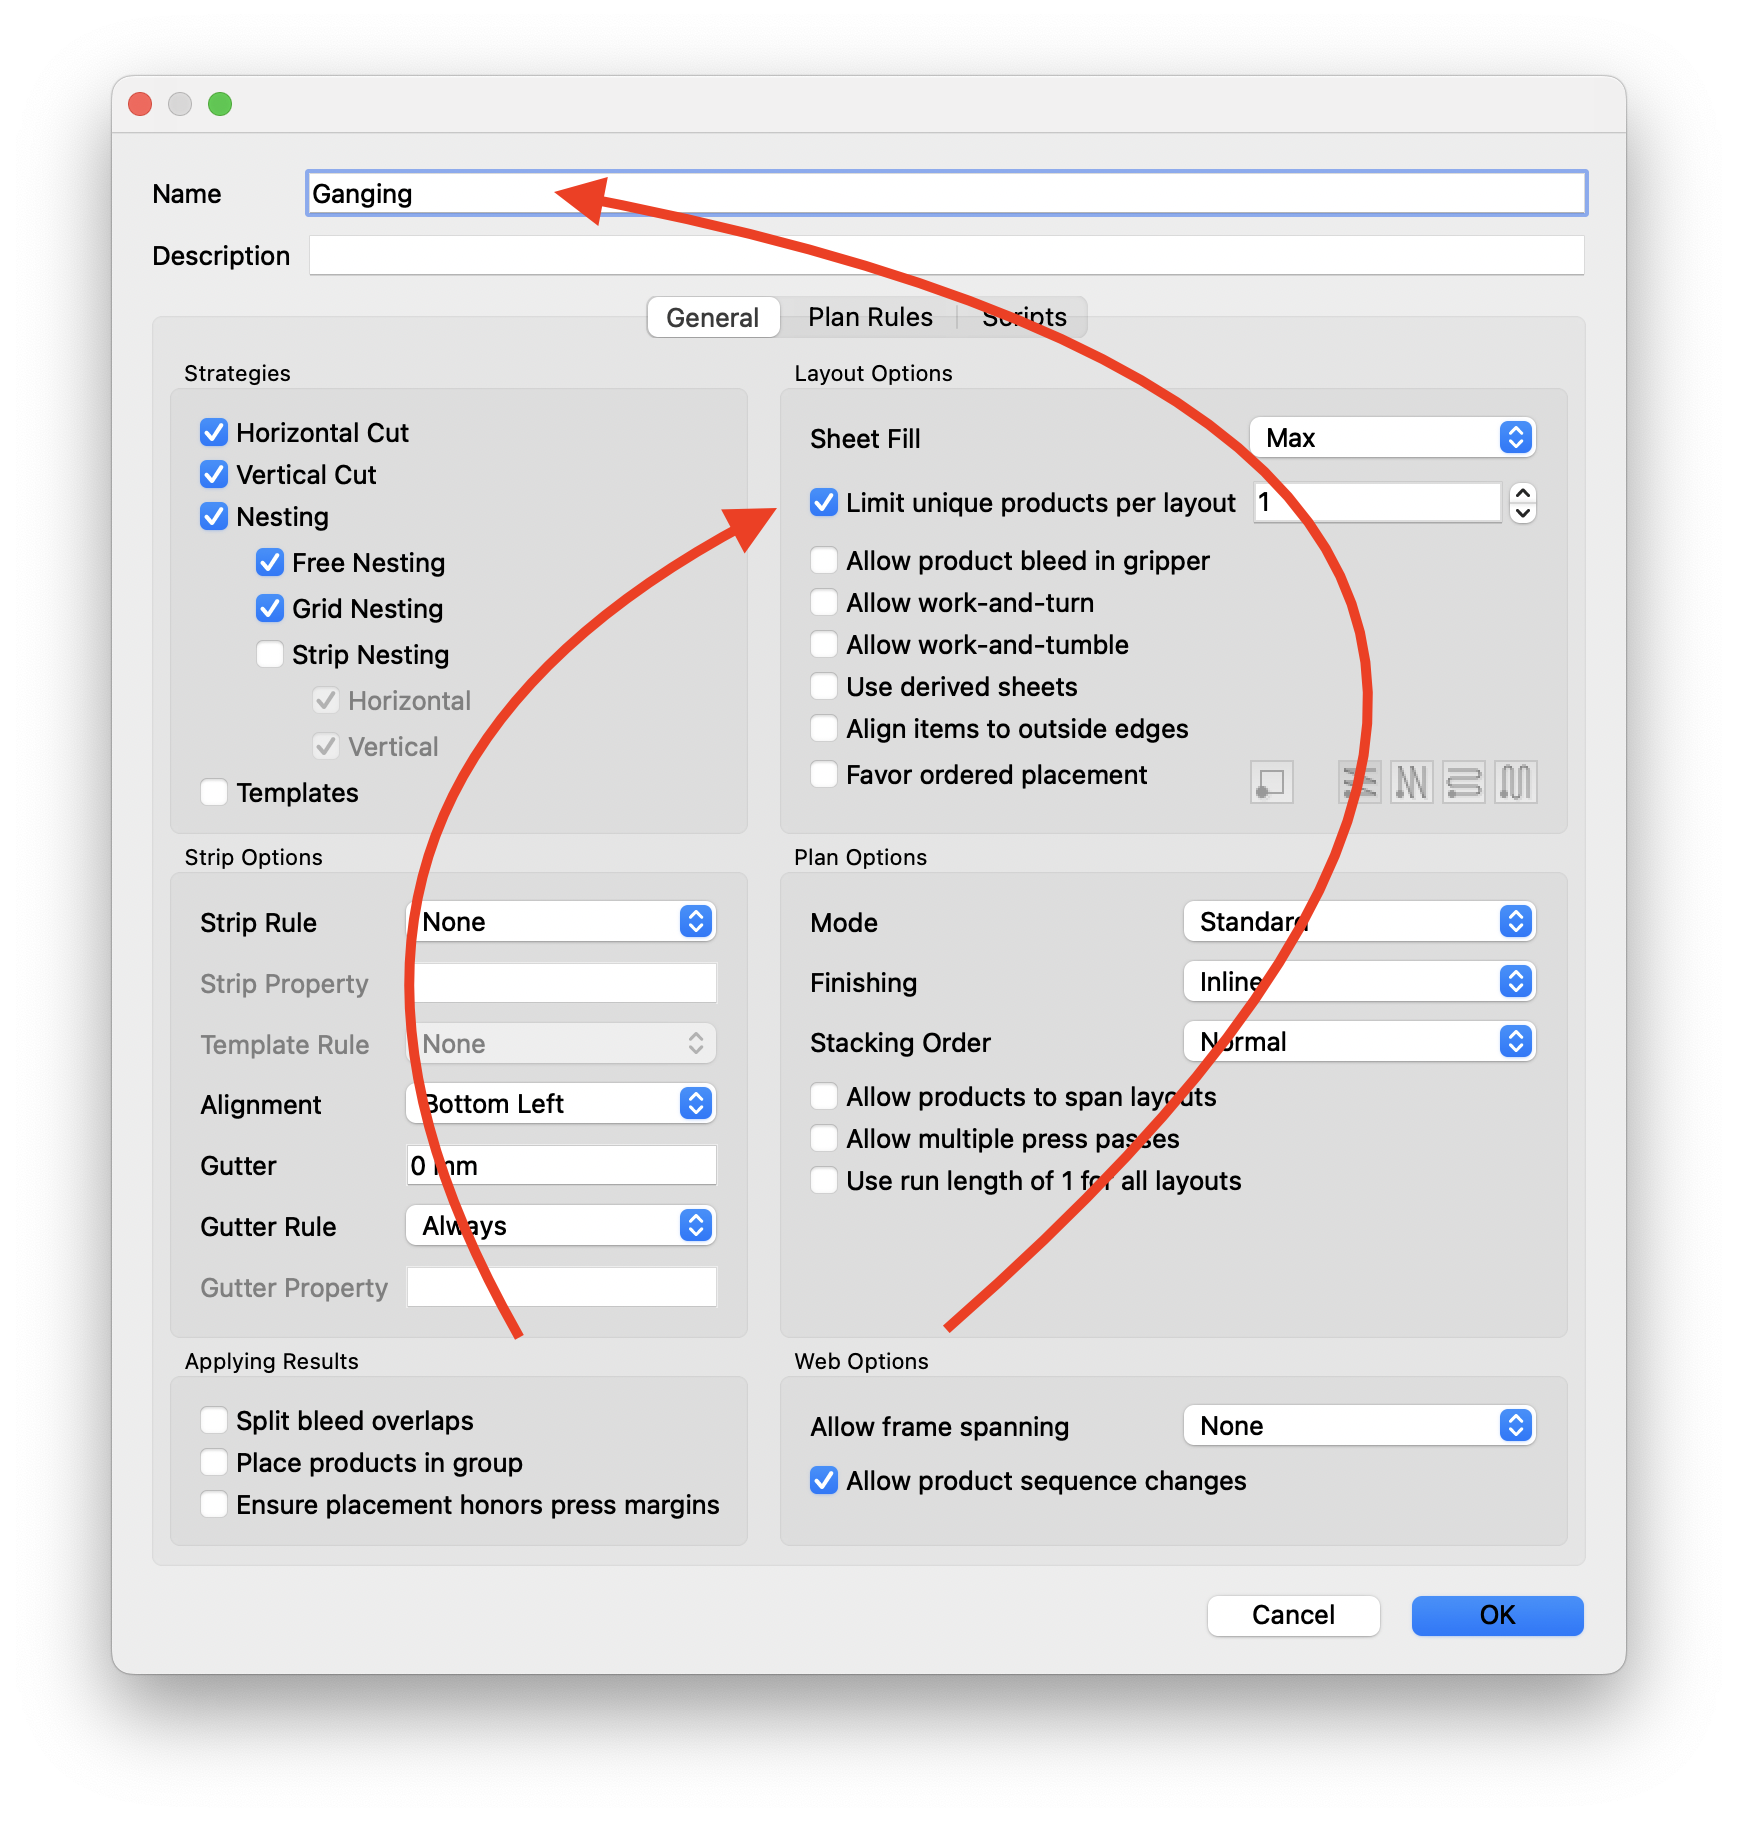
You can open an Imposition AI profile by clicking on the Profile dropdown list then clicking the “✎” pencil icon. Open the Imposition AI profile we first used called “Single Product per Sheet.”
There are a lot of options and rules inside of Imposition AI profiles. It’s not necessary to know them all right now but more reading and videos on Imposition AI profiles can be found here (opens new window).
For now, let’s remove the rule that we have set limiting the number of products that appear on layout. Uncheck the box next to the option “Limit unique products per layout.”
Let’s save this new profile with a different name.
We have now told Imposition AI that we can mix our products to get better, more optimized results. Let’s run Imposition AI with this new Profile selected.

After a few moments, Phoenix starts generating a number of results sorted by cost (material + press time). Clicking on the “(i)” button at the top right corner of each layout proposal will give you a more detailed view of the job and each layout.
As before, you can double click the layout proposal that you want to apply and follow the previous process to export print and cut files.
# A bit about Presses, Stocks, and Marks
# Presses Library
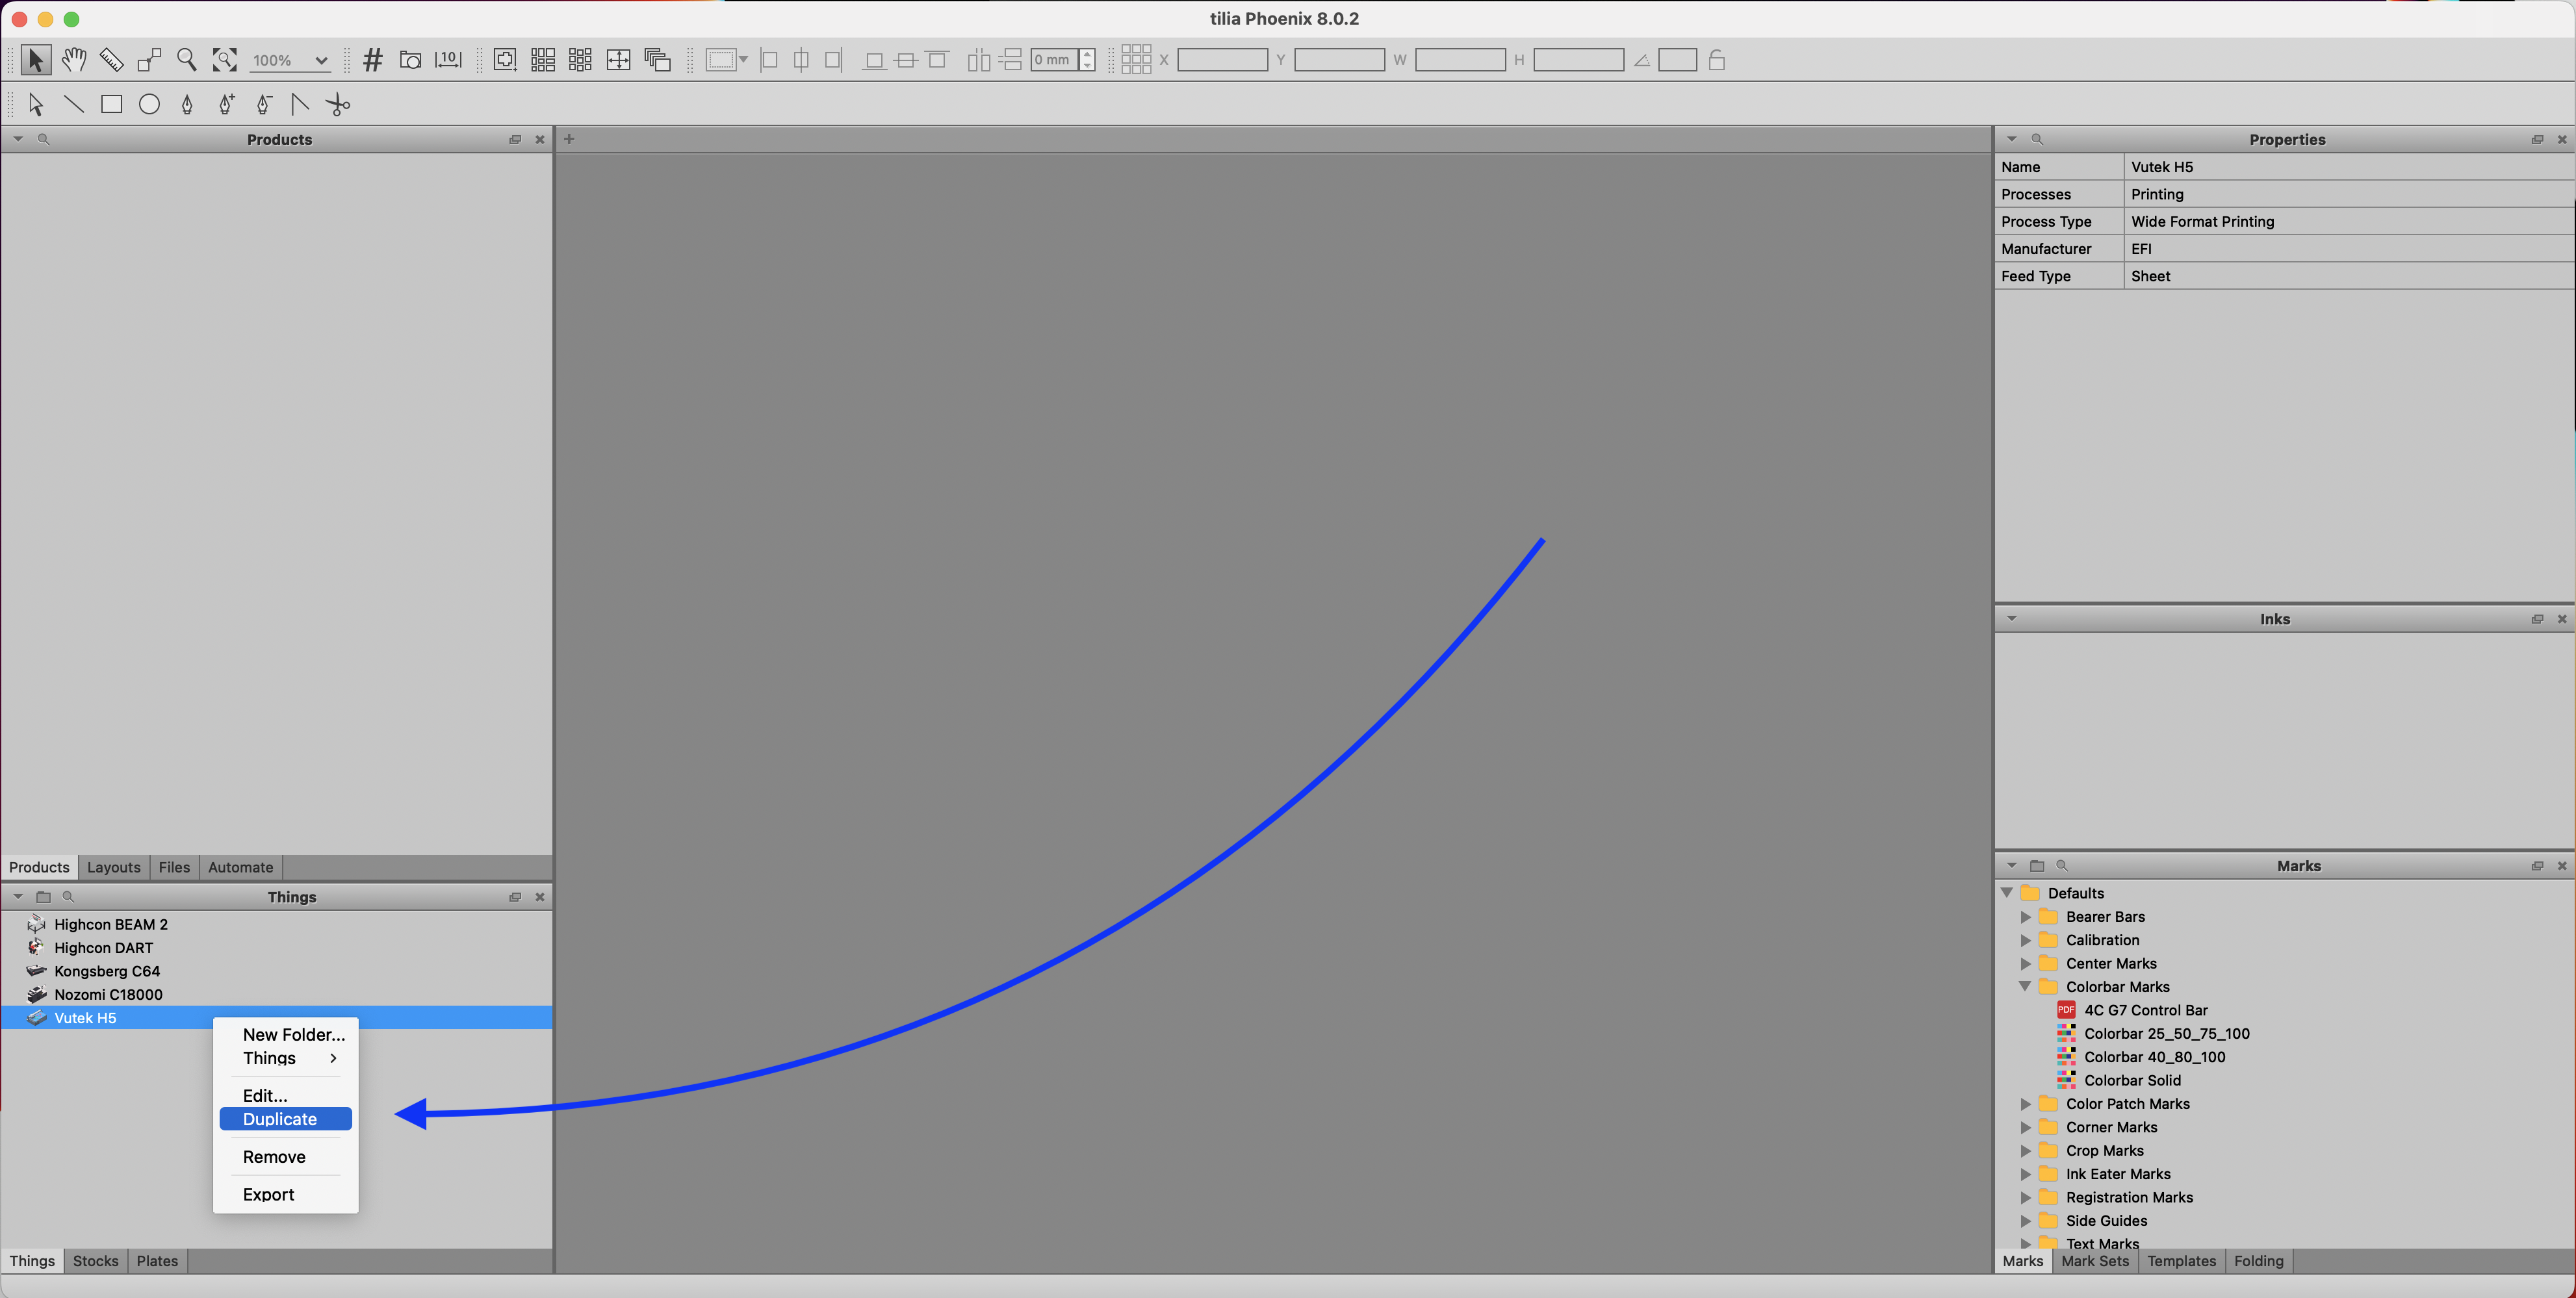
Phoenix has a library of Things that include presses, finishing devices, and processes (a lot more about Things here). Double clicking on a Thing will open the configuration menu. From here, you can preset information about the Thing such as minimum and maximum sheet sizes, speeds, margins, marks, and more.
Right clicking on a Thing in the Things panel will duplicate it. Try duplicating the Vutek H5 and playing around with the settings to get a feel for how to make changes to the press.
More Info ☝️
You can also set up finishing devices like conventional and digital die cutting equipment and die creation cost. This is an advanced topic that you can read about here or cover in your full Phoenix training sessions.
# Stocks Library
Let’s add some additional stocks and stock sizes in the Stocks library. Access the Stocks library by clicking the “Stocks” tab in the bottom left panel (it is probably currently on the “Things” tab).
Start by adding another stock to our library. When importing multiple products with different stocks, Phoenix will automatically ensure that products end up on the correct stock!
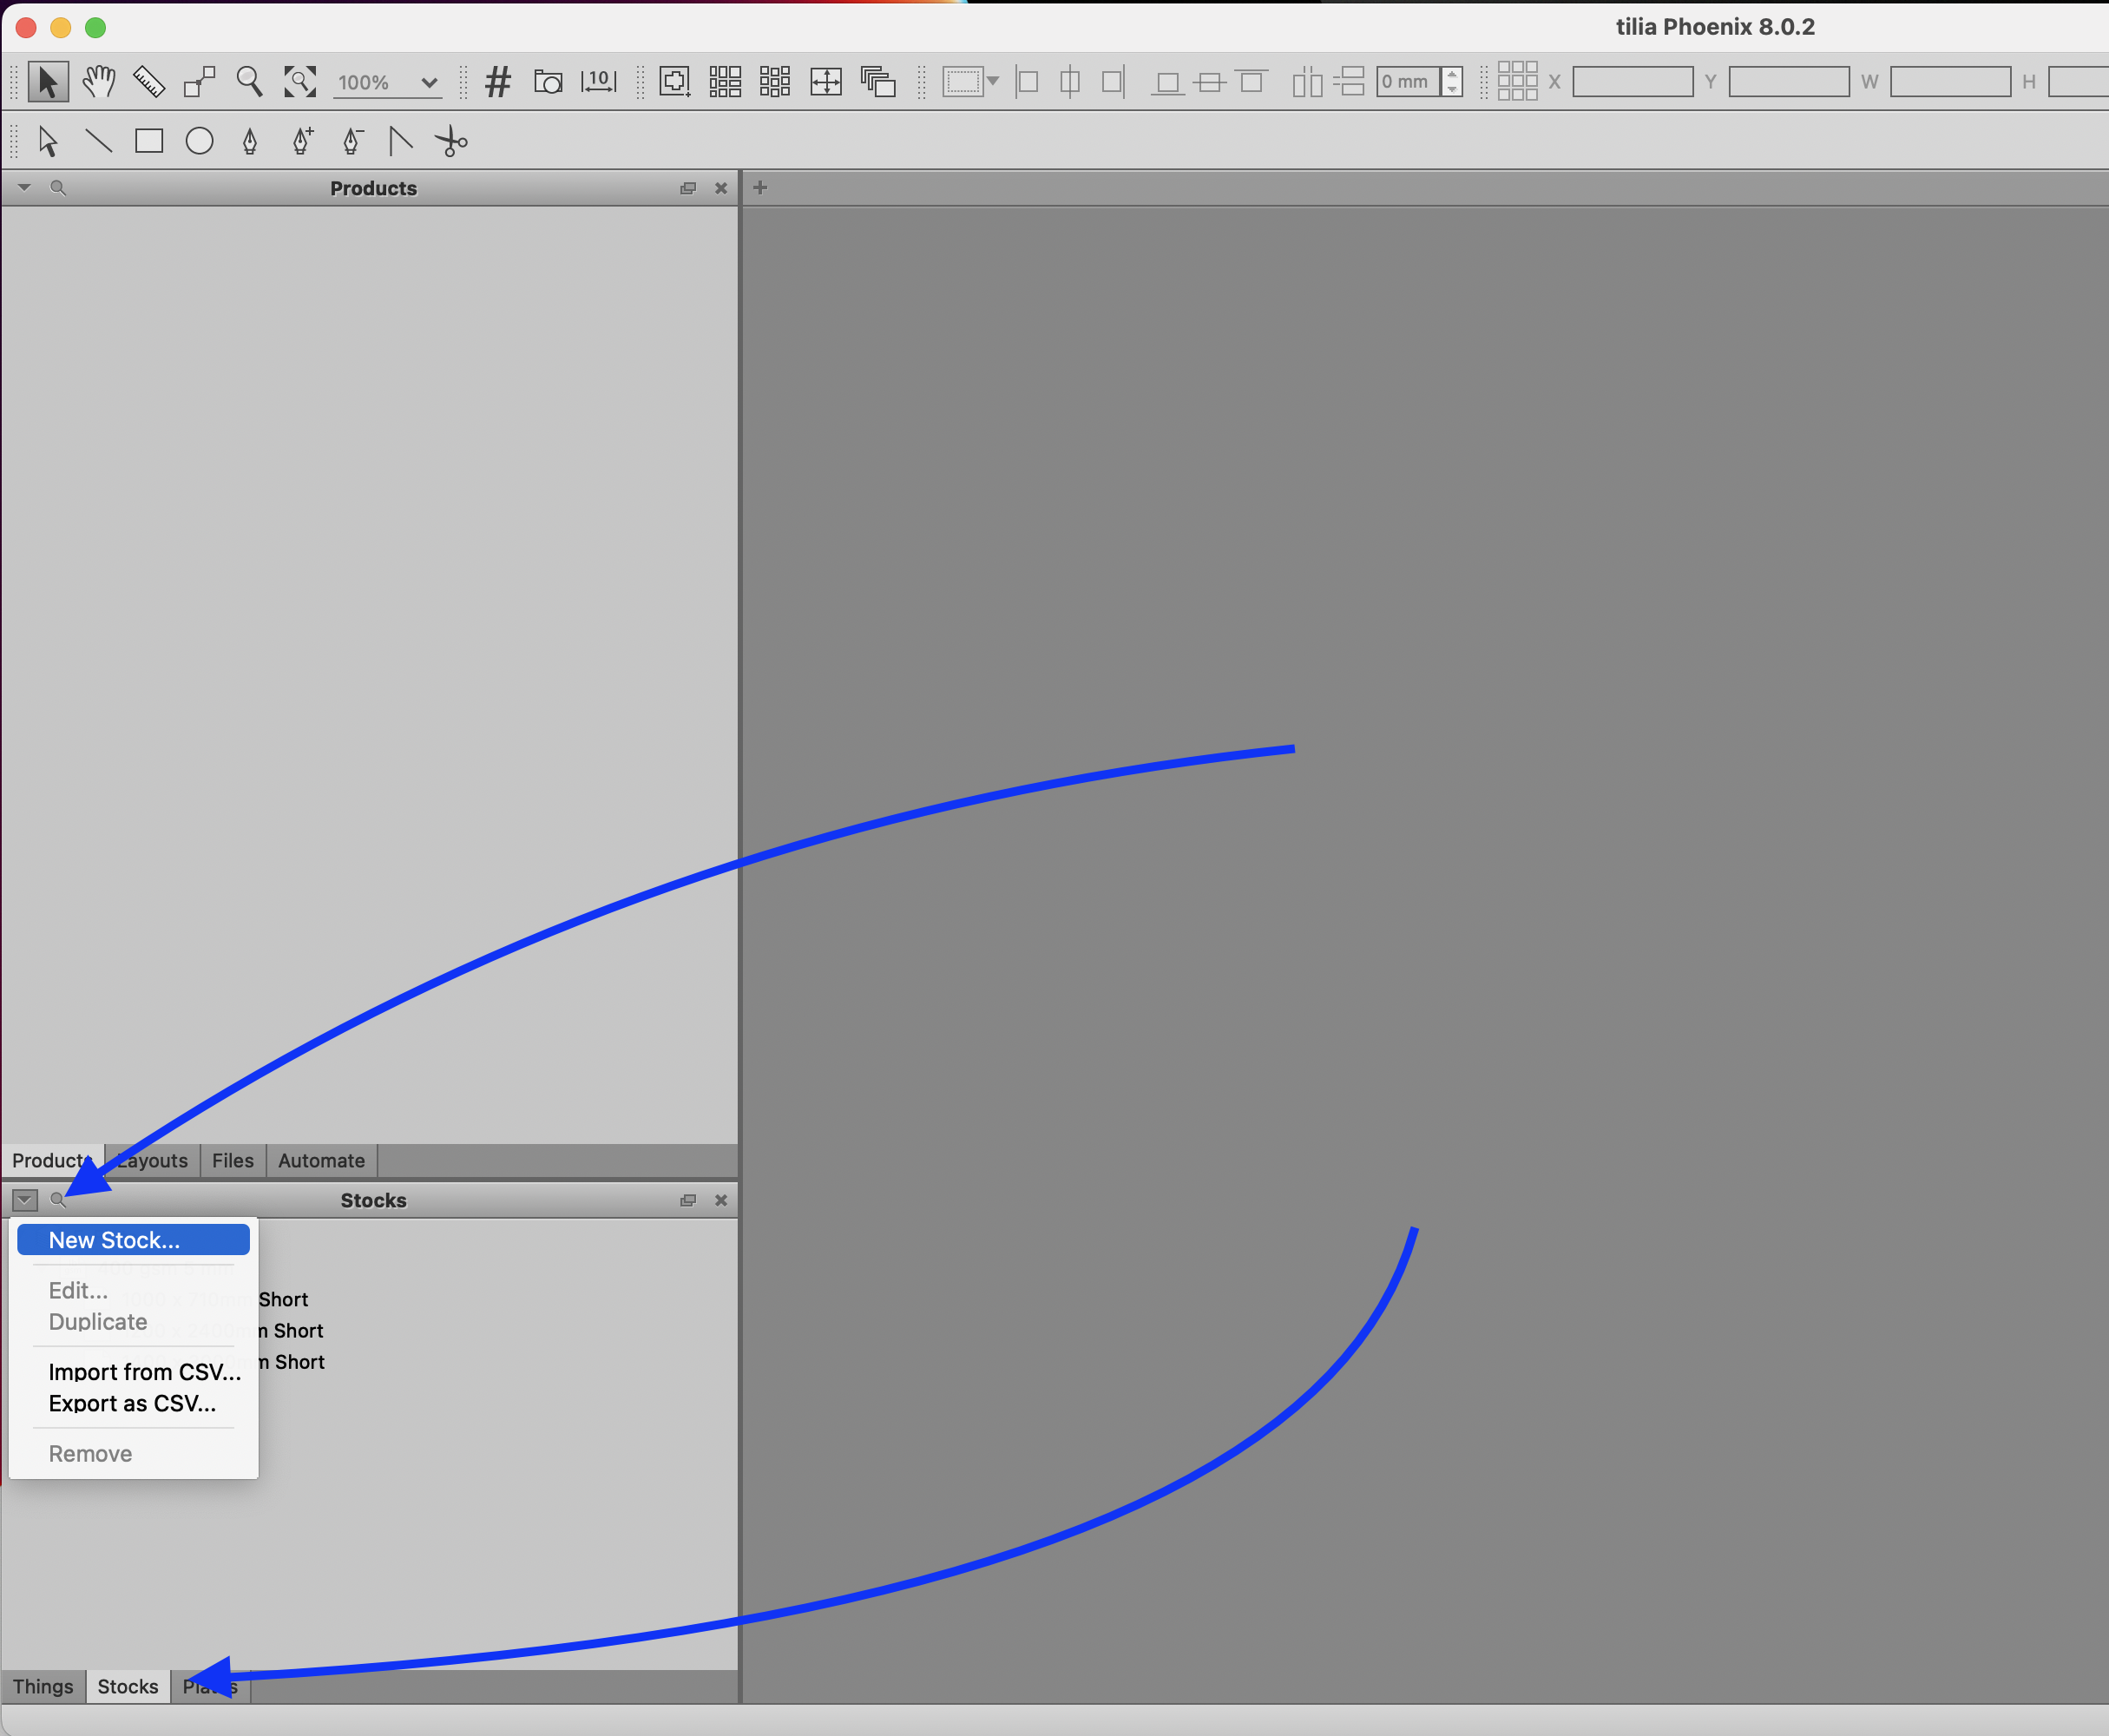
Let’s add a B-Flute White stock to our library. Clicking the grey “+” button will add new items to Phoenix libraries. Start by giving this new stock a name - ideally one that correlates with your upstream ordering system for good data consistency.
Another good practice for further automation in to select the appropriate “Stock Type” from the dropdown list.
Add a new Grade (caliper) and fill in the Caliper and Cost information at the bottom of the dialogue.
Finally, add your available sheet sizes. Be sure to add a flute direction by specifying the “Grain” property of the sheet. Long refers to the flutes running parallel to the larger dimension and short refers to the flutes running parallel to the shorter dimension.
TIP
☝️ Phoenix can also determine the optimal sheet size based on the order but more on that during your full training.
# Marks Library
Phoenix has a vast library of dynamic, “smart” productions marks that can be applied to artwork or layouts. These marks include things like variable text, barcodes, and registration marks. While we don’t have time to cover all the different kinds of marks and their use cases, let’s spend a bit of time reviewing the most important marks for digital corrugated print and finishing.
First, navigate to the Marks panel by clicking the “Marks” tab in the bottom right panel. You should see a few pre-built marks for our Quickstart Library. You can build marks from scratch by clicking the triangle menu icon at the top left corner of the marks panel.
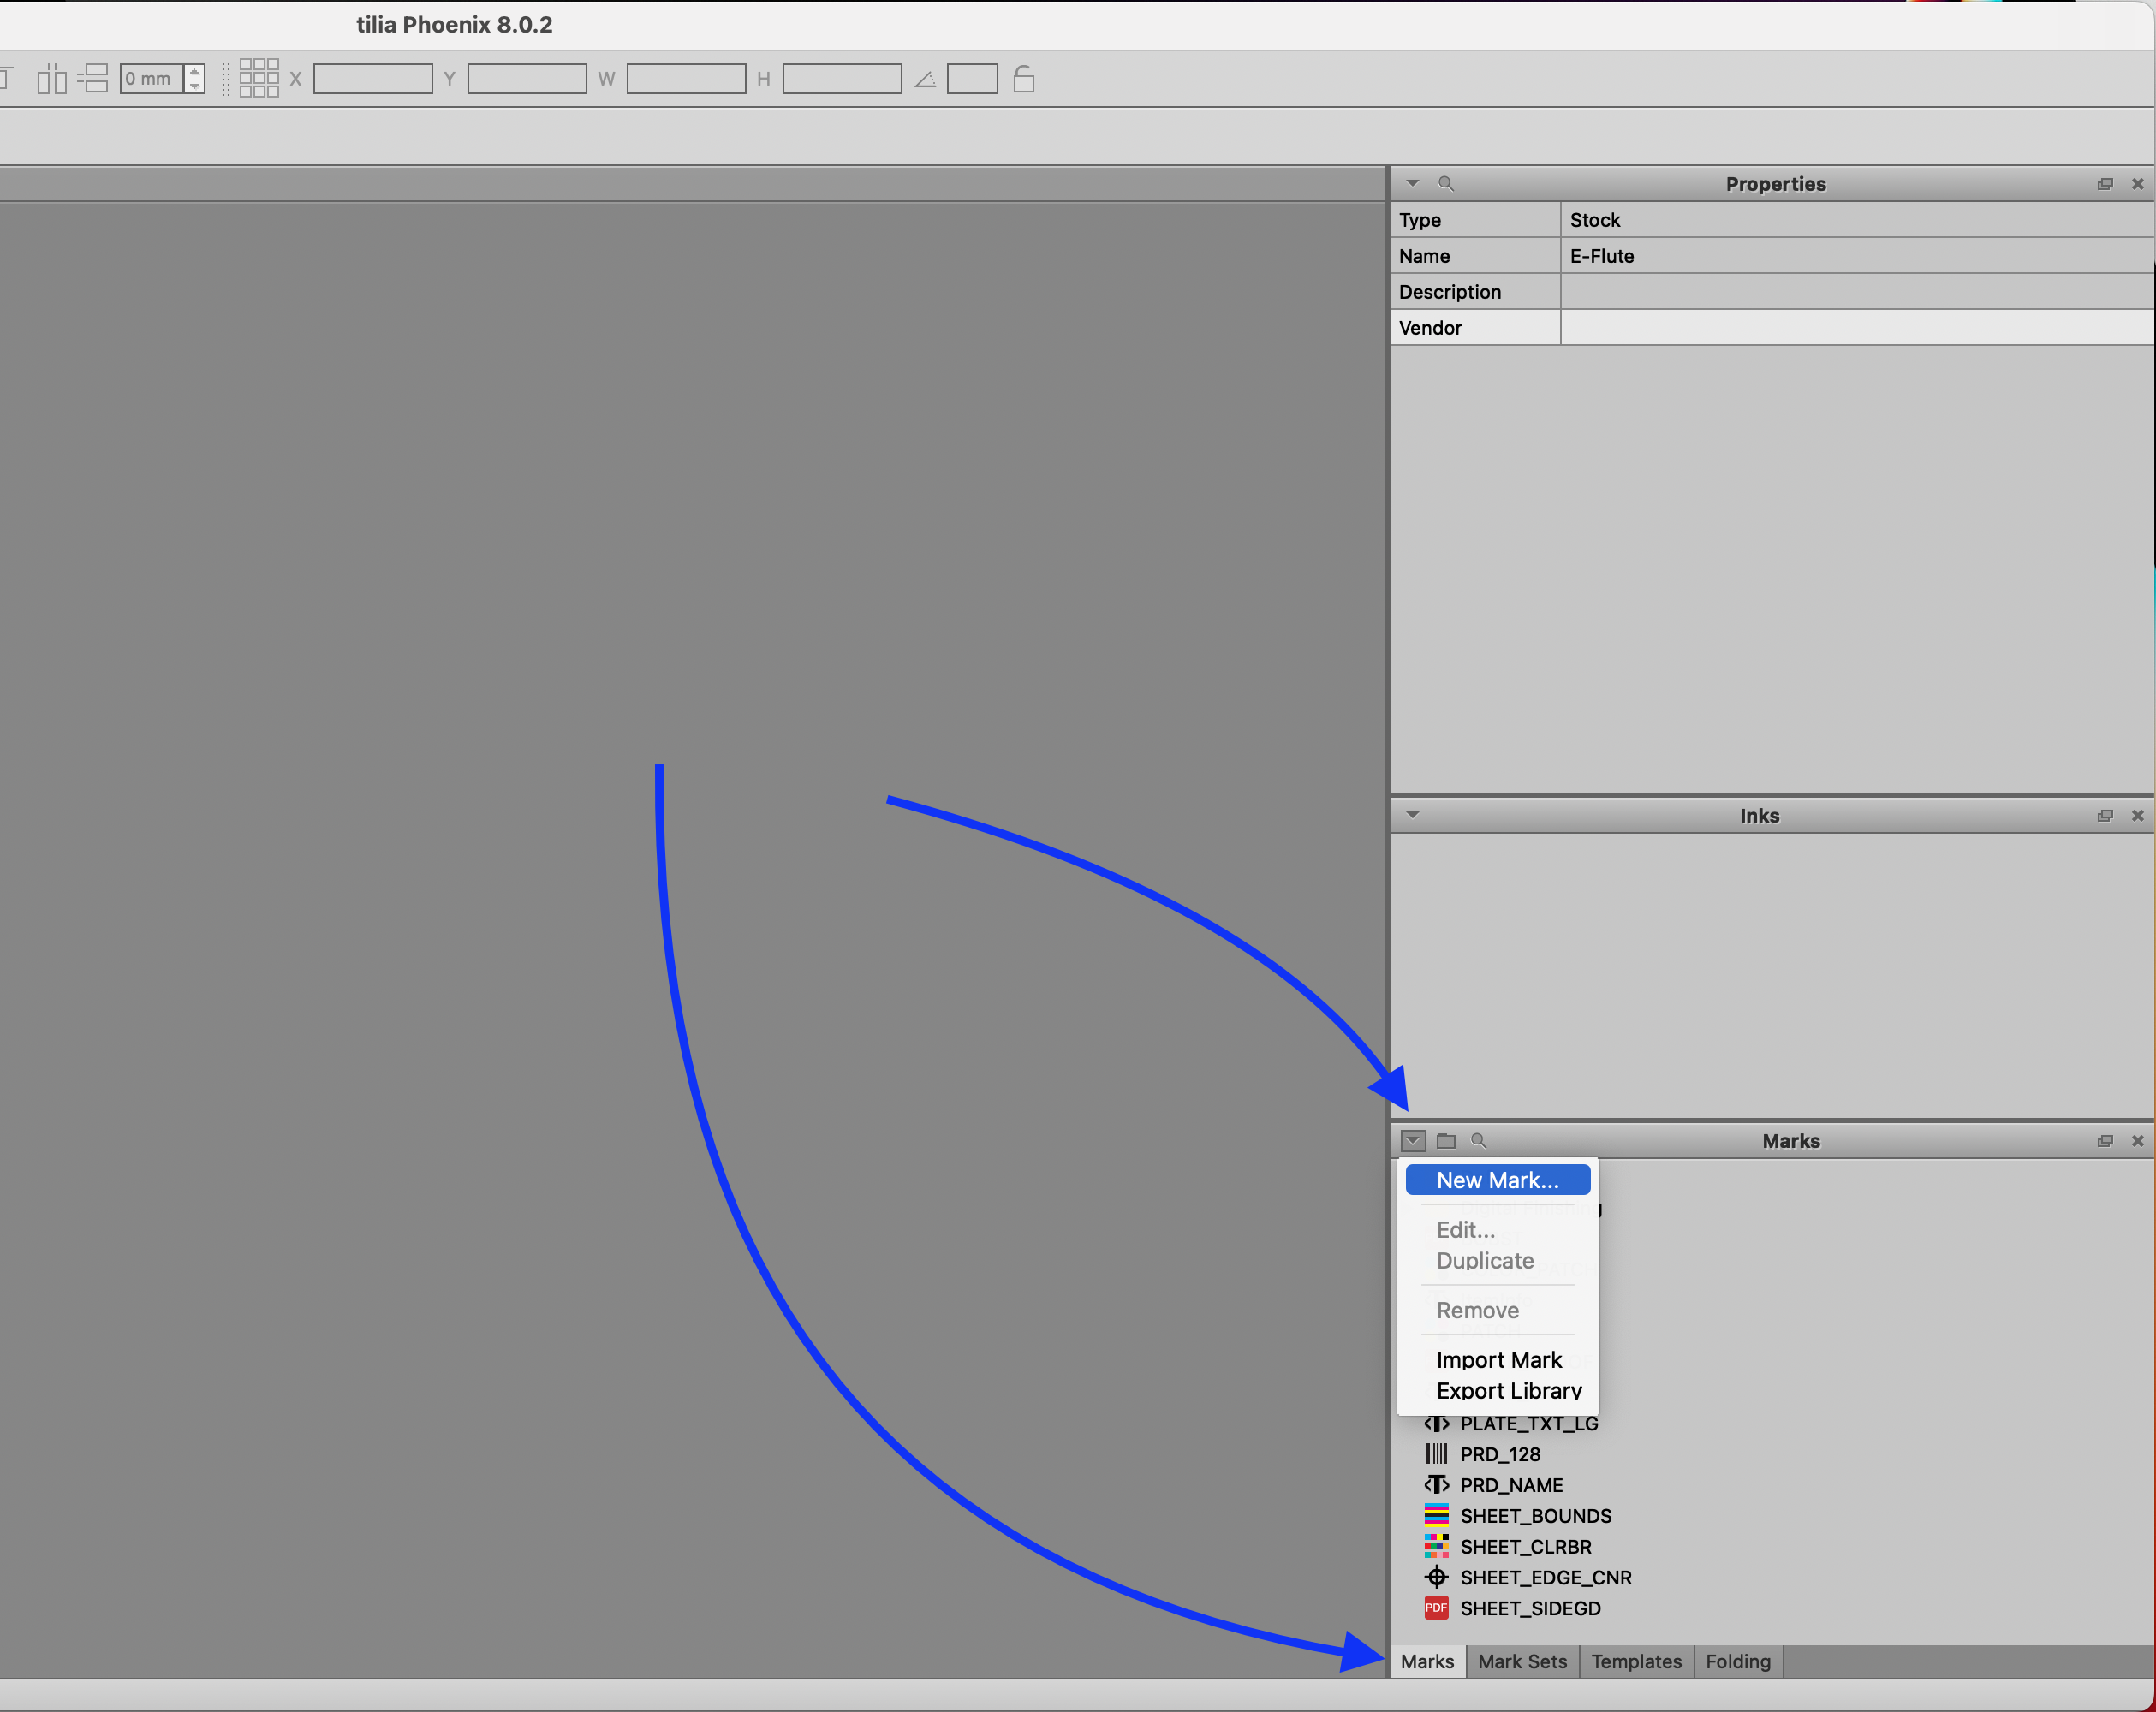
From here you can browse the different kind of marks available for various applications and build them from scratch. A full rundown of our marks and keywords can be found here:
For now, let’s just stick to the pre-built marks that we have included in this quickstart library.
One common set of marks we need for digital print and finishing are camera registration marks. Navigate to the Marks panel and open the “Digital Finishing” folder. You should see a mark called “Camera”. Double click this mark to open the wizard.
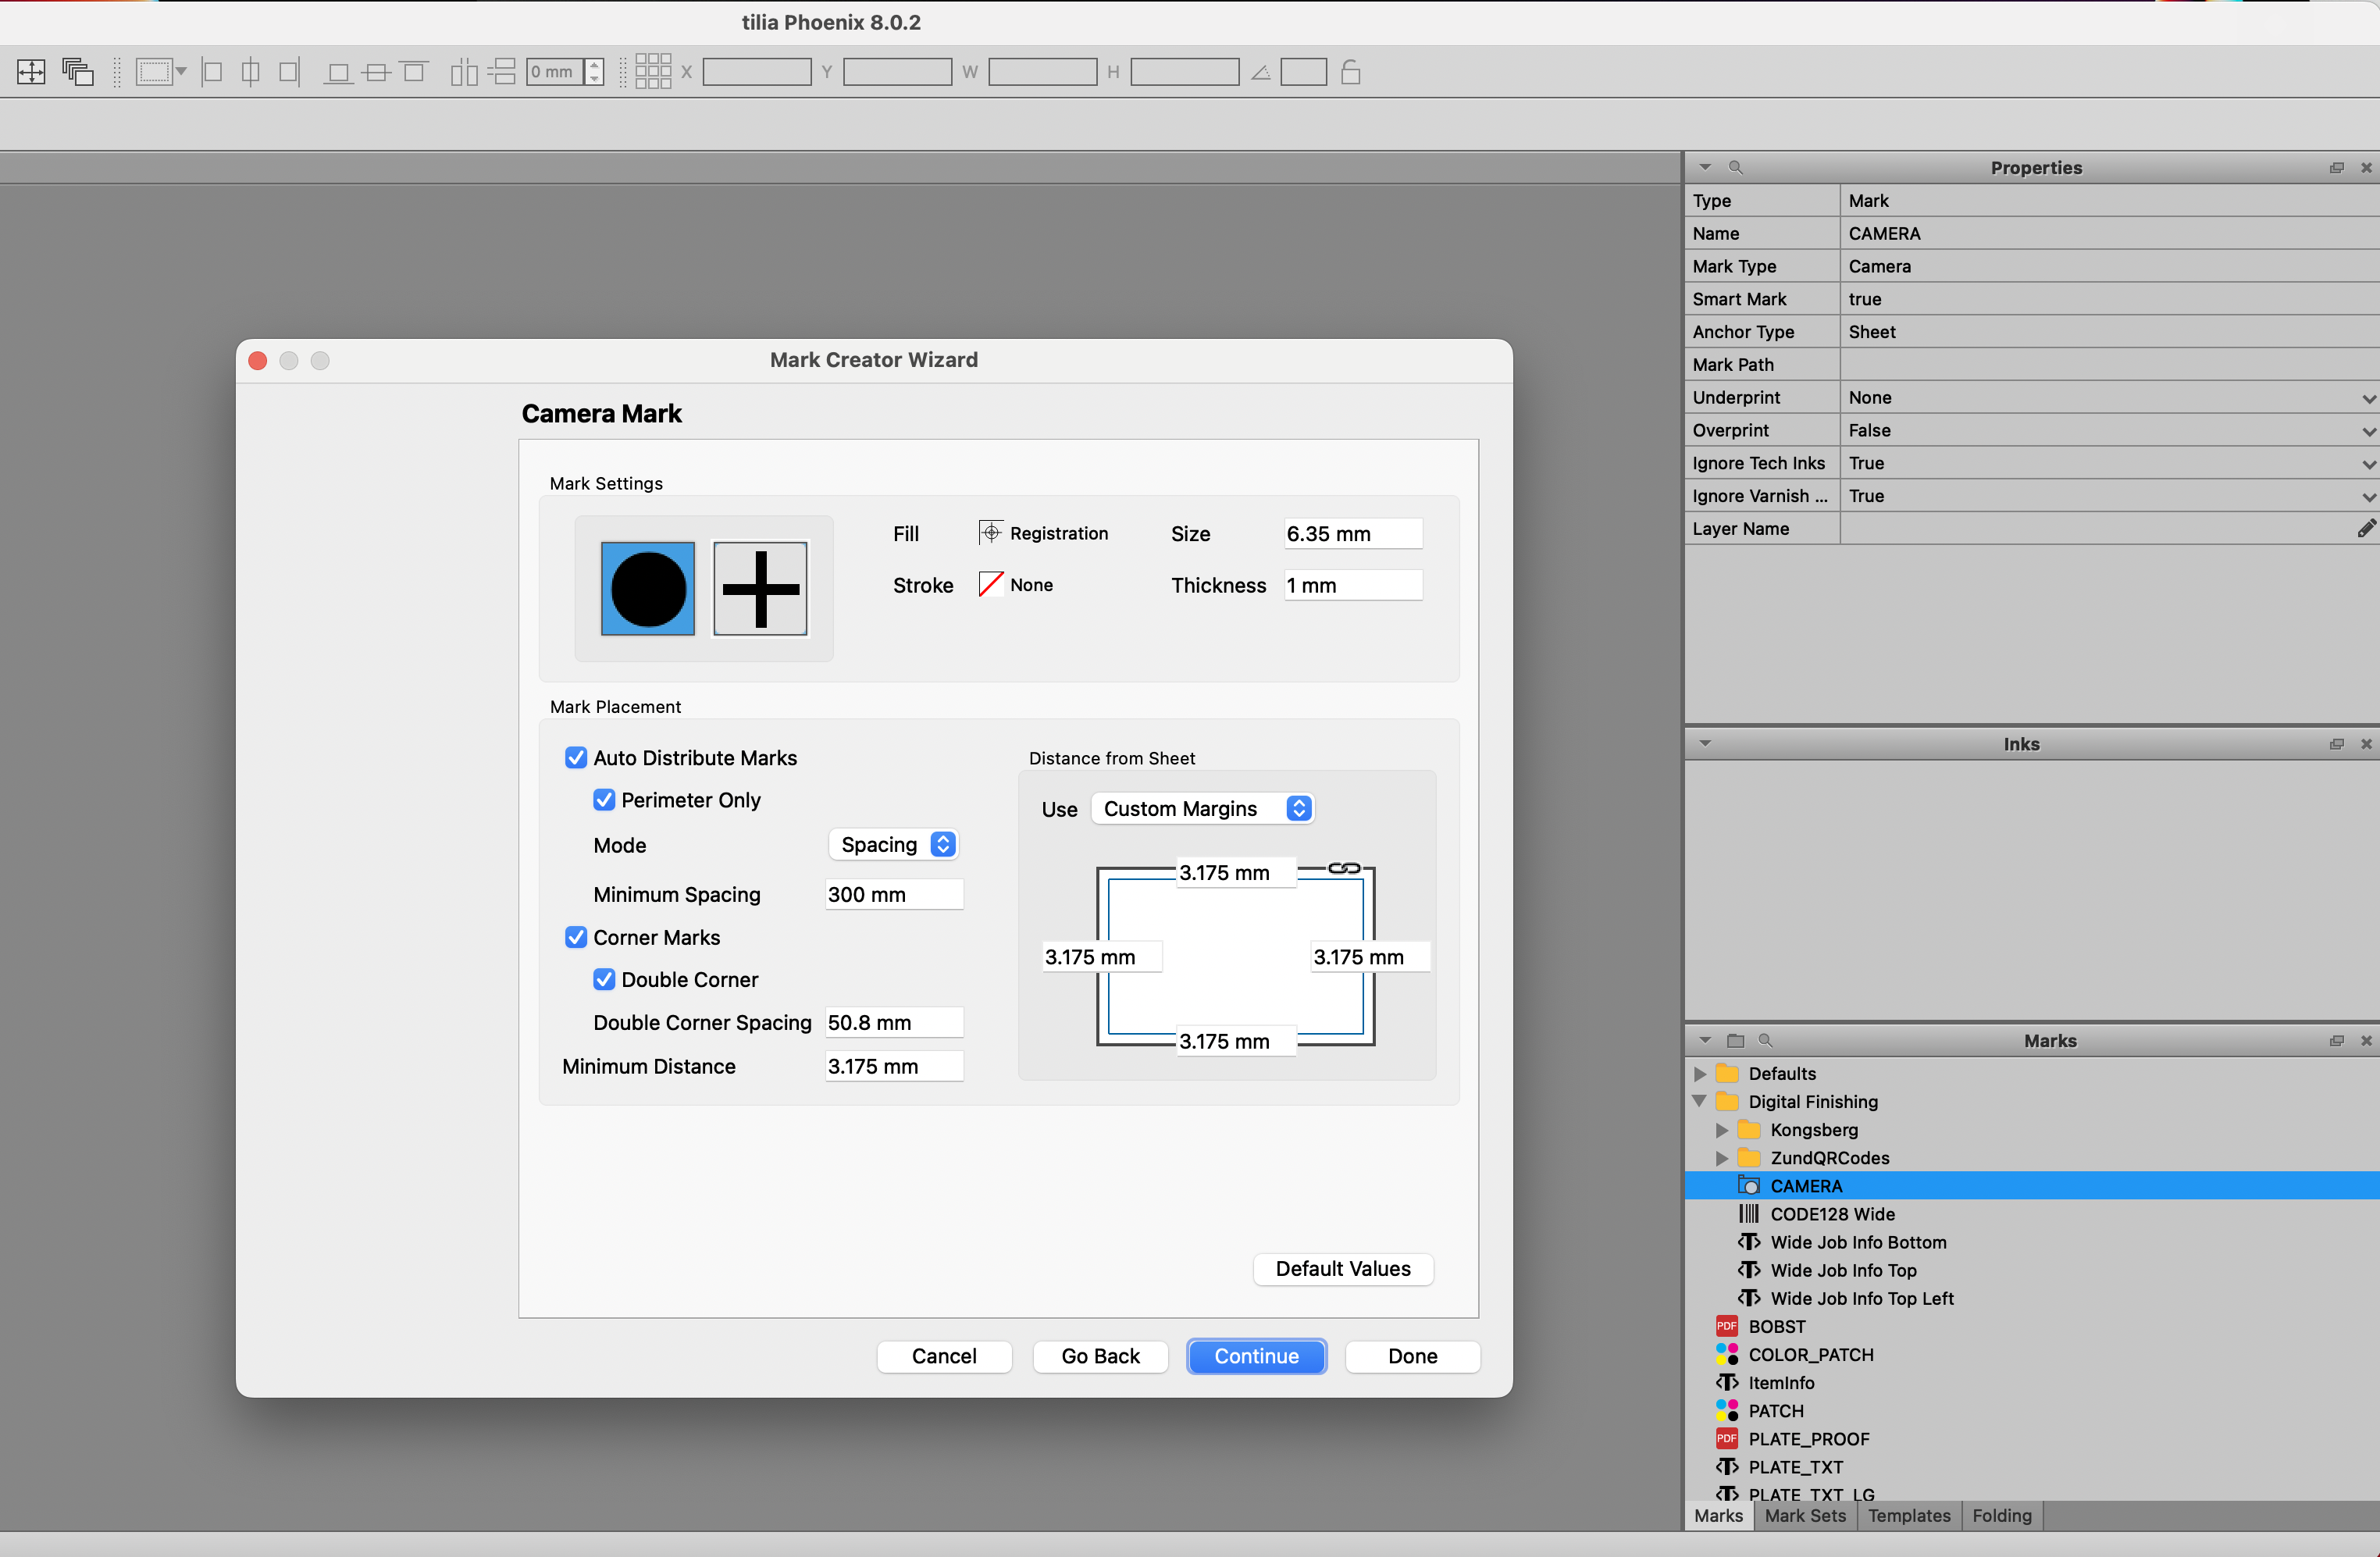
Browse through the wizard screen by clicking the “Continue” button. You can change these settings to match the specifications required by your cutting table - although these default setting should work for most common kinds of cutting tables.
We can apply these camera marks to a layout in one of two ways:
Manually drag them onto a layout we have created.
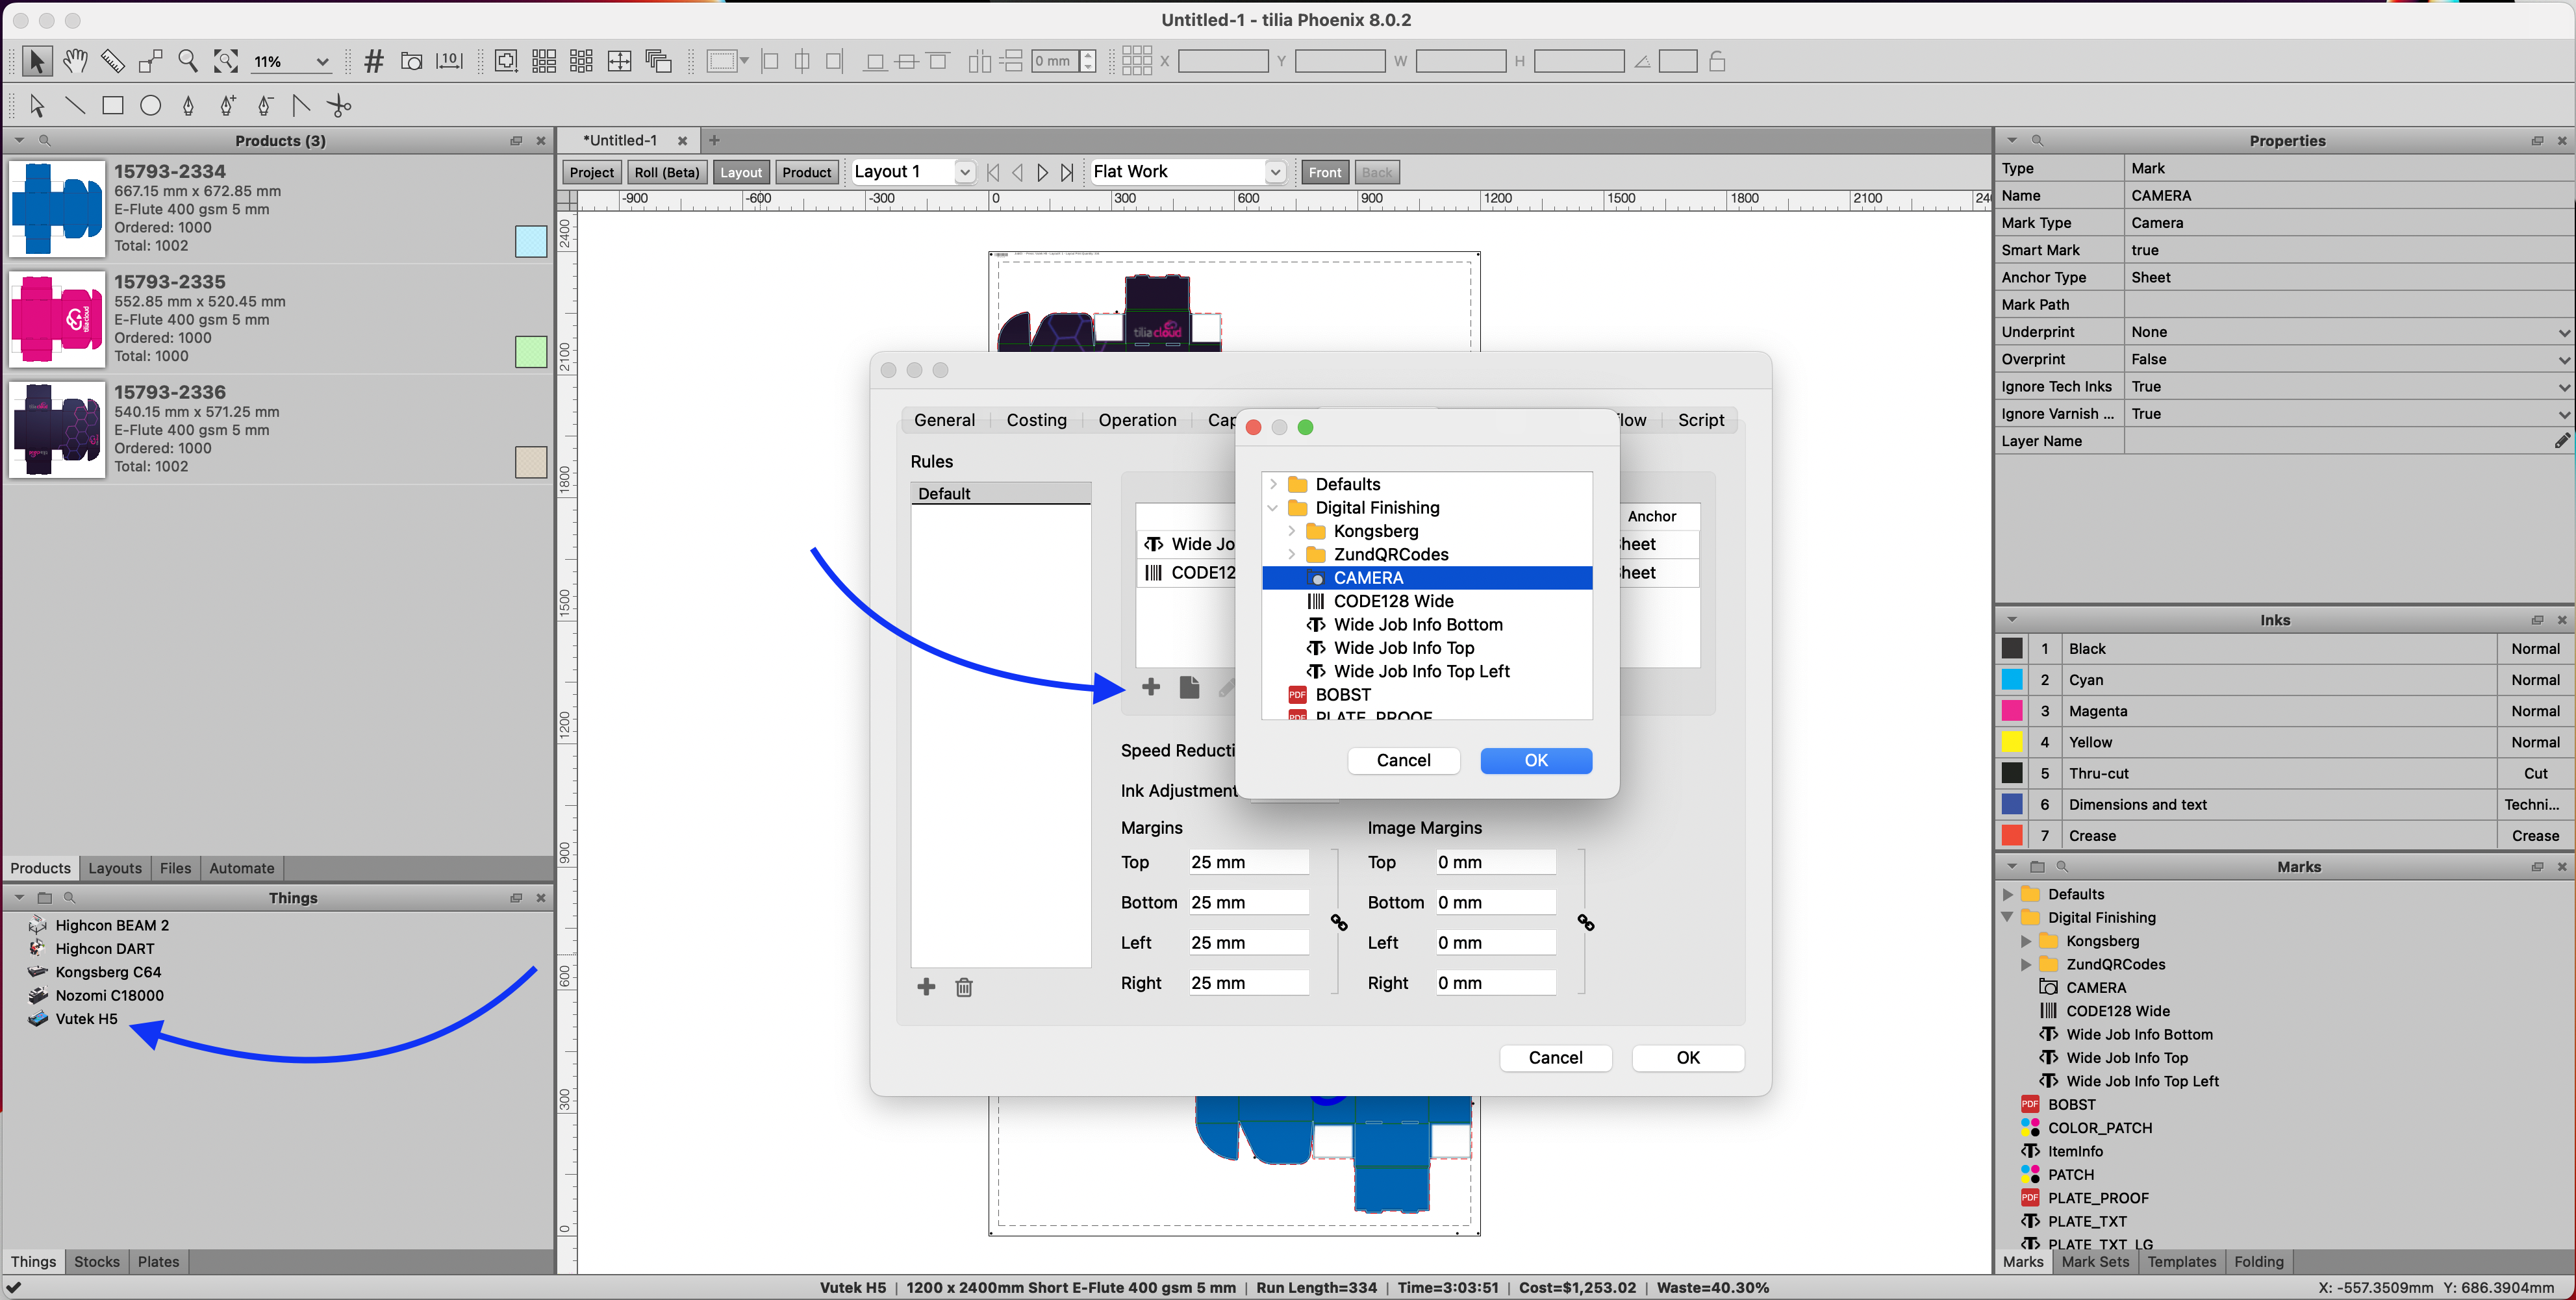
Or add them to a Thing as default marks. This ensures that any layout created using this Thing always has a given set of marks. Let’s add Camera marks to the Vutek H5.
Double click the Vutek H5 in the Things panel. Navigate to the “Media Rules” tab in the wizard. Under the Marks window, click the “+” button and add the Camera mark.
Now any layout created for the Vutek H5 will include these camera marks!
# Add a little automation - Importing products from a CSV file
In this final section, let’s explore how we can speed up the process by importing products from an Excel spreadsheet.
Instead of manually dragging and dropping PDF files, Phoenix has the capability to mass import products from a spreadsheet. Take a look at the included .CSV file. Double clicking it will open it in Excel or Numbers.
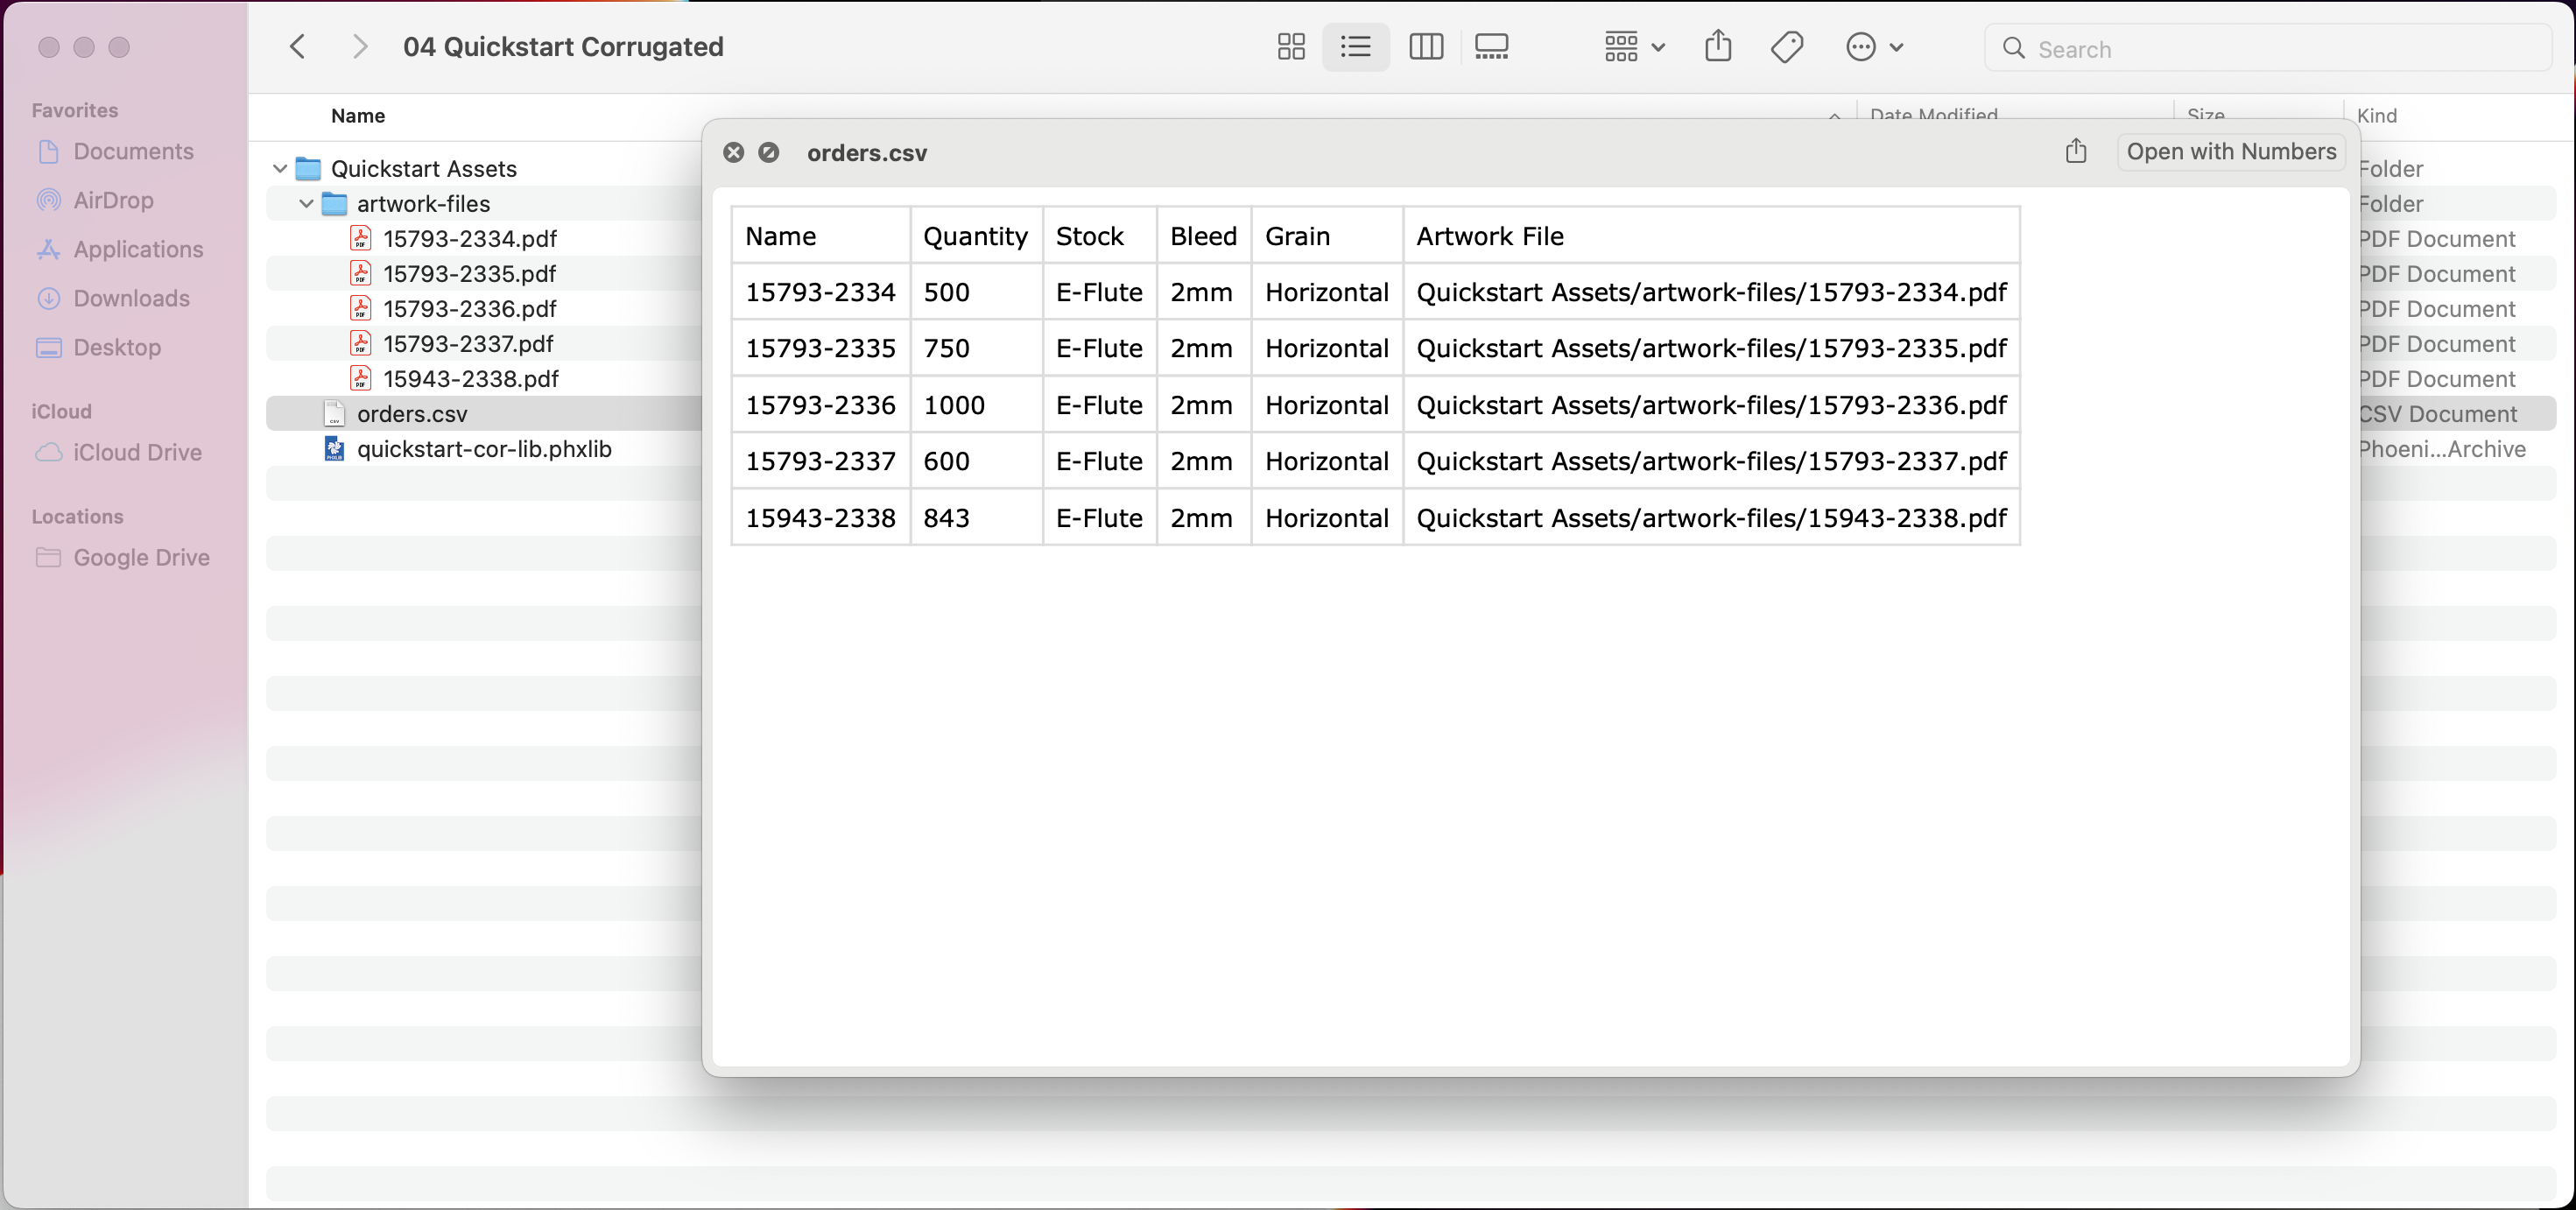
Notice this spreadsheet contains a row for each product we will import into Phoenix. We have a column for Product Name, Quantity, Stock, and Artwork File.
Create a new Phoenix job. Next, drag this spreadsheet file directly into Phoenix from your finder.
You will now see all five products import at one time with the proper Stock and Quantities already set. From here, proceed to Imposition AI to create your layouts!
# Learn more in our complete user guide
We hope you learned something in this quick overview, but there is so much more to Phoenix! Here are some suggestions for where to look next:
- Want to use existing dies in Phoenix? A lot more on that process in our Quickstart for Folding Cartons.
- Decorate your layouts with tons of production marks.
- Dive deeper into Imposition A.I. with this short explainer video.
- Learn about how Phoenix integrates with Zund for cut time estimation (opens new window).
- Explore our Youtube page for great webinars and feature videos.
- Contact sales for a personalized demonstration or additional training.
- ...and so much more!