#  Labels Quick Start
# Overview
If you're strapped for time and just want a quick, step-by-step introduction to some Phoenix basics, follow the Labels Quick Start guide below. For more info, check out the complete user guide, or try out the search bar to find a particular term.
For this Quick Start Guide, you'll need a few files to get started. Grab those here, and we'll tell you where to use them later on in the guide.
This .zip contains
- Phoenix Library (.phxlib) containing all of the Phoenix settings
- Demo Artwork Files
- Example order csv
# Installation
To install Phoenix, double-click the .dmg (on a Mac) or .exe (on a PC) file, and follow the installation wizard prompts. Installation is a breeze!
# Basic Concepts
There are some basic concepts you need to understand about Phoenix. The ones below are very brief, so for more detailed info, check out Key Concepts.
# Products
A Product is a piece of artwork that needs to be printed. In Phoenix, products can be broken down by type: either flat, folded, tiled, or bound. For label work, products are always almost going to be flat products. Products also have specific properties, like quantity, height, width, and what stock it needs to be printed on.
# Layouts
A layout is a representation of the actual printed layout. This is what will be exported to go to the RIP to be printed. Layouts are assigned a stock material andalso can be optionally assigned a press. The layouts in Phoenix are interactive, meaning you can always edit what is on a layout to add, remove, edit, and rearrange products and marks.
# Projects
Projects are the native files that are used in Phoenix. Everything in Phoenix starts as a project, which then contains one or more layouts containing one or more products. A project consists of everything involved in that particular order/job/project, including the products, layouts, marks, and any assigned properties.
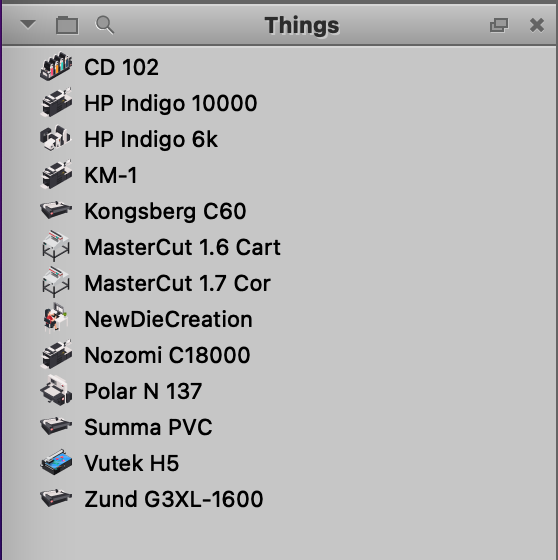
# Things and Stocks
Phoenix creates a model of your production environment, including the “things” (presses and finishing devices) and stocks you use. This allows your production capabilities, including material and device costs, to be factored in to determine the most cost effective layout and stock choices when using Imposition AI, or simply to keep track of the cost of a project if creating layouts manually.
# Imposition AI
Imposition AI is a tool in Phoenix that uses artificial intelligence to automatically create the optimal layout results based on the products in the project, combined with the available presses, finishing devices, and stocks. In Phoenix you can build layouts manually, use tools like the Step and Repeat tool, and also with Imposition AI. Imposition AI is incredibly powerful and makes Phoenix the best software in the industry for imposition and planning.
# Creating your first project
# Importing the Library
The first thing we need to do is to load the Phoenix Libraries so that you can follow along with our example production environment (with predefined presses, stocks, and so on). Open Phoenix, and navigate to Preferences. On a Mac, Preferences can be found in the menubar under the Phoenix menu. On a PC, navigate to the Edit menu and then select Preferences. From there, click on Diagnostics, and then Import Libraries. Select OK, choose the .phxlib file you downloaded earlier, and click OK once it's loaded. Phoenix will shut down once the libraries have been imported. Open Phoenix back up, and now we're ready to create a project!
# Create a project
To create a new project, go to File > New project (or press Command/Control and "N"). This will create a new project, and display a prompt for what you want to name the project.
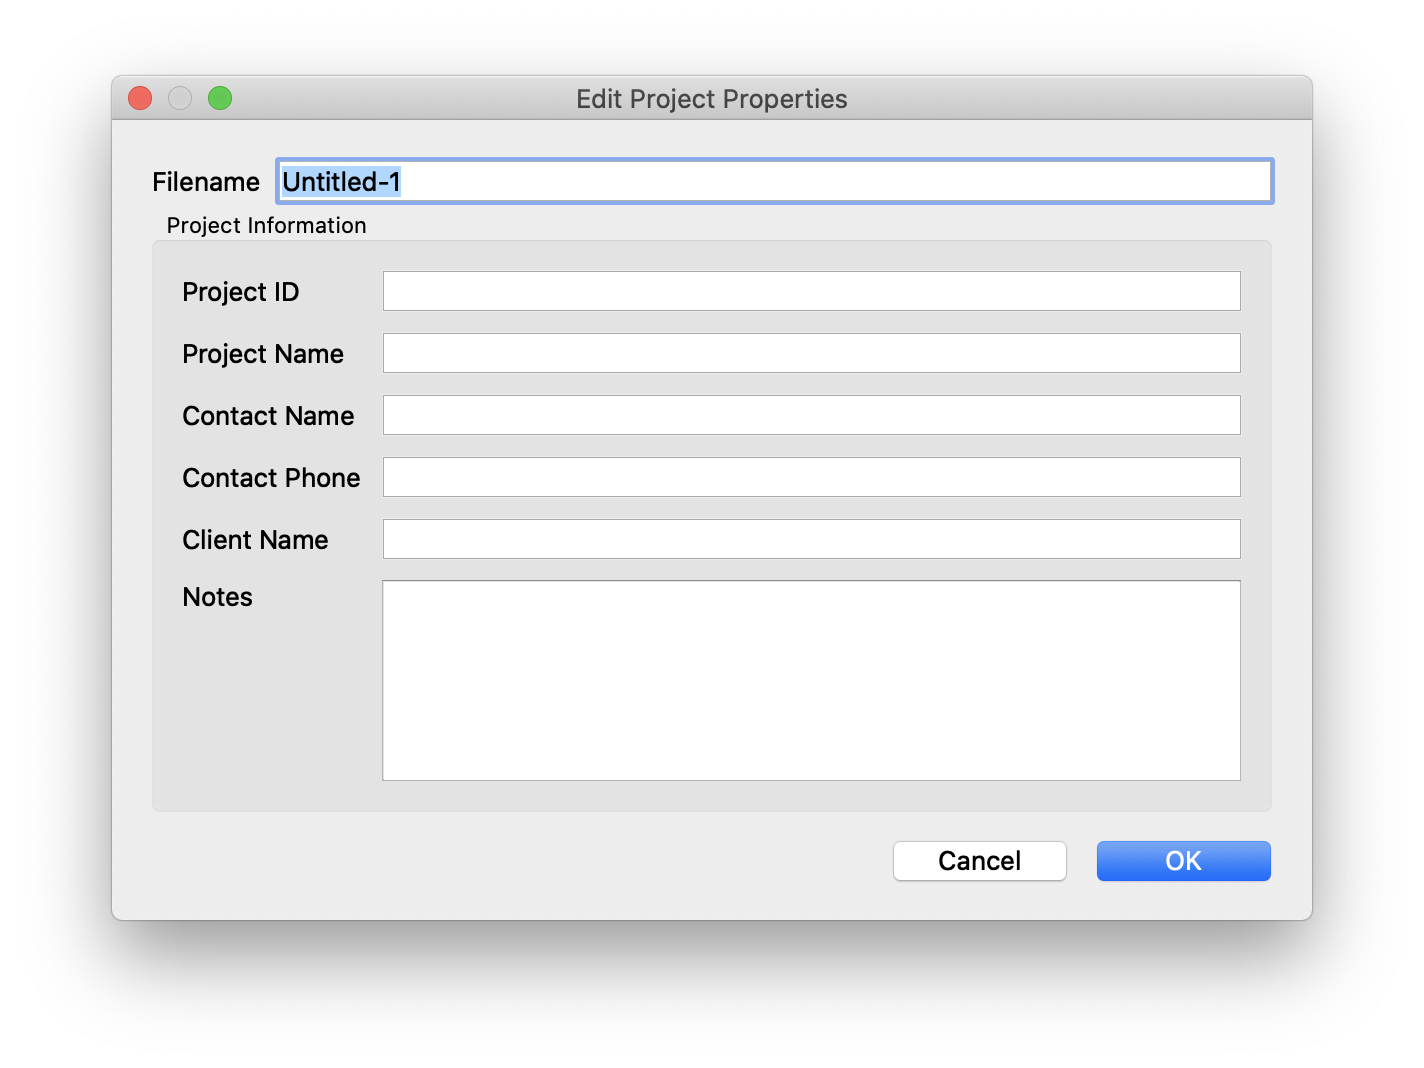
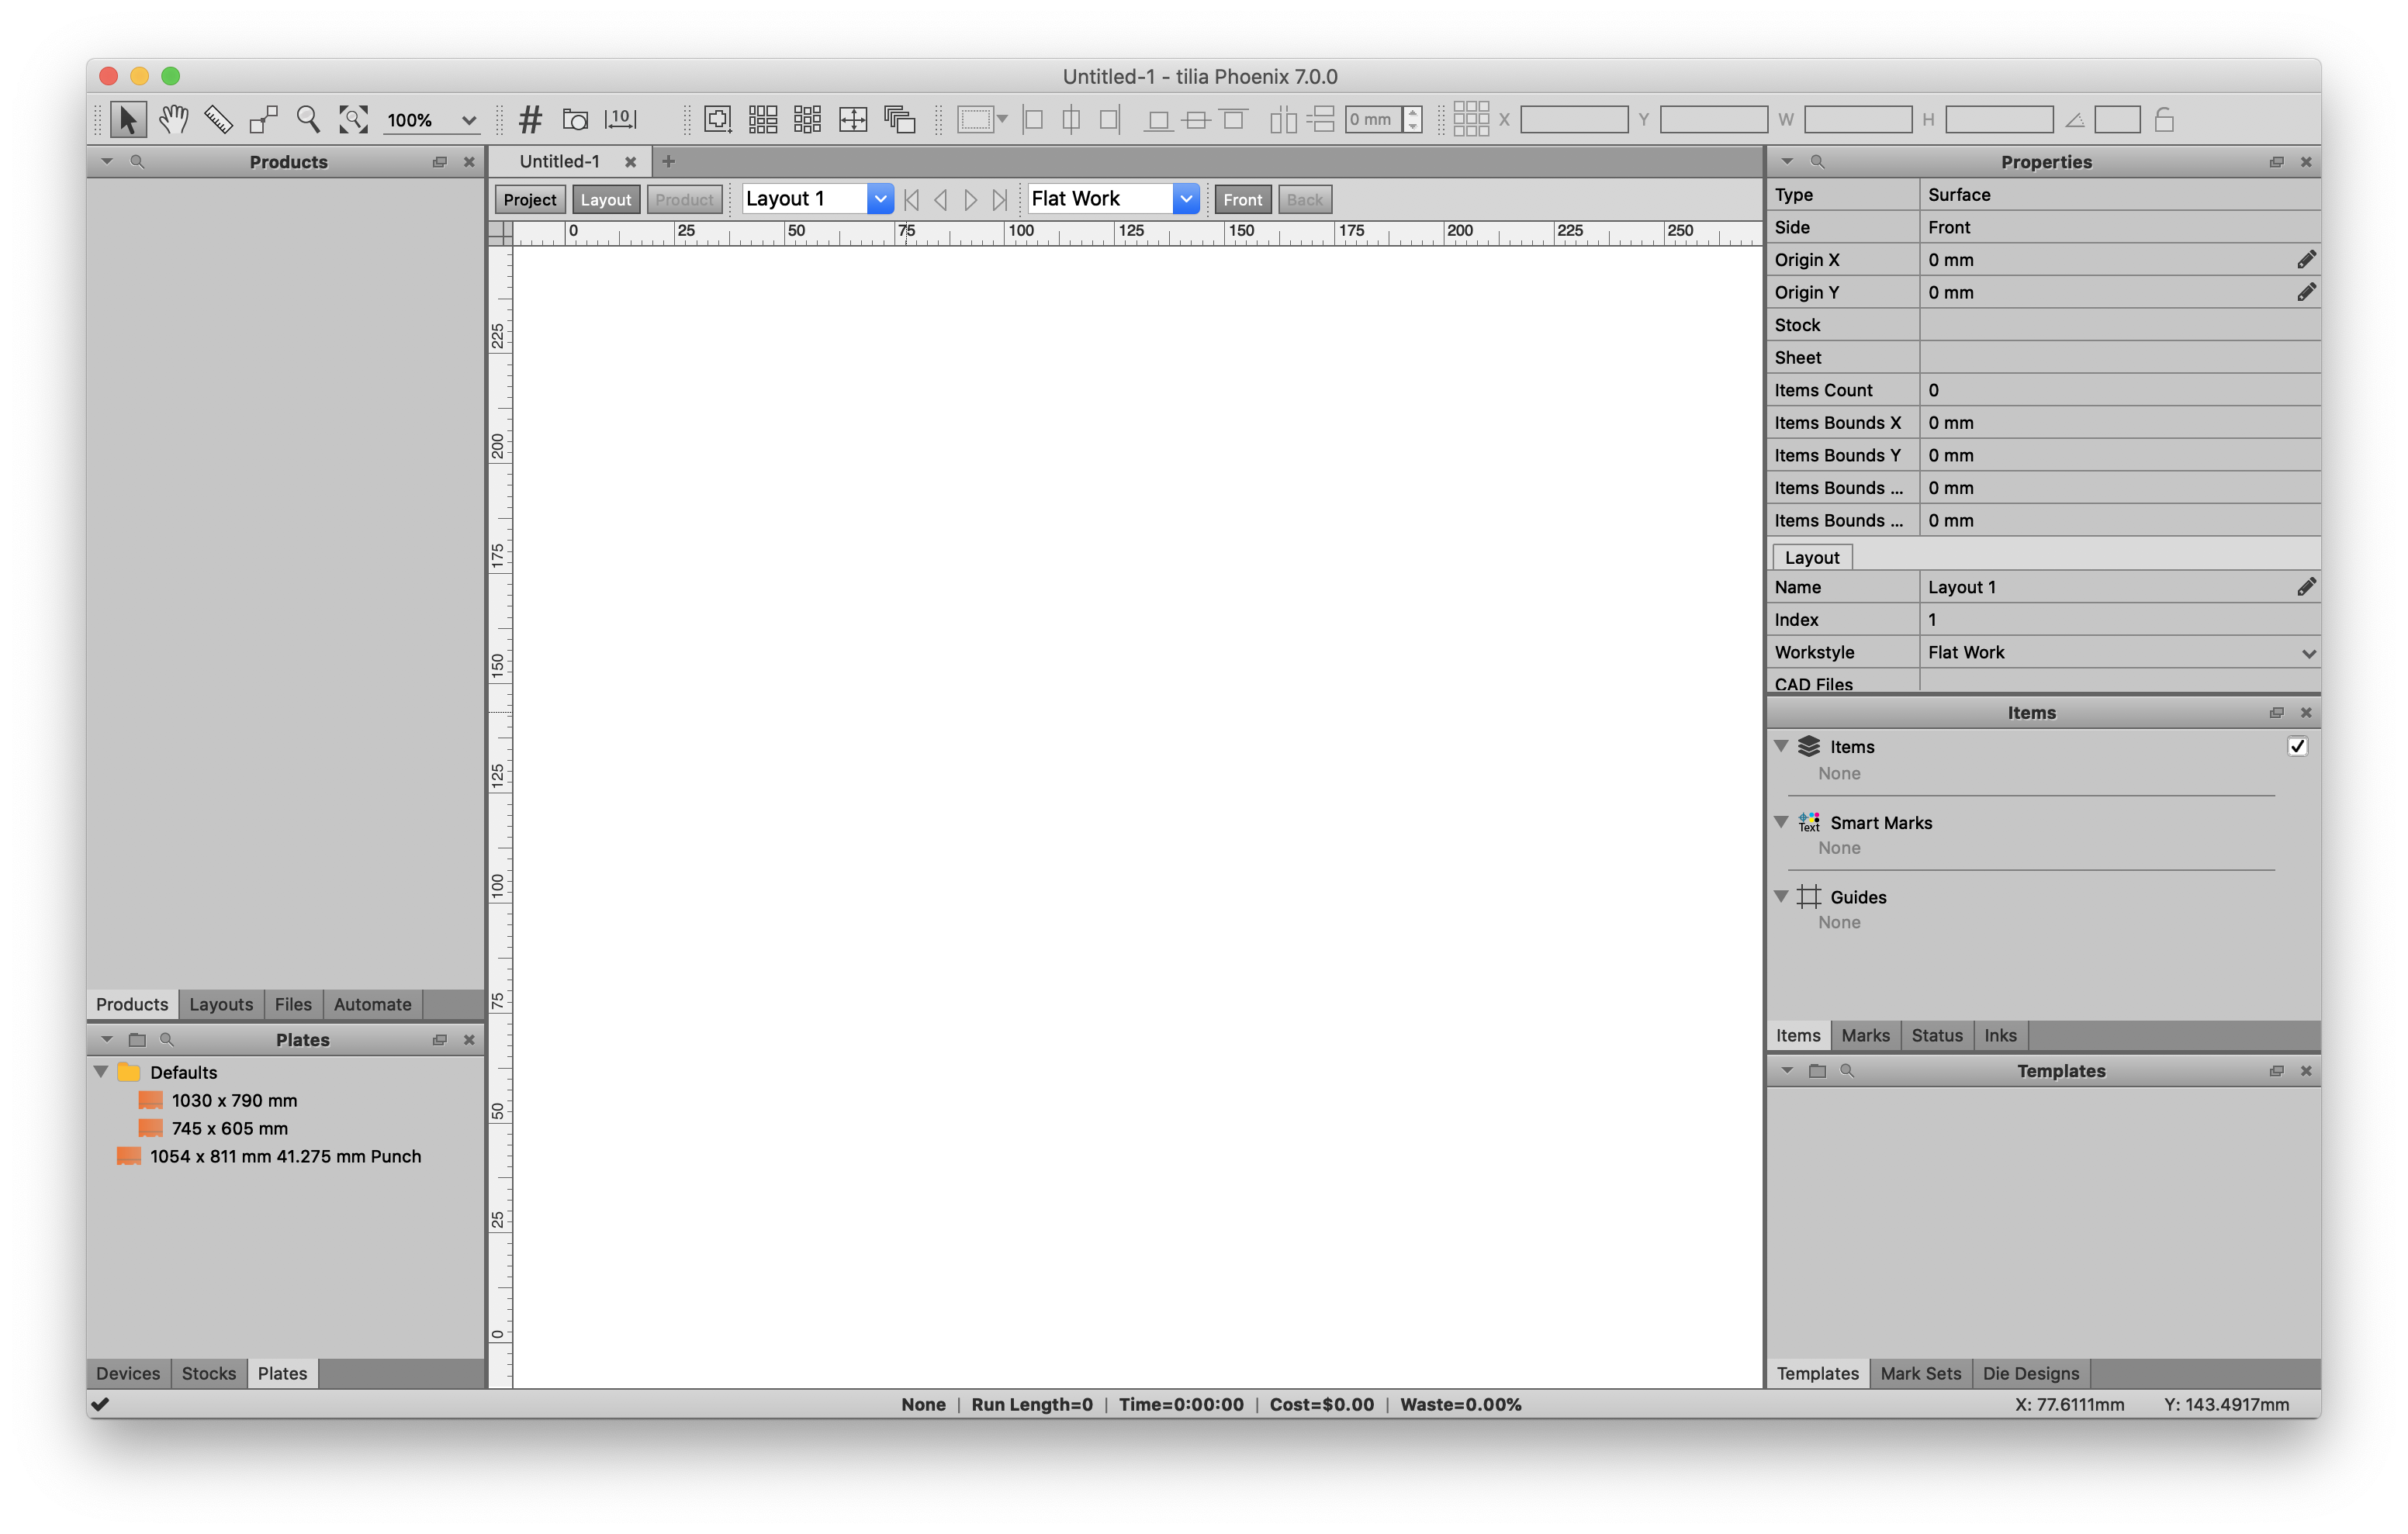
Set the filename to "LabelJob" and leave the rest of the fields blank. Note that all of these fields can be used to add additional information to the project, but are not necessary. Now click "OK". You should now see a blank layout like the screenshot below.
# Add Products
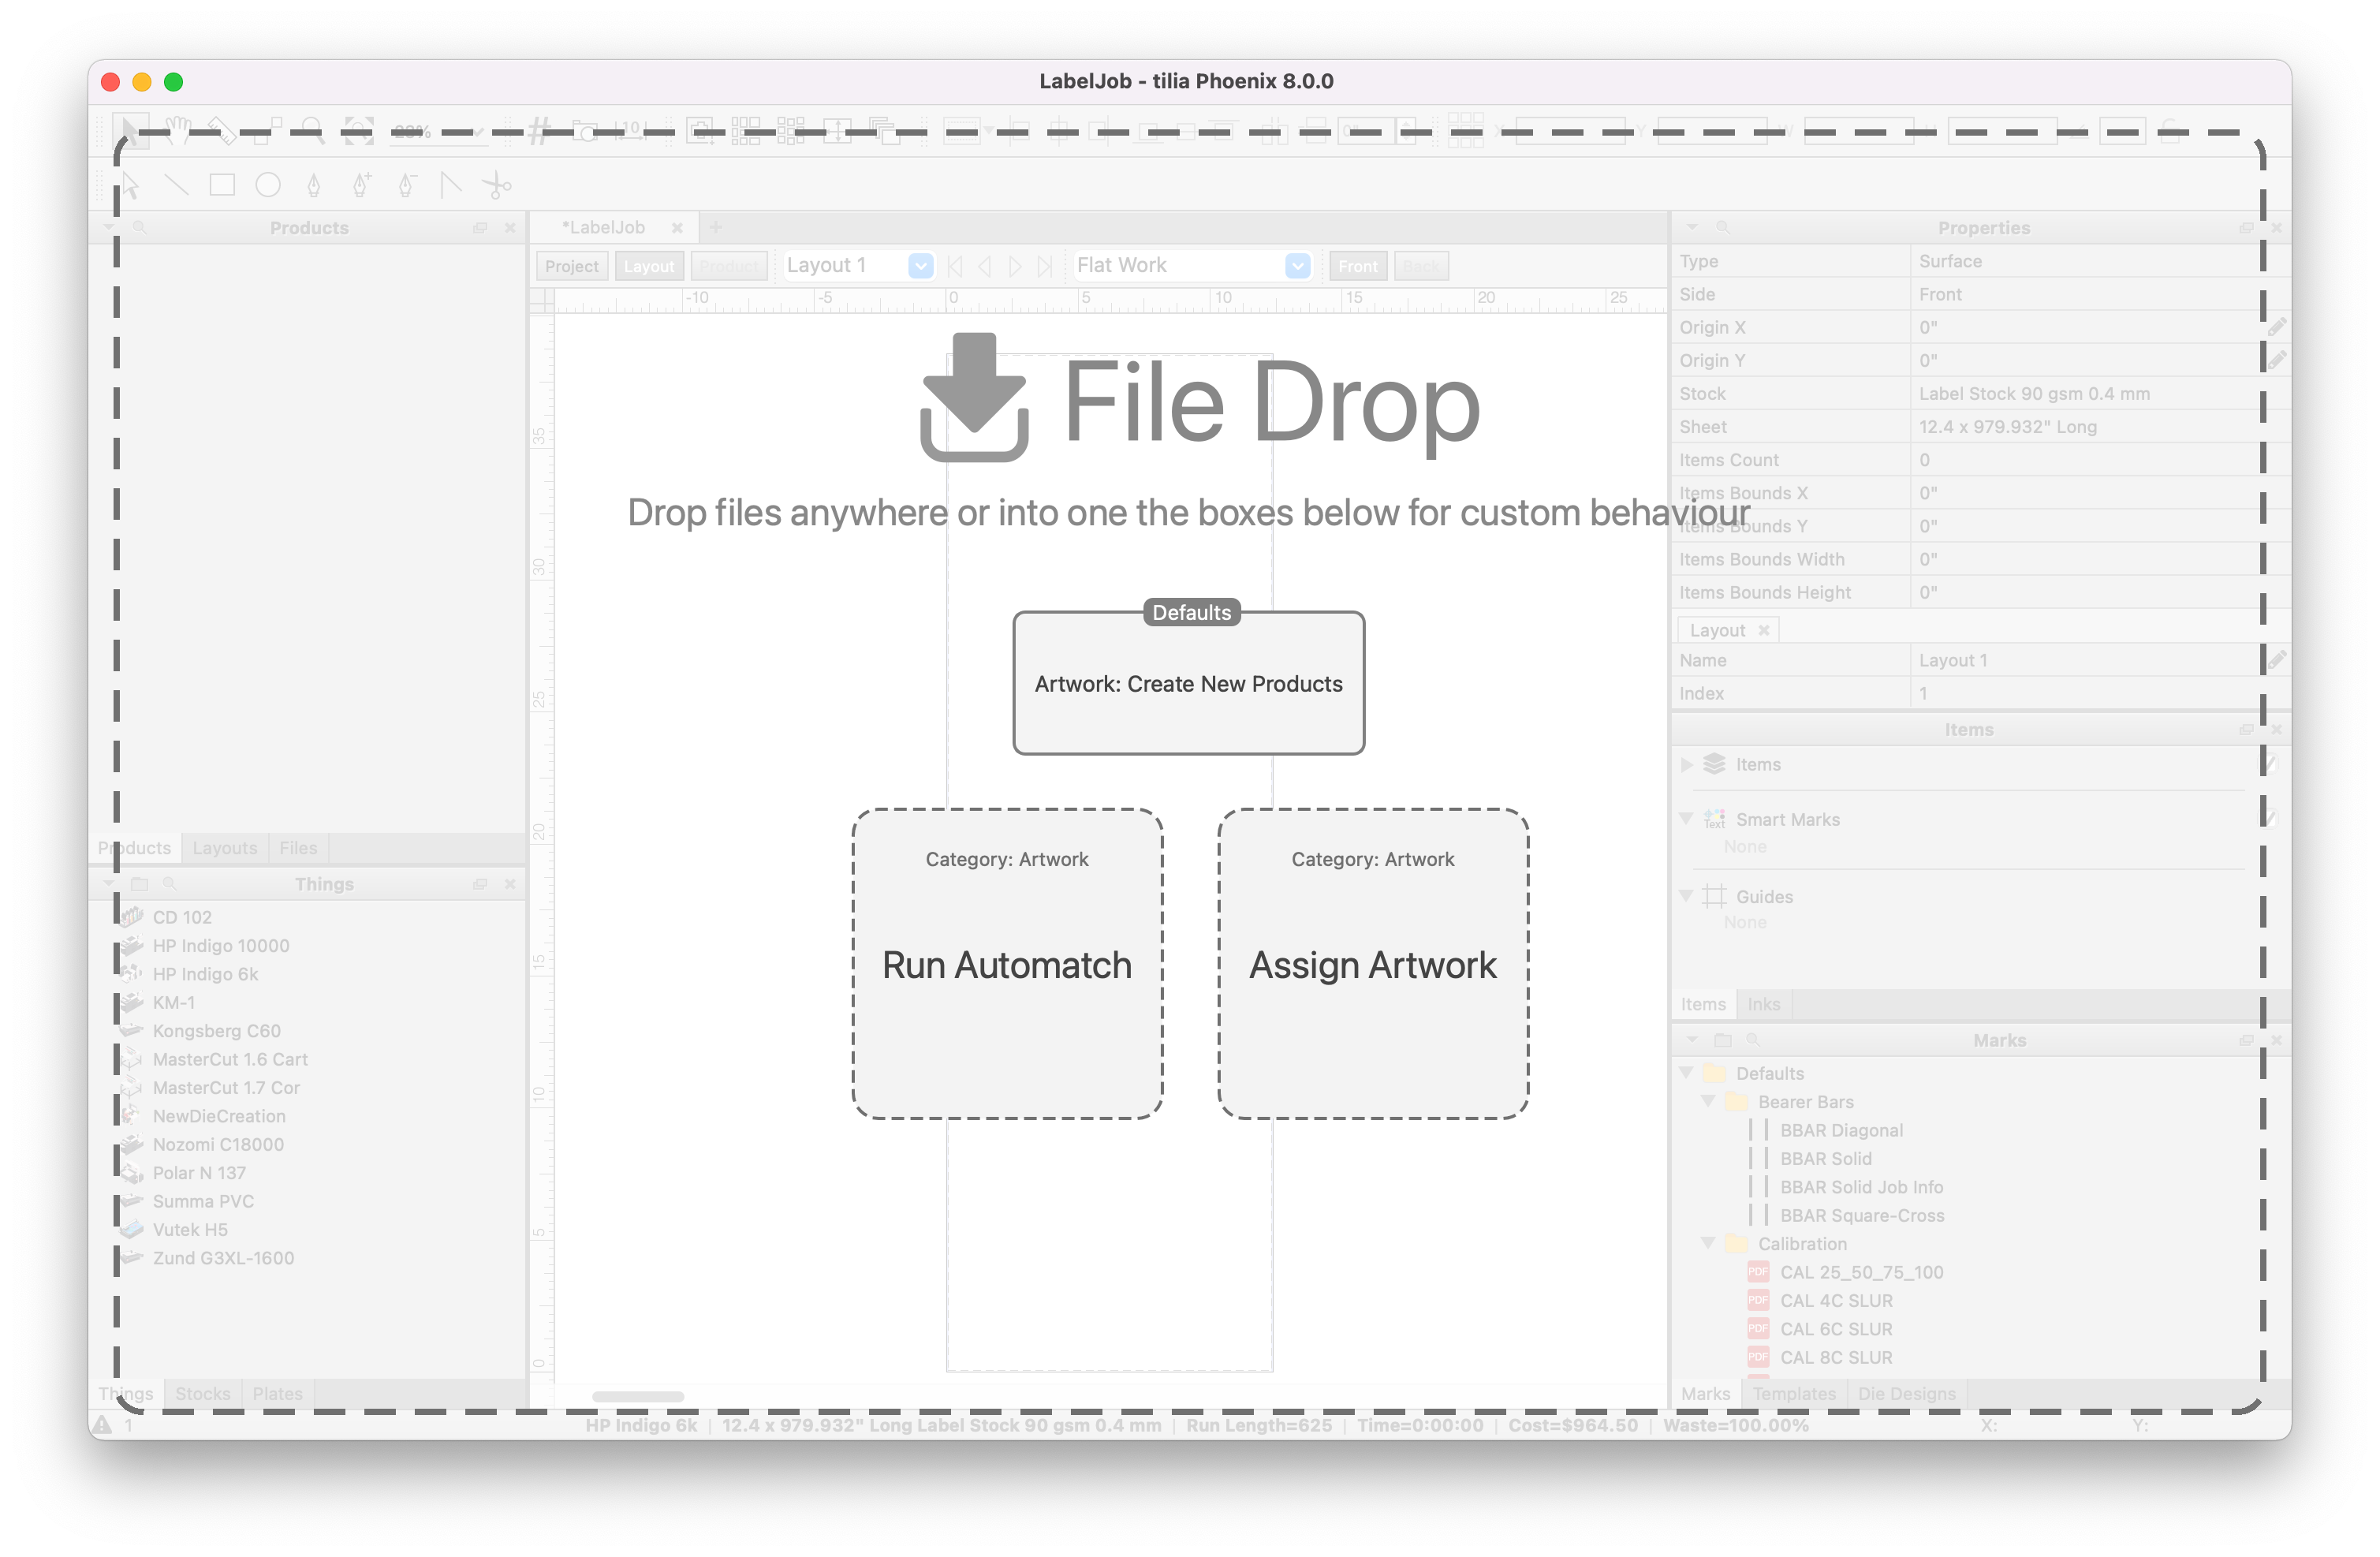
Now we want to add products to the layout. For this first example we’ll just grab the first 6 products. We can do this by simply dragging and dropping the first 5 pdf artwork files you downloaded earlier onto Phoenix. As you drag the files onto the Phoenix interface, you’ll see that you have different options depending on where you drop the files. For now, just drop the files anywhere other than the two boxes. We’ll use the default drag and drop behavior, which is to simply add the products to the project.
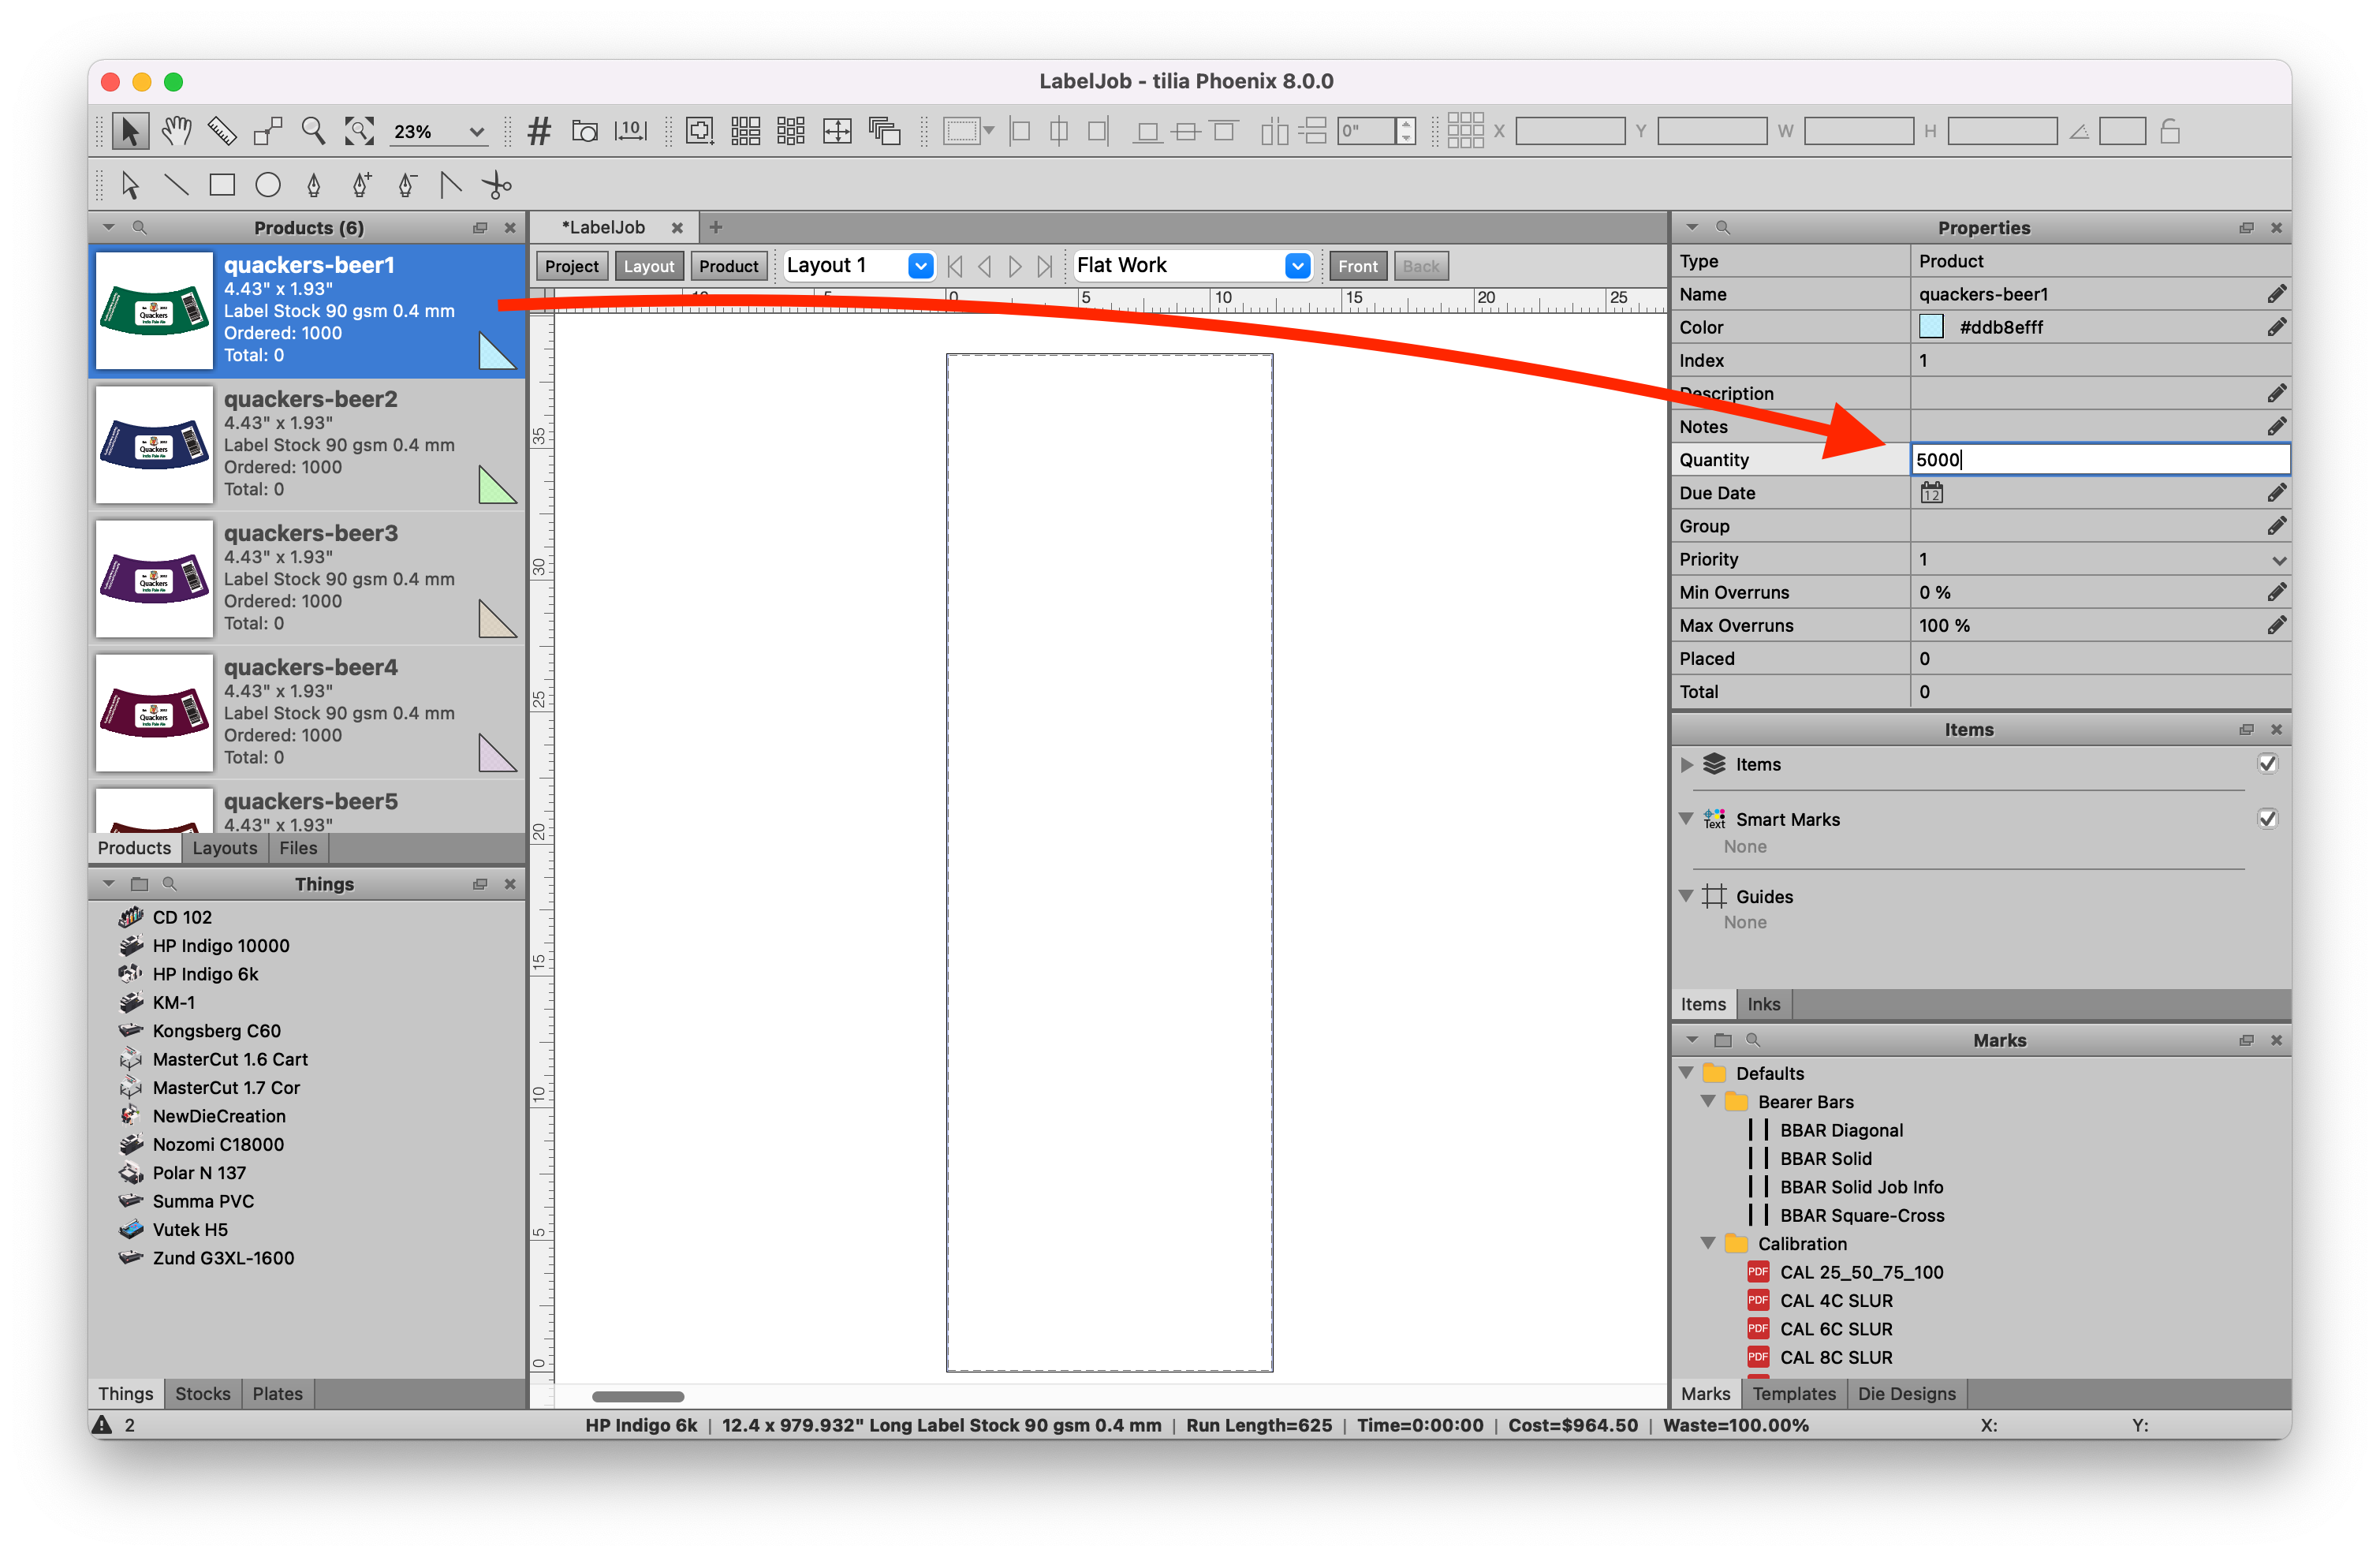
Click on the first product to select it, and then find the Properties panel on the right side of the screen. It now is displaying the properties for the product you have selected. Let's specify a quantity of 5000 and change the stock to Label Stock.
Repeat the same steps with the remaining labels. Note that you can select multiple products at once by shift+clicking the first and last products in a selection, or holding the control/command keys while clicking to add to an existing selection. With multiple products selected, you can change parameters for multiple products at the same time. Now the products have been added to the project, we have order quantity and stock defined, and we're ready to create a layout. Notice that there are many more product properties available to us, including bleed, grain direction, rotation, and more. For our example these aren’t necessary to set, but they all can have an effect on the way Phoenix creates layouts and are useful depending on your needs.
# Create a layout
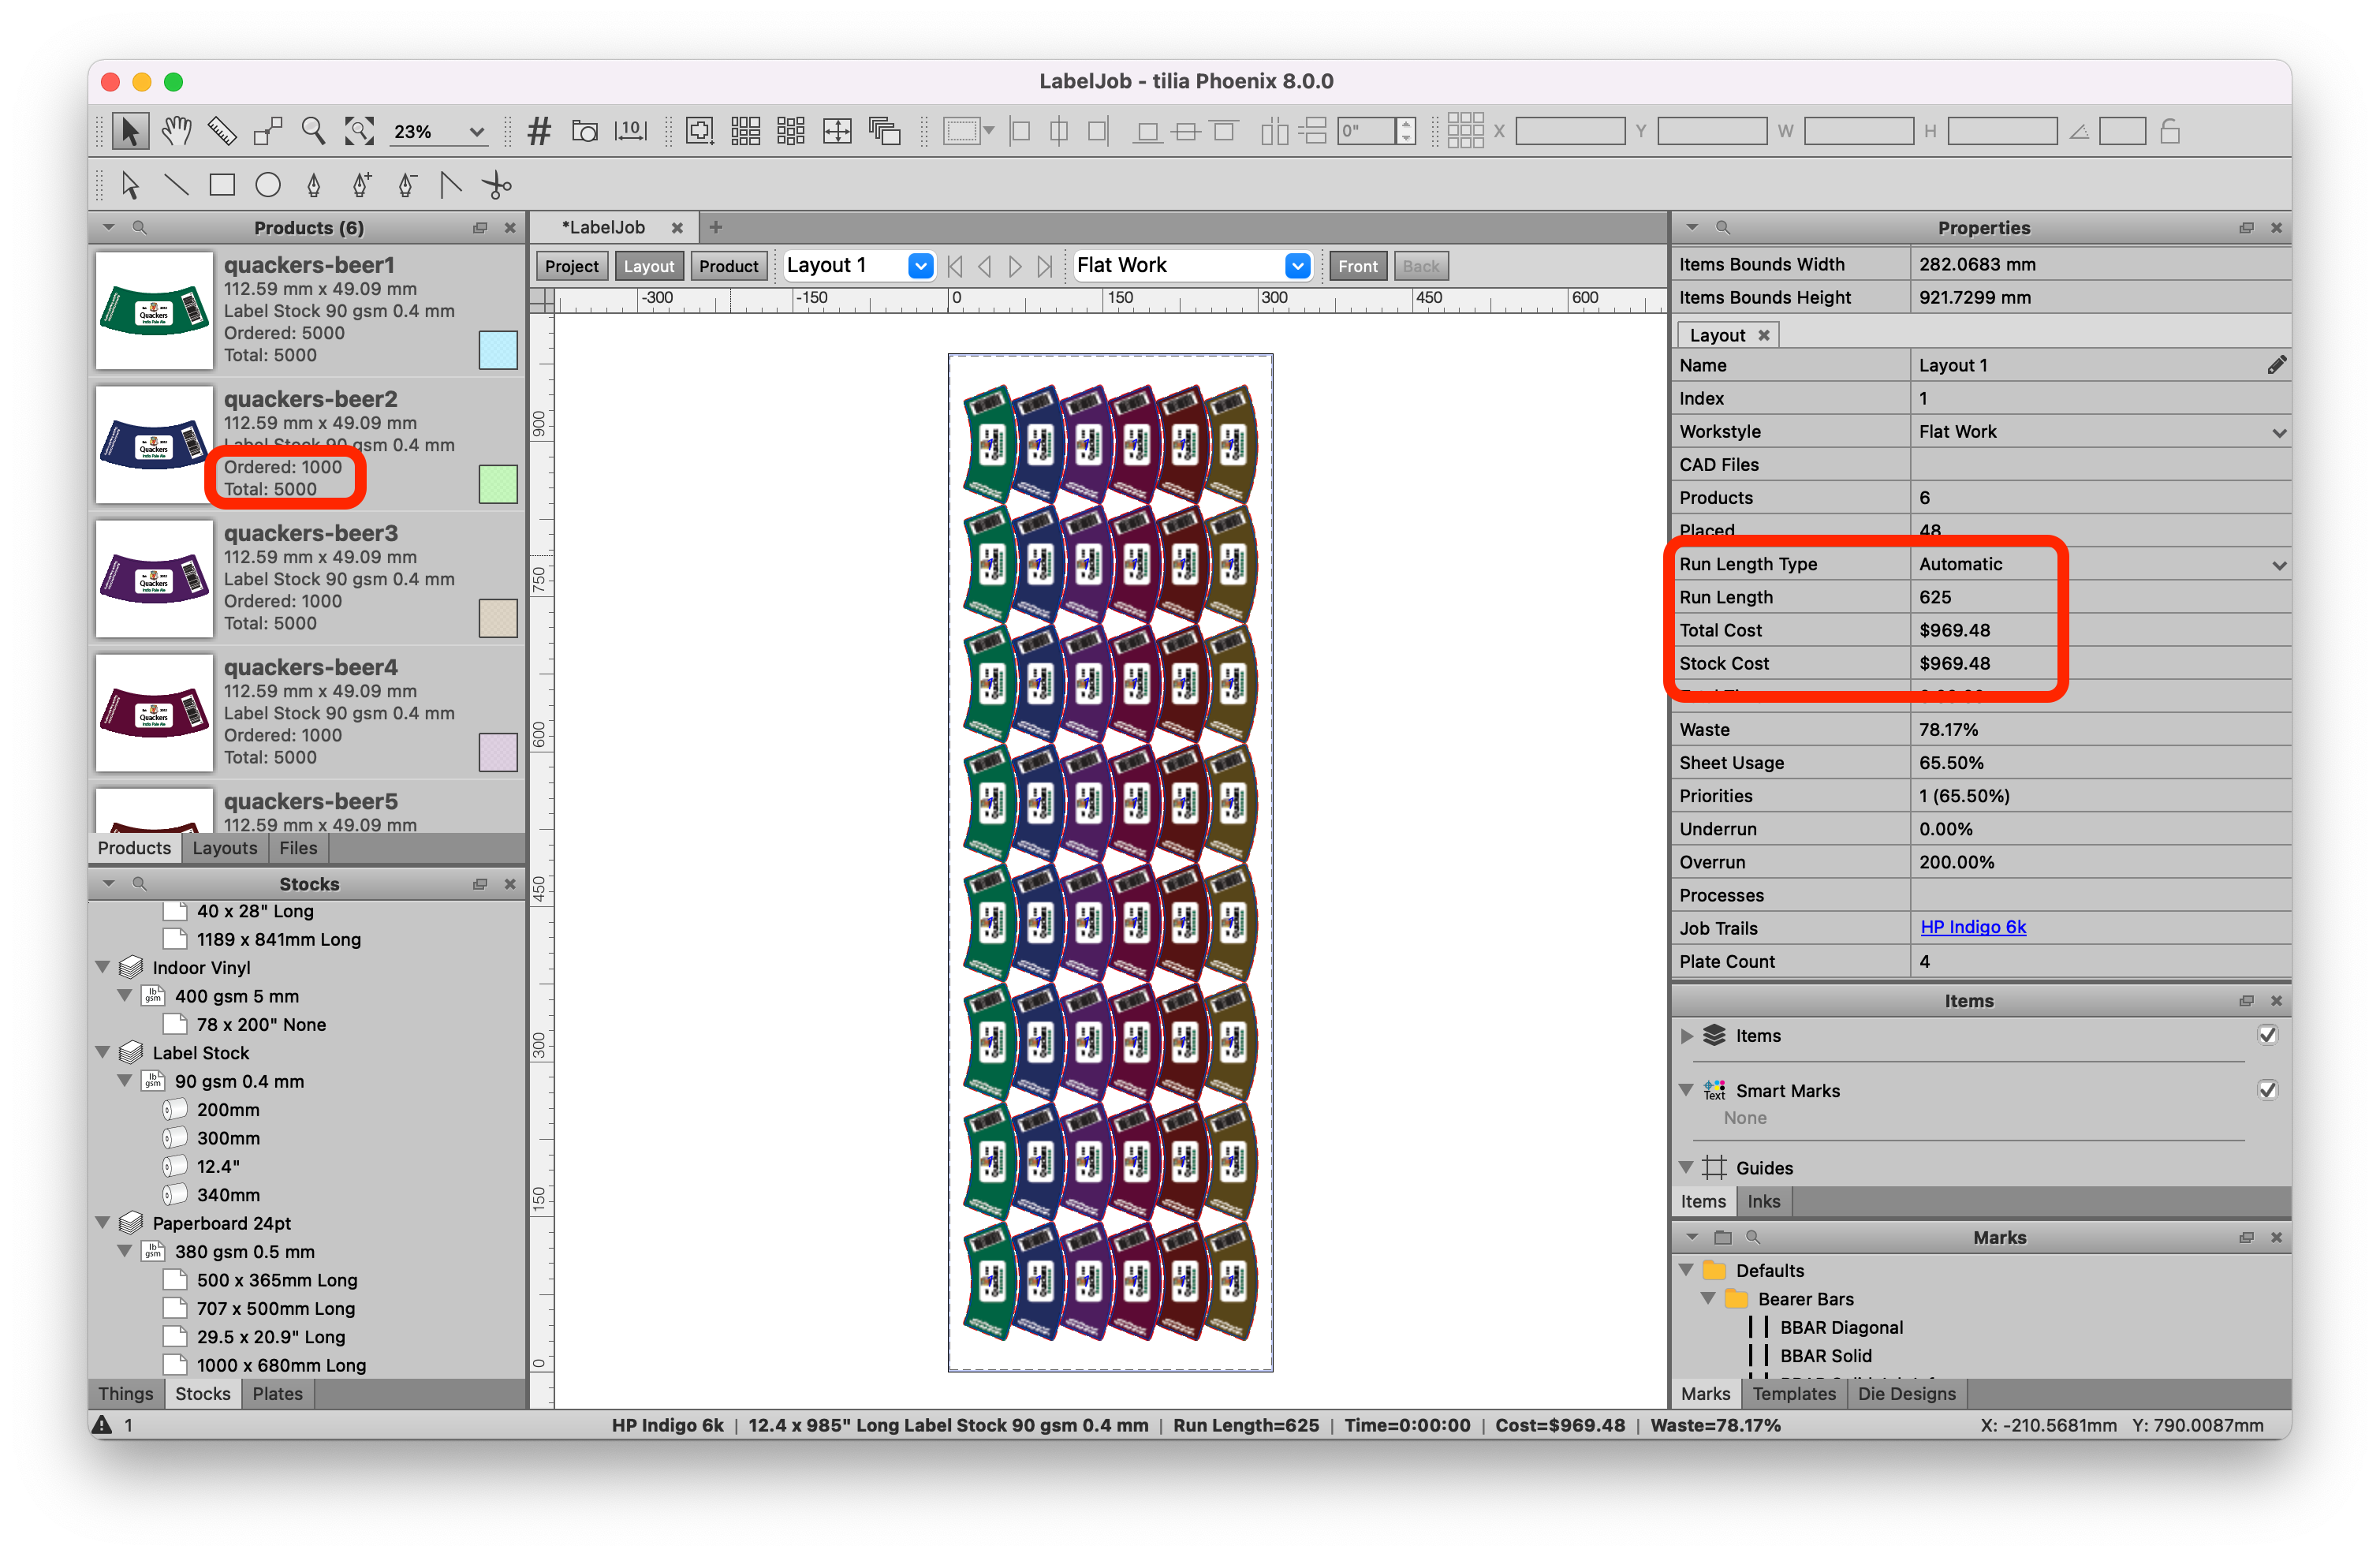
When the project was created, a blank layout was automatically added. You can see this in the Layouts panel as "Layout 1." You could create another layout, but we'll stick with this one. Notice that in the staus bar at the bottom of the window, there is no sheet size or press specified, and it shows "None." This means that there is a layout, but no actual sheet sizes have been defined and no press assigned. Let's fix that.
Navigate to the Things panel in the bottom right of the Phoenix window. Click and drag the HP Indigo 6k from the Things panel onto your Artboard. This assigns the press to this layout. You can see this in the status bar at the bottom, where it shows "HP Indigo 6k", and if you navigate back to the Project tab you’ll see the press listed in the “Things” column.
Now let's add a stock to the layout. Navigate to the Stocks panel and find the Label Stock. For each stock, there is one or more grades defined, and one or more sheets or rolls. For this example, the label stock has a grade of 90 gsm and different roll widths available. Click and drag the 12.4” wide roll onto the layout. You’ll see the layout has a size defined now, represented by a tall rectangle
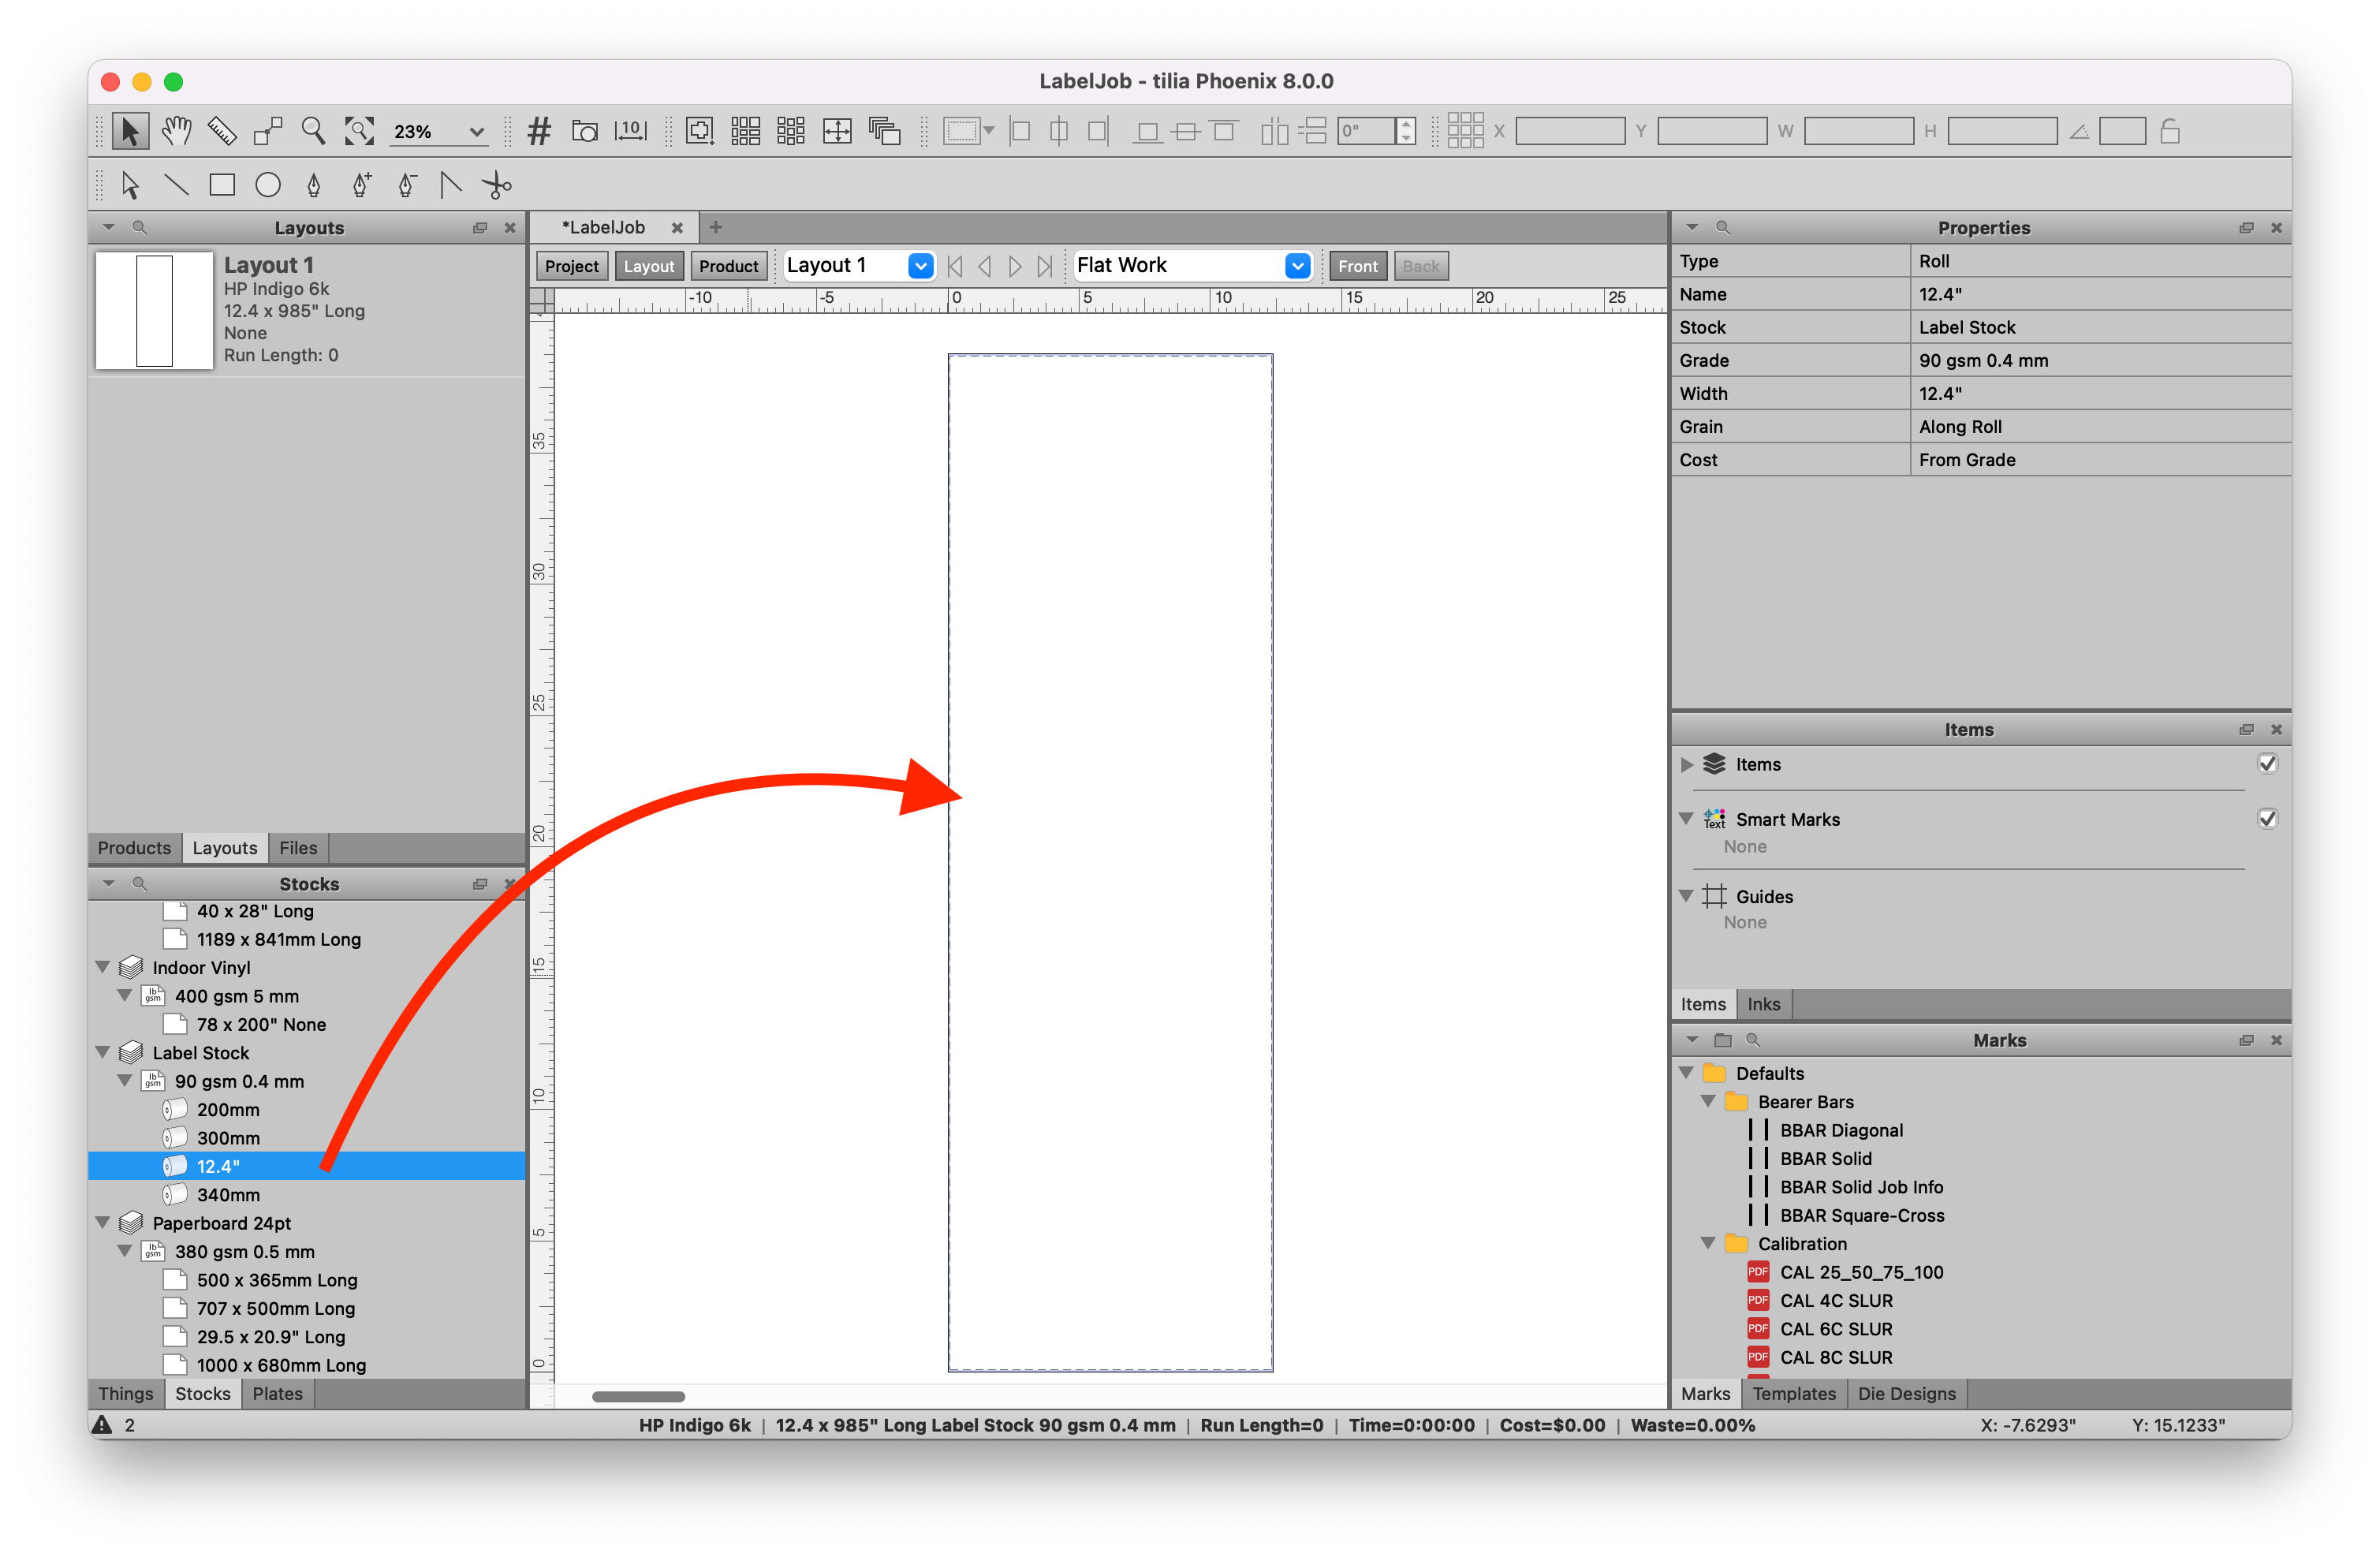
Even though the stock is defined as a roll with no set "height", the layout only shows a height of around 38 inches, or around 985mm. This is because the press assigned, the HP Indigo 6k, has a max height defined, so Phoenix is smart enough to know that the layout created cannot exceed the max height of the press.
Now we have our layout set up with the correct stock and press.
# Add your products to the layout
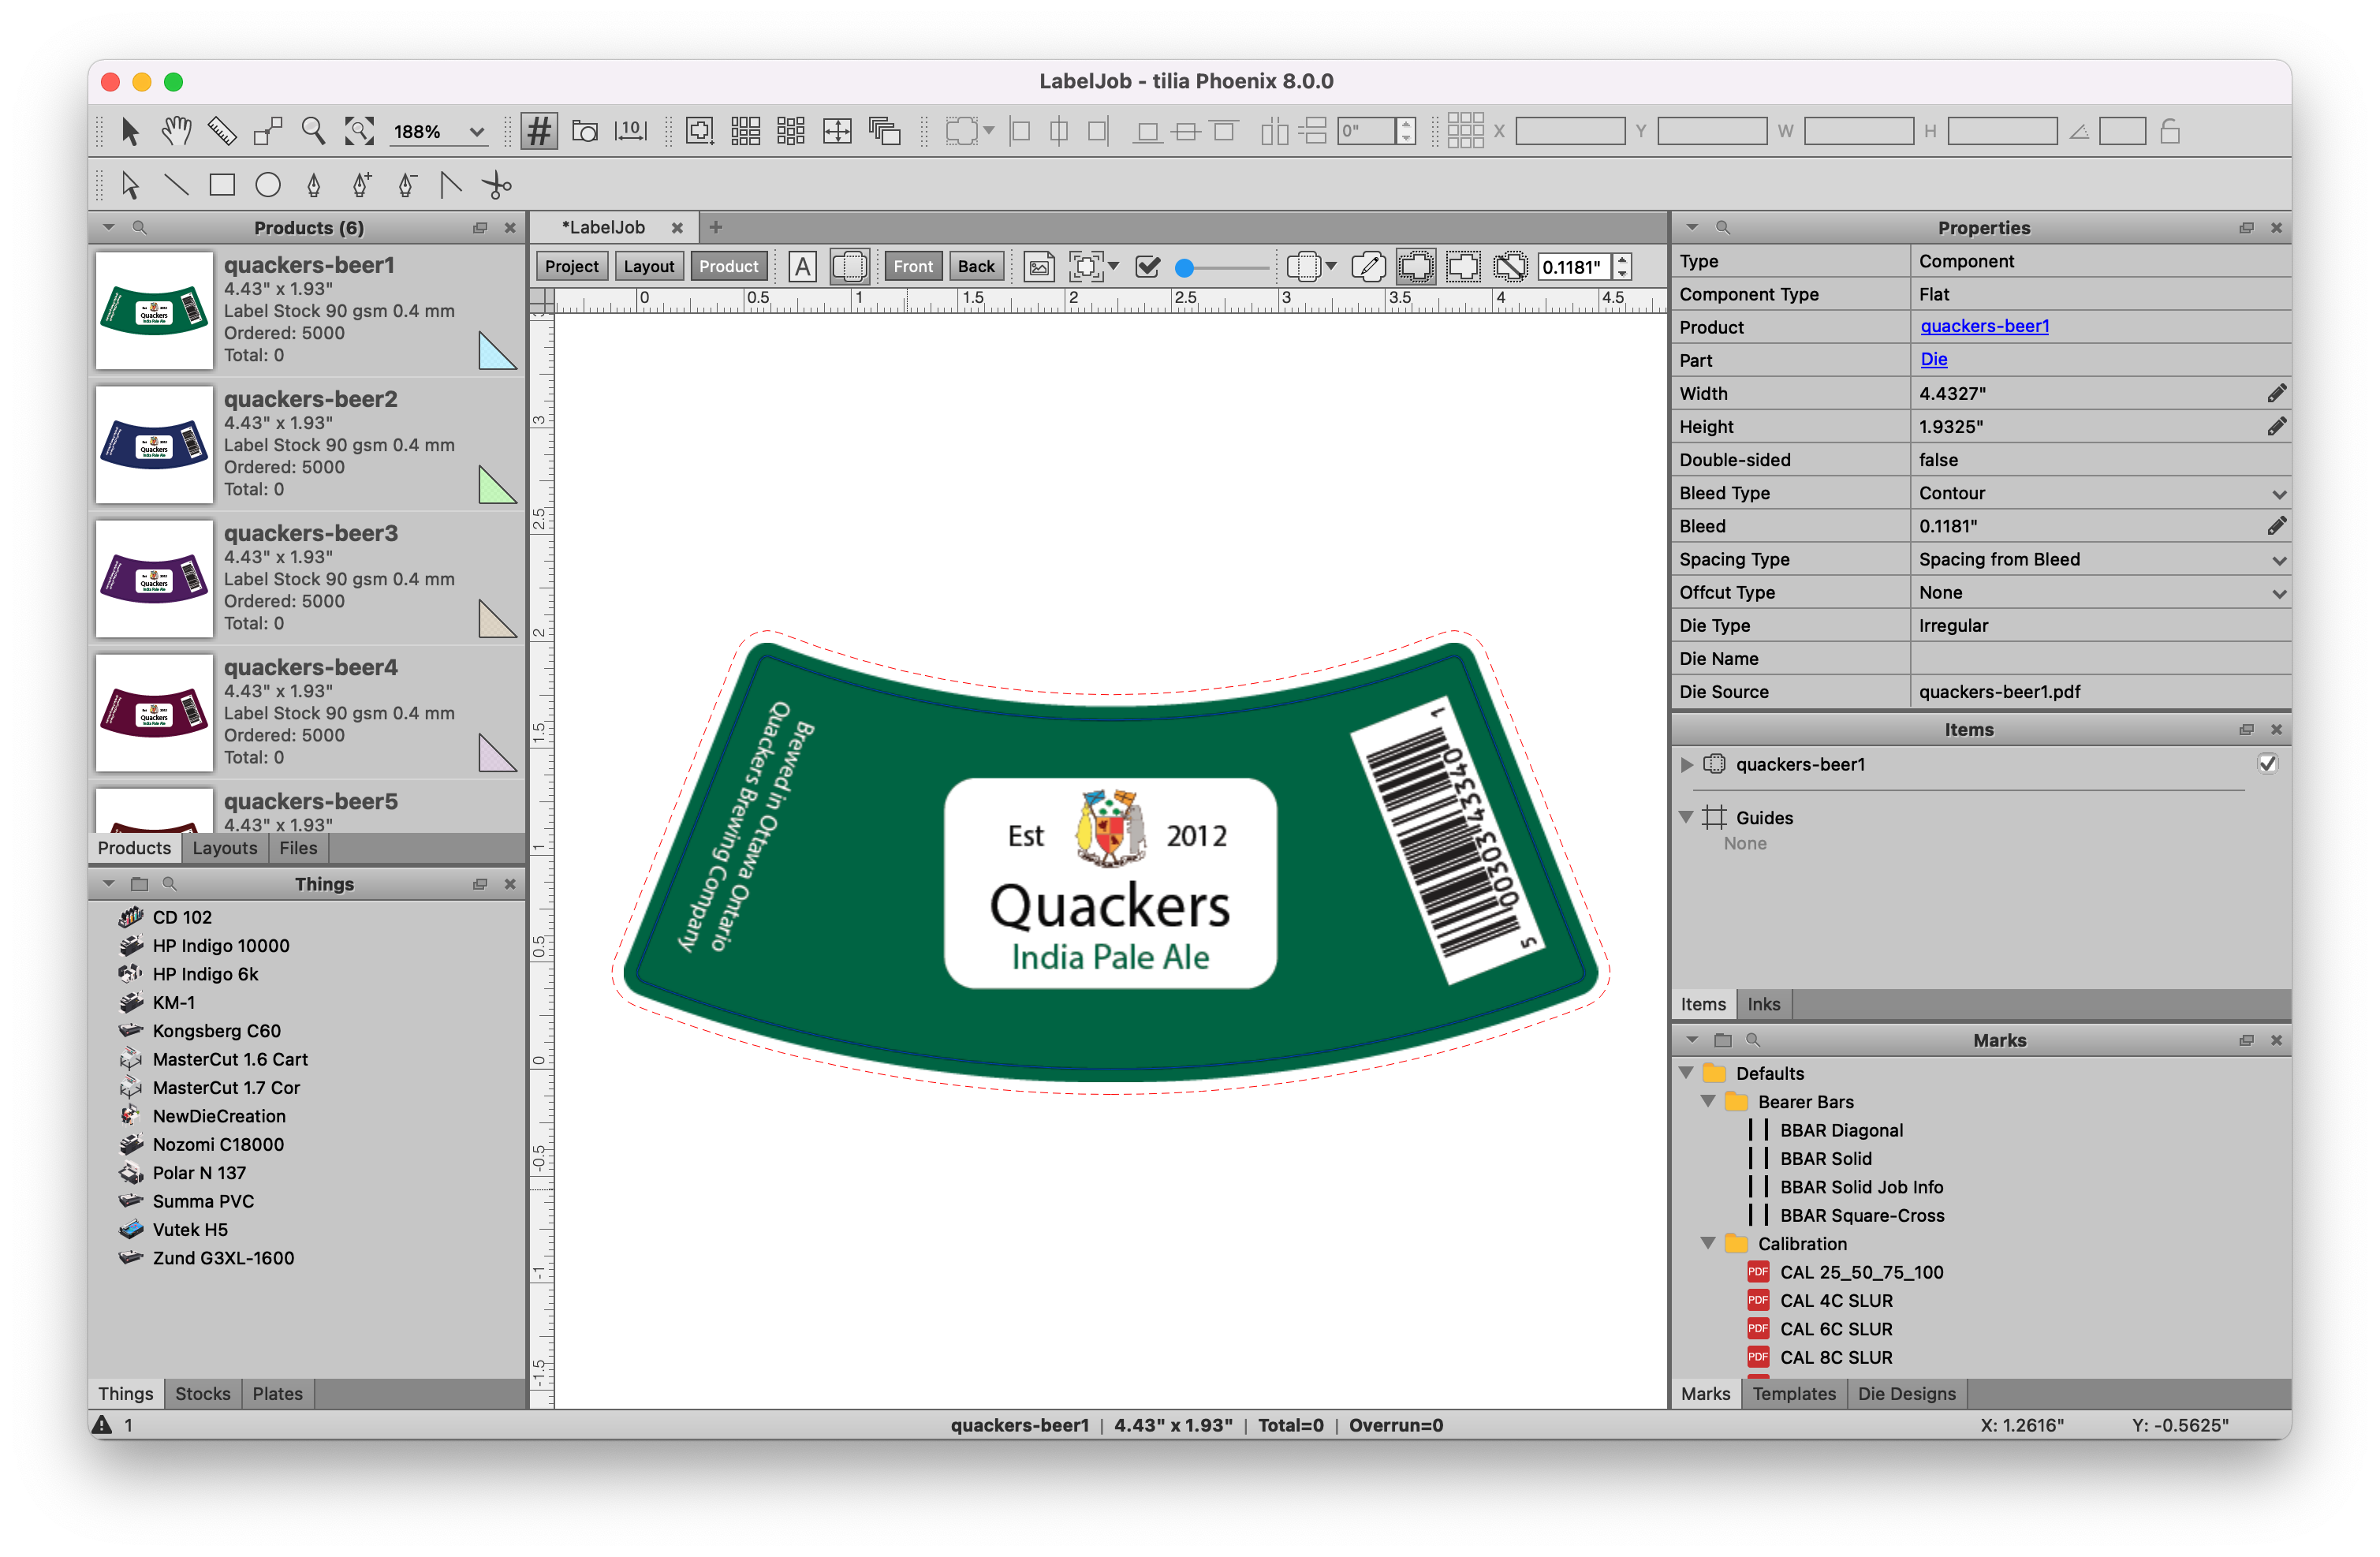
Drag the “quackers-beer1” product from the Products Panel onto the Layout. Now, rotate the product by either selecting it and typing in 90 in the rotation field in the very top right of the Phoenix window, or by clicking and holding one of the corners of the product and rotating it interactively. Note that if you’re interactively rotating, you can hold the shift key on your keyboard to restrict the rotation to 45° increments.
Now right-click on the product, or go to the Tools menu, and select “Step-and-Repeat” to show the Step-and-Repeat panel. You can click the “Apply” button on the Step-and-Repeat panel to create a repeat of the selected product with the current settings.
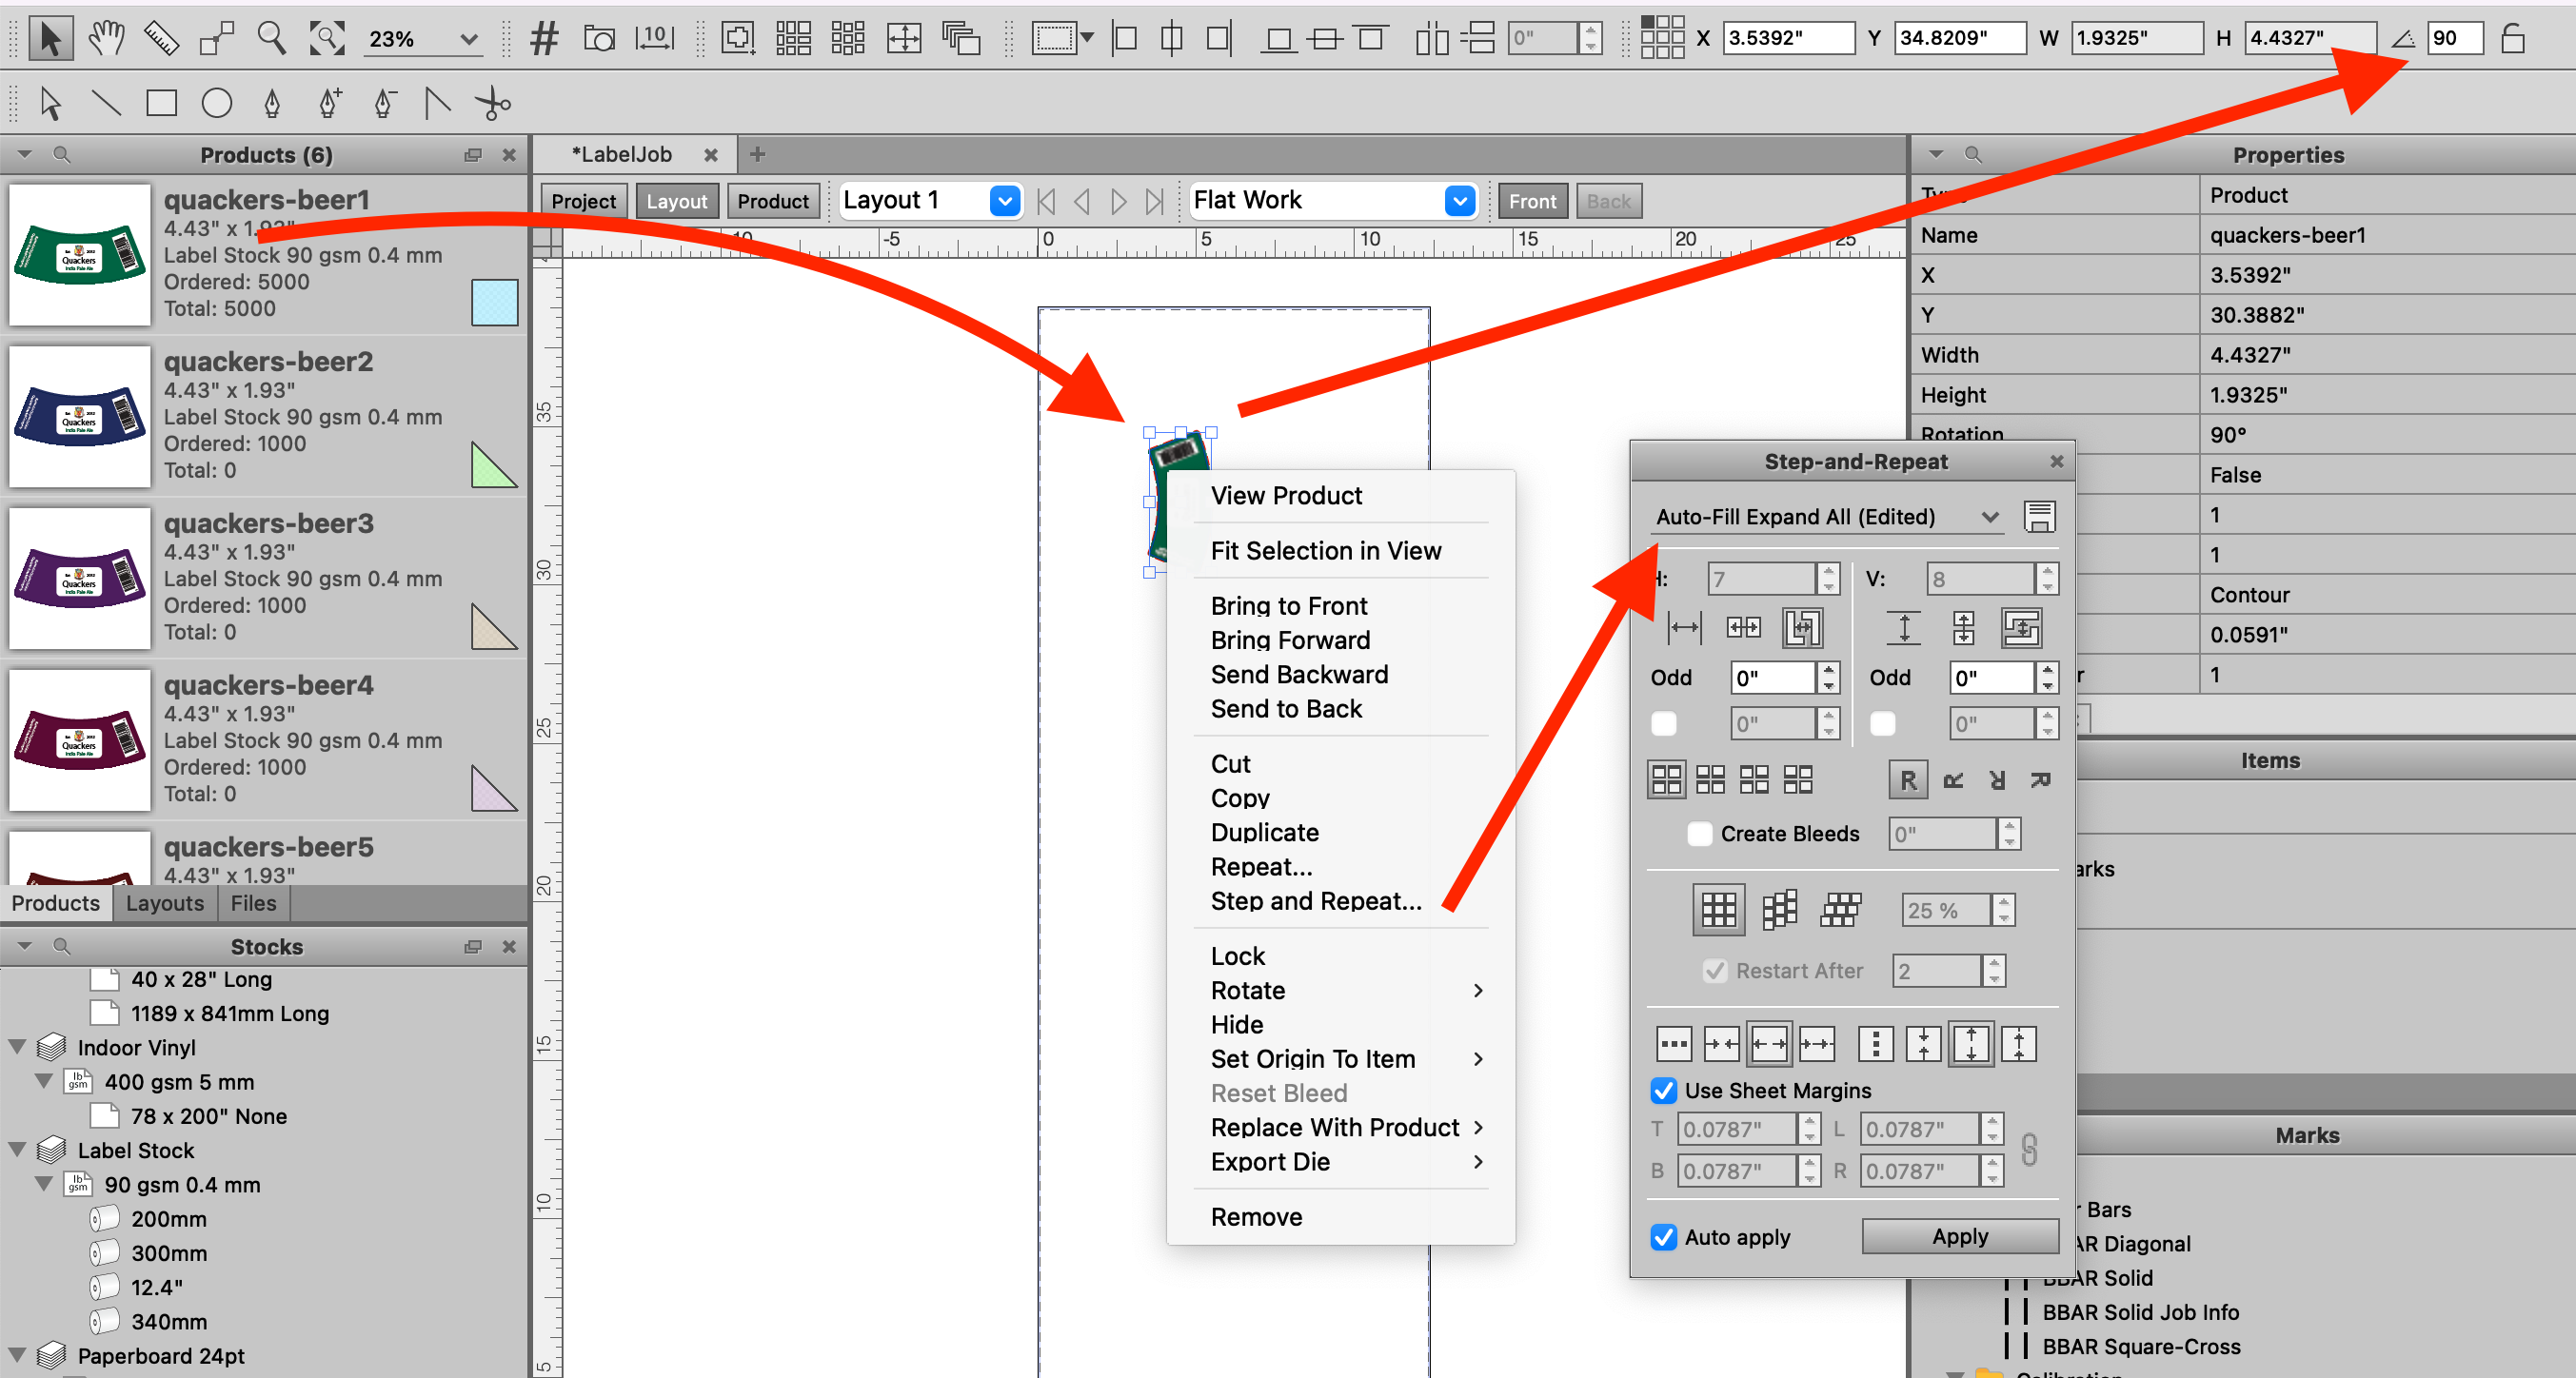
Click the drop down and choose “Auto Fill Pack Single-Cut” to turn on Auto Apply. This will use a preset to automatically fit as many products as can be placed on the sheet both horizontally and vertically, using the cut path of the artwork and no gap distance. Since this artwork has 1.5 mm bleed, change the step distance to 3mm both horizontally and vertically. If you'd like, play around with the other settings in the Step and Repeat tool to get a feel for what they do.
At this point the layout is complete with one product and should look like this:
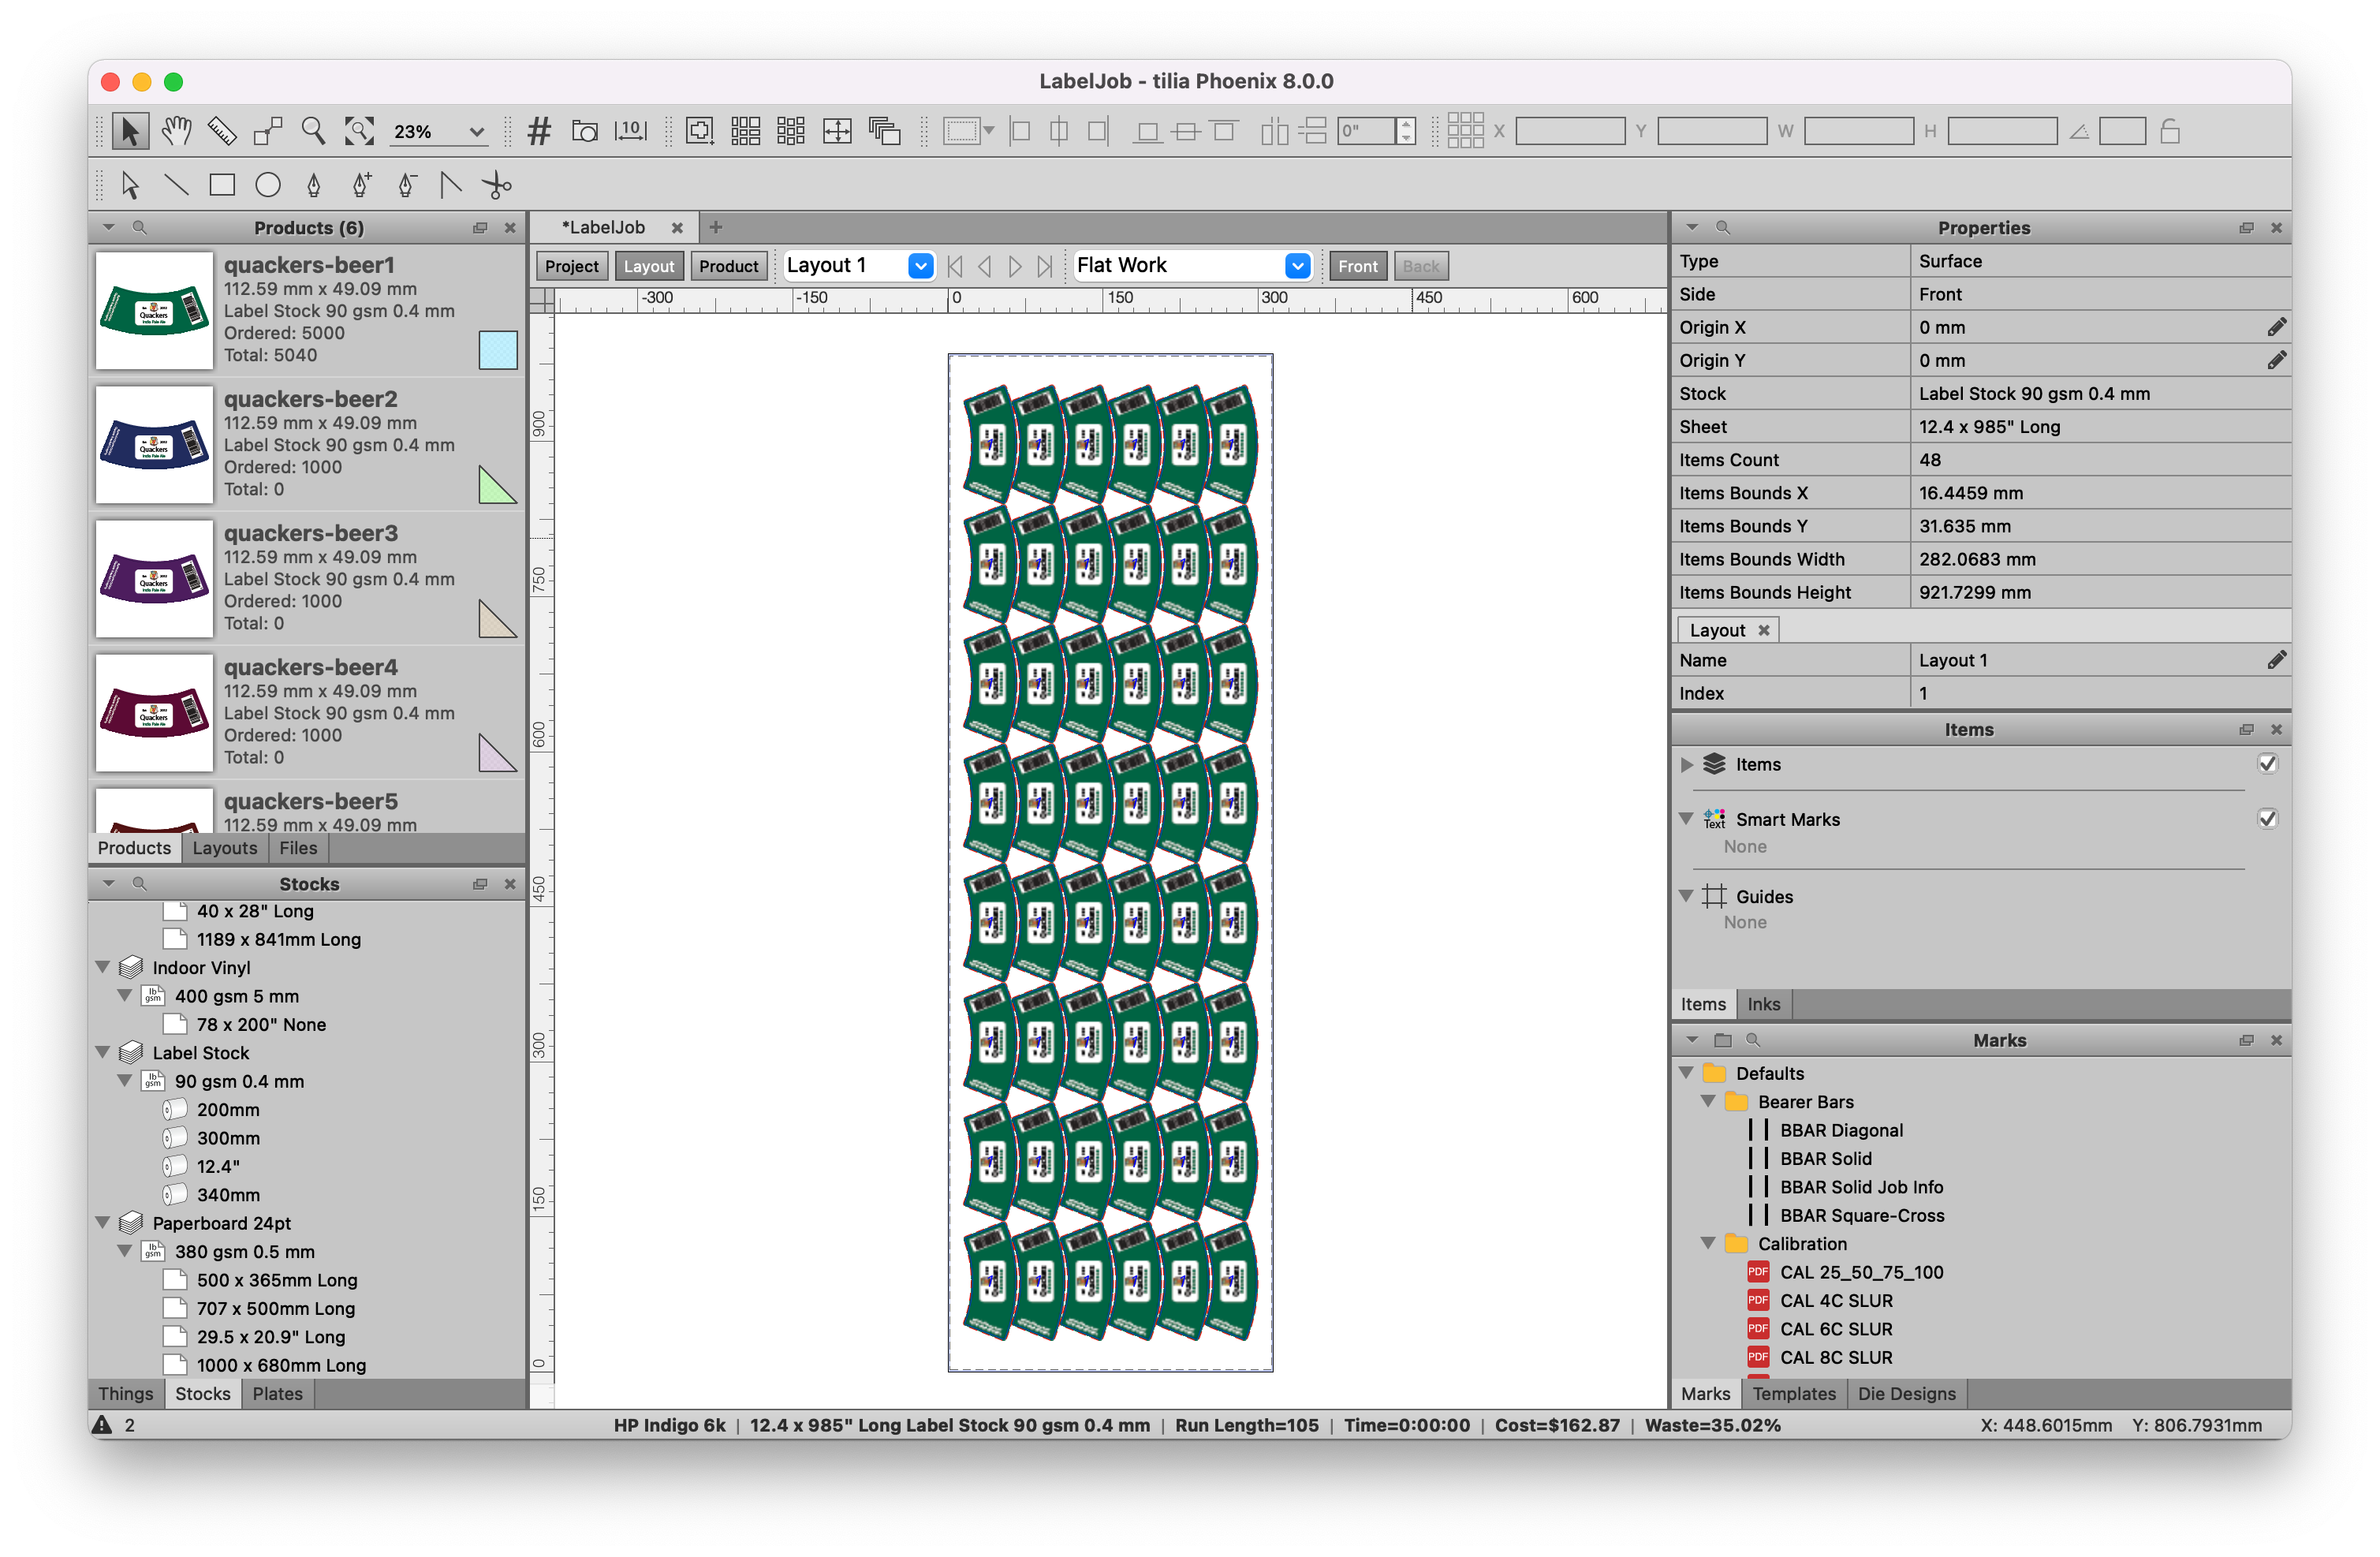
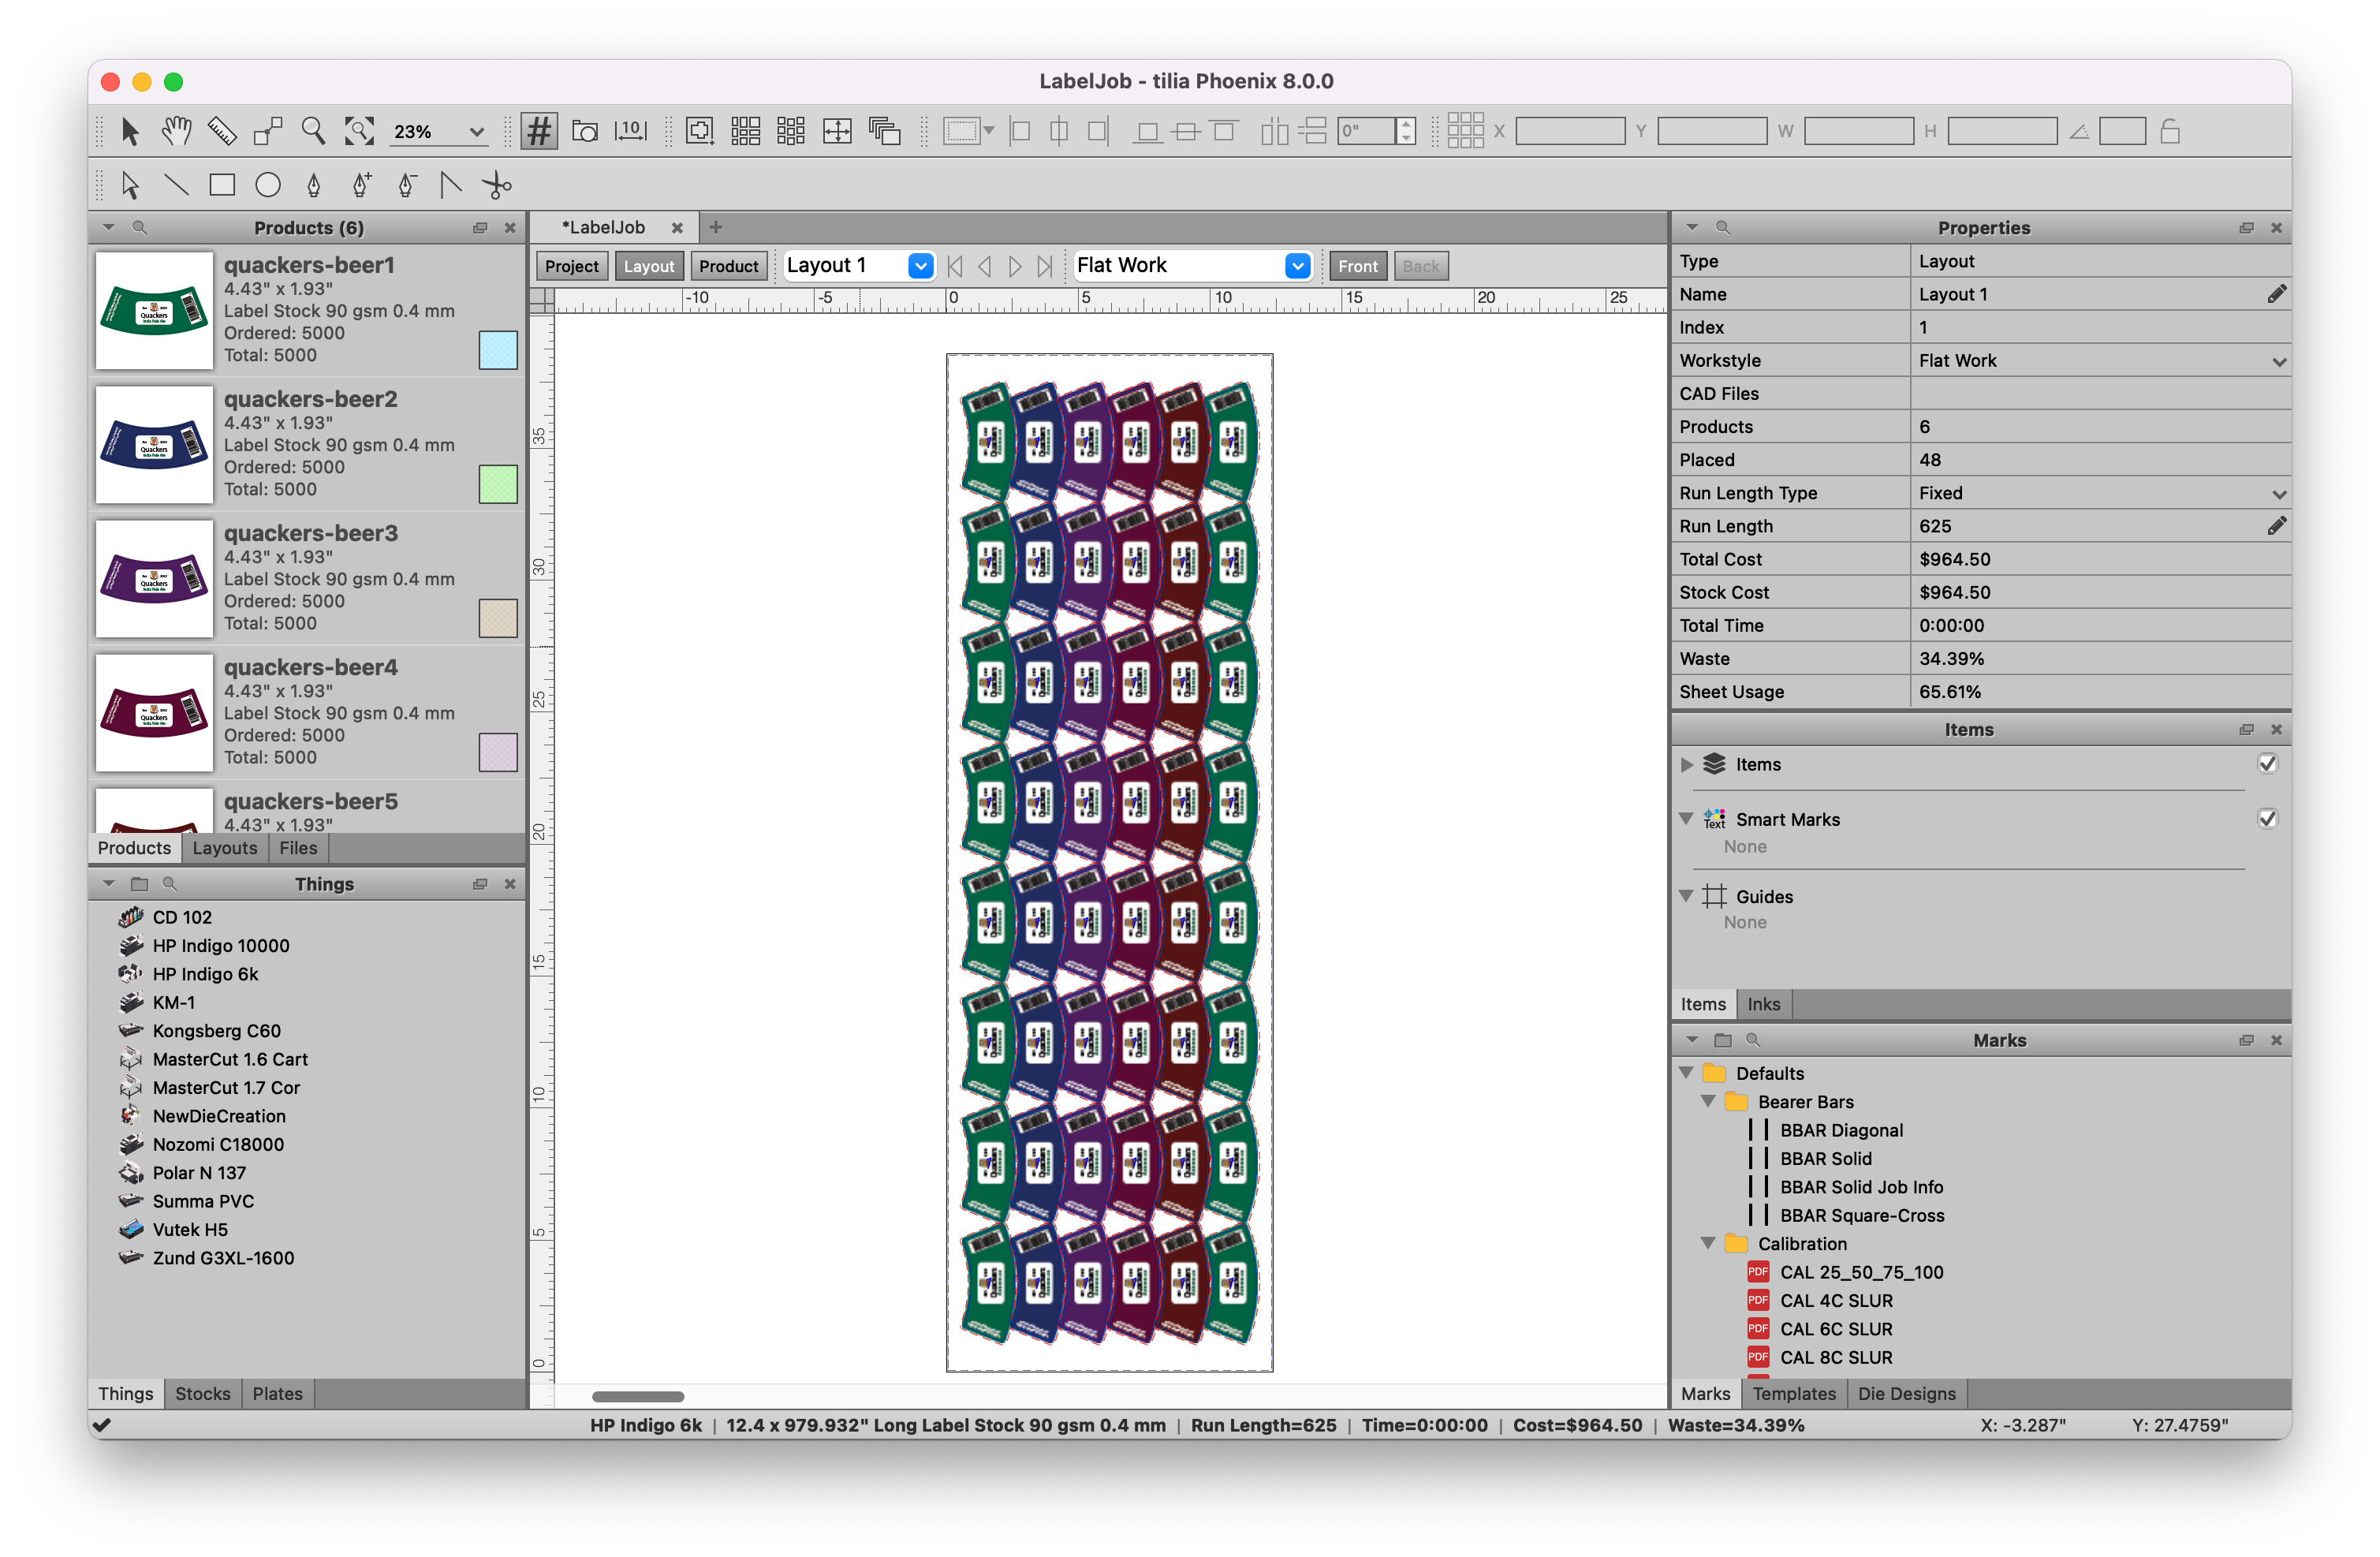
Now let's add the other labels to our step and repeat. Phoenix allows you to easily swap out products in a layout with drag and drop, so we’ll see how that’s done. Double click on the repeat to enter the repeat context so you can select individual items in the repeat. You’ll see a blue bar at the top of the layout window that indicates you’re currently looking at “Repeat 1” within the Layout.
You’ll notice that if you now click on the products, you can select an individual one instead of selecting the entire repeat group. Click and drag to make a marquee selection that includes the all but the first column of labels. Now, with those products selected, click on the “quackers-beer2” product in the products list, and drag and drop it onto your selection while holding the control/command key. When you release the mouse, Phoenix will replace the selected products with the “quakers-beer2” product. Repeat this process for the rest of the products so that each column of the layout has a different product.
Now that the layout is complete, let’s look at a few things:
The status bar at the bottom now shows a cost and waste for this layout
If you exit the context of the repeat by clicking the X in the blue bar mentioned earlier or double clicking on a blank spot in the layout view, you’ll be able to see the properties for this layout. The properties view now displays everything about this layout, including cost, run length, waste, and plate count. The run length is automatically calculated, but you can change this to be a fixed number and change the run length manually. If you do this, the cost and overruns/underruns will update dynamically.
In the Products panel, the ordered quantity is displayed as well as the total quantity as determined by the number placed on the layout multiplied by the run length.
# Export your project
Now that the layout is finished, we need to export it.
Go to the File menu, click on "Export for Printing" and choose "Imposed PDF..." In the resulting export dialog, choose the Factory Default PDF Export and click OK. Now choose where to save your PDF.
You can similiarly export a file for cutting if you need to create a die or send a cutting PDF, CF2, DXF, or ZCC file downstream.
Lastly, export a PDF report of the project. Go to the File menu, click on Export Report and choose PDF... You can modify the settings if you'd like, and then click OK to create a report. Save the report, and then open it.
Here you can see the details of the project. On the first page you can see total run length, cost, waste, sheet usage, and more, along with a breakdown of each layout. After the overview, there is a layout by layout breakdown with a preview of the layout, followed by an overview of each product in the project.
# Save layout as a template
Now that we’ve manually made this layout, we can save time by saving it as a template for use in the future. Navigate to the Layouts panel, where you can see a list of any layouts in the project. Since we only have one layout, right click it, and choose Save as Template, and give it the name QuackersLabel. This will save the layout as a template to our Templates library for later use. You can browse all template in the Templates panel which should be in the bottom right of your Phoenix window, or available via the Window > Templates menu.
# Creating your first project with Imposition AI
Now that you have a basic overview of creating a project manually, we'll go through a much faster and efficient method using Imposition AI.
# Create a project
Go to the File menu and select New Project, or press Command/Control + N, to create a new project and name it LabelJob-ImpositionAI
# Add Products with CSV
This time, instead of dragging and dropping the PDF artwork directly into Phoenix, we'll use a CSV file. This CSV has the product parameters already predefined, making for fewer steps in Phoenix. Phoenix can map data from the CSV into any product parameter.
Drag the downloaded CSV into Phoenix to import the products. You'll notice the parameters are all mapped correctly, and the order quantity, file name, and stock are properly assigned.
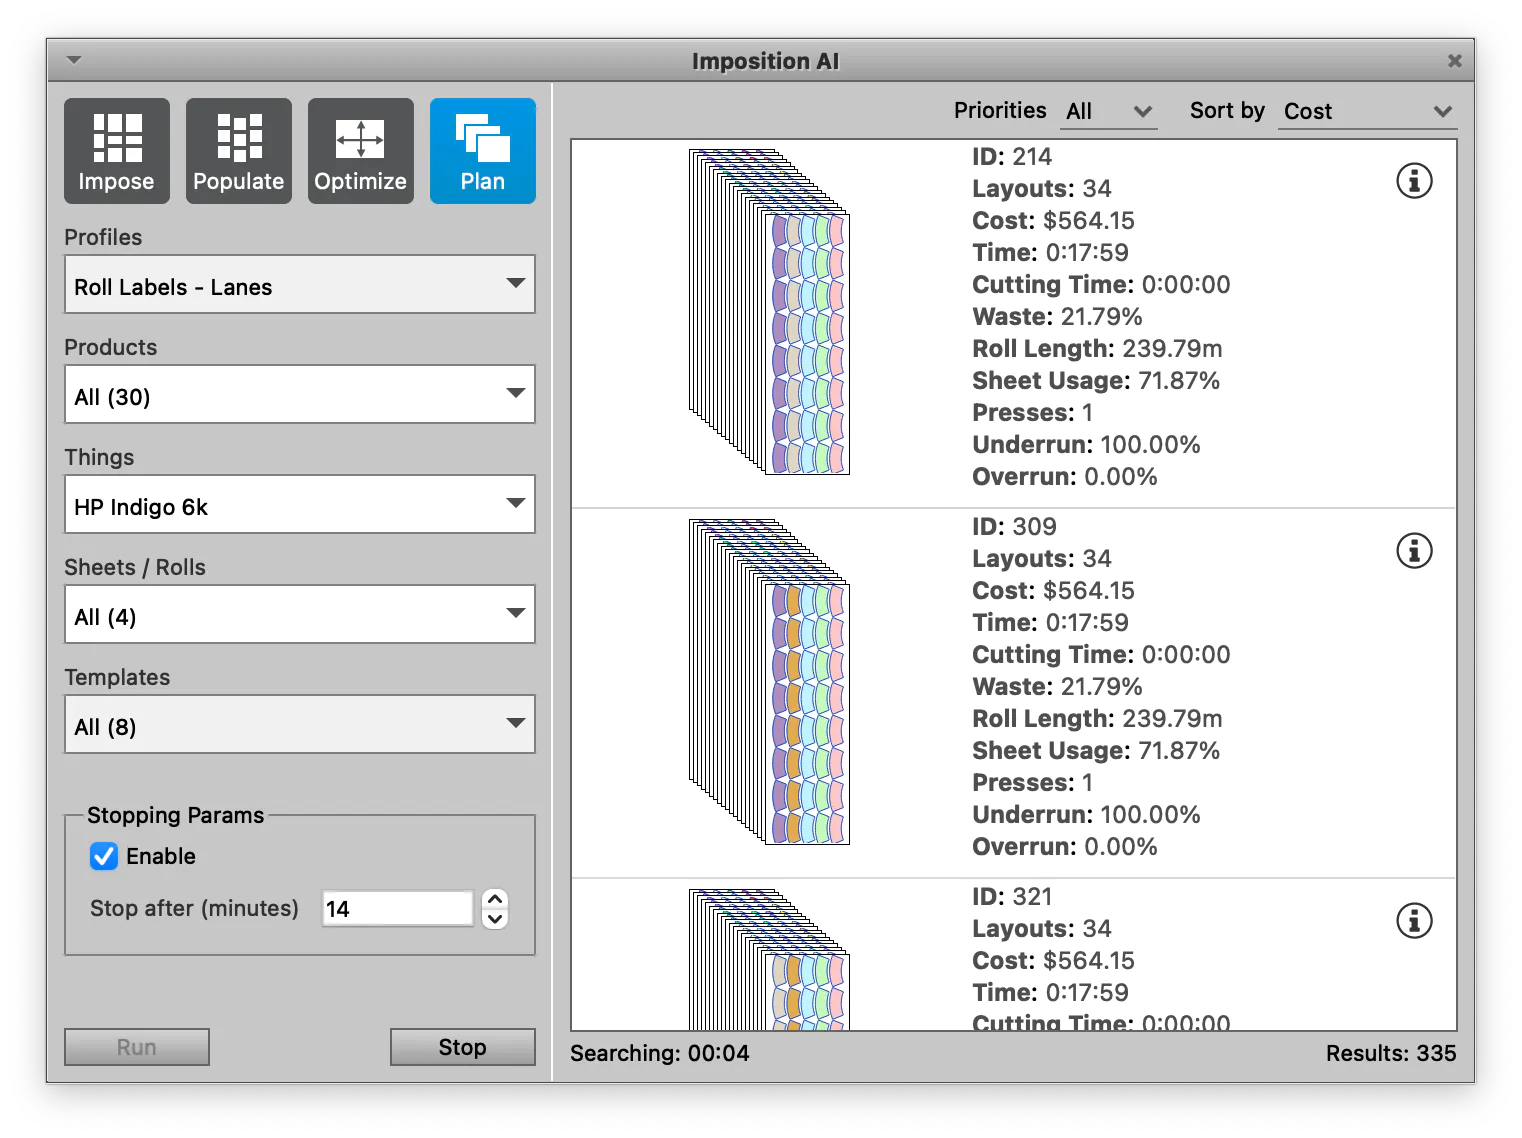
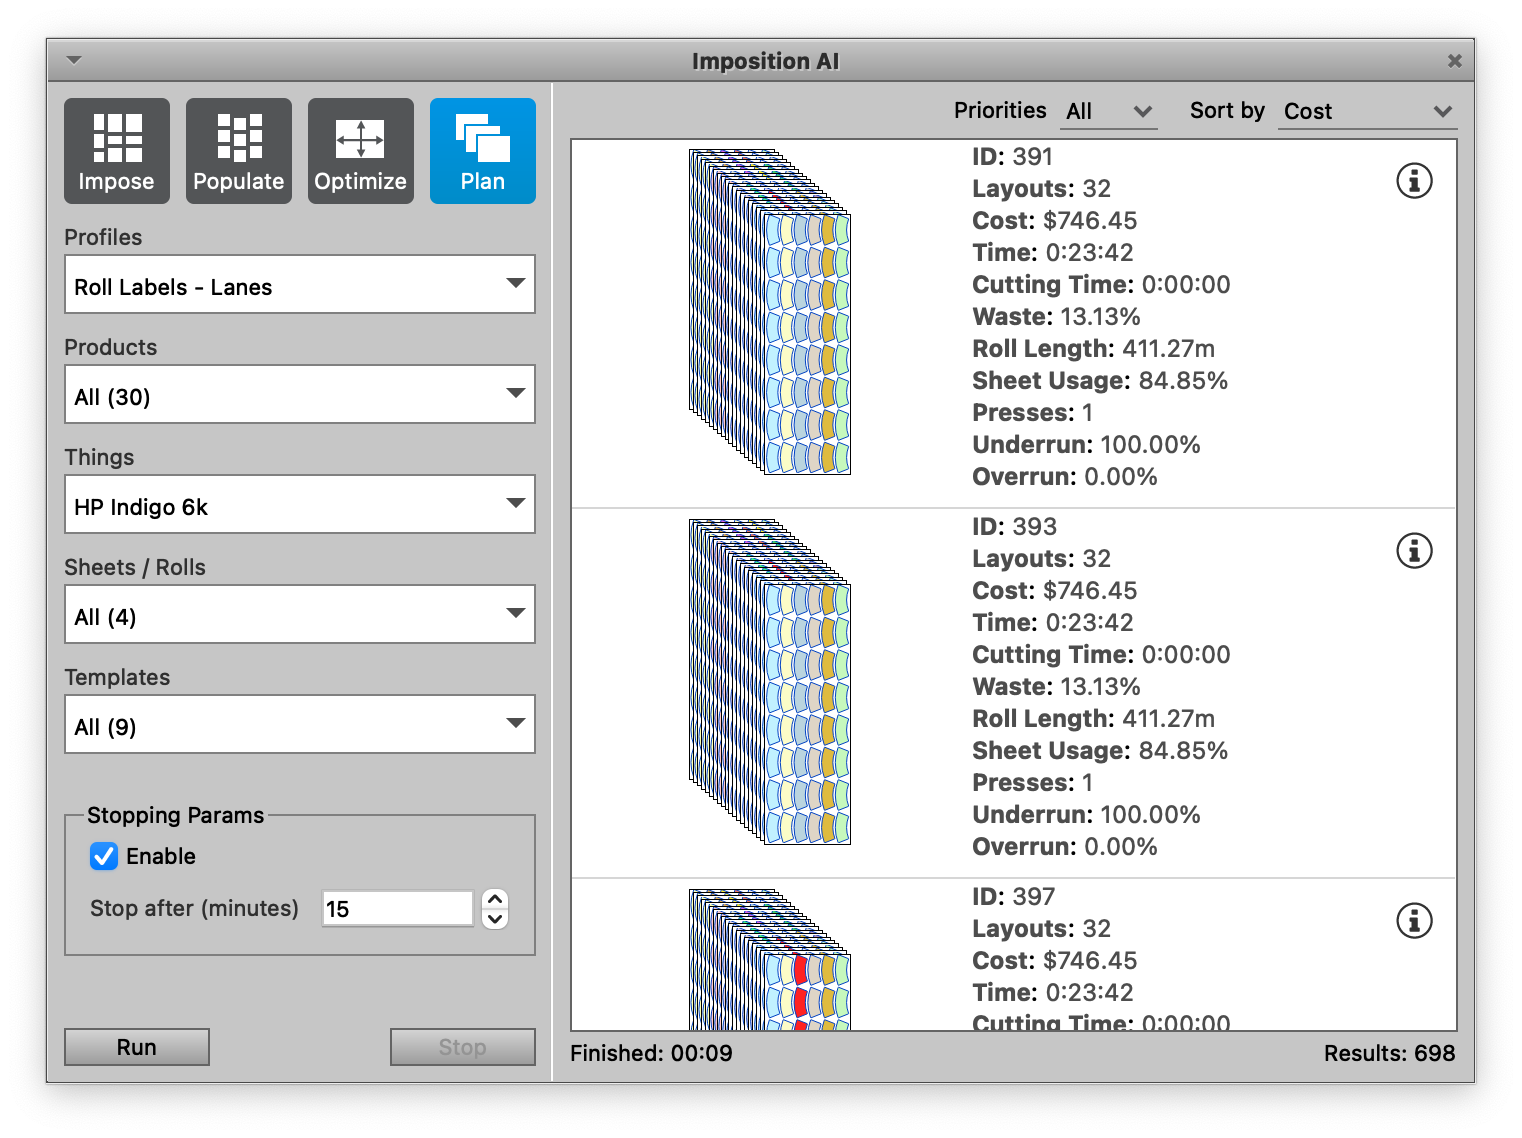
# Run Imposition AI
Now, Phoenix already knows what stock the product needs to be placed on since the information was in the CSV. It also knows your production capabilities since the presses and stocks are predefined. So, Phoenix is now equipped to automatically find the best layout for you!
Navigate to the Window menu at the top of the screen and choose Imposition AI. Click the "Plan" option at the top of Imposition AI, and then choose the following settings:
- Profiles: * Roll Labels - Lanes
- Products: Select All
- Devices: * HP Indigo 6k
- Sheets/Rolls: Select All
Now click Run. Phoenix uses the parameters above to find the best possible layout using all available sizes of that stock that will fit the selected press and the possible options with the two presses specified. You can play around with other settings here if you'd like, and see what a different press could do, for example.
Note
Imposition AI Profiles allow you to set parameters around how Imposition AI finds results. Feel free to click the pencil icon next to a profile name to see the available options, or visit the documentation for Imposition AI to learn more.
One of the options within a profile is to evaluate any existing templates to see if the products match the template and can be used. This is where you might use the template we created earlier to automate this, if, for instance, you were trying to use the template to ensure the products match on a particular die.
After clicking Run, Phoenix will return potential layouts on the right side of the window. You can click on the (i) for more information about the result, or just double click to apply. Once you're ready, double-click the top result to apply it. Now you will see that Phoenix shows you the Project view, which is similar to the exported Project Report from earlier. This shows you the details about the Project. You can navigate back to the Layout View by clicking on the "Layout" button. This layout is still editable, so you can add or remove marks, or change the products in the layout however you see fit. You can navigate to other layouts by clicking the arrows at the top of the main window, selecting a specific layout from the dropdown menu, or navigating to the Layouts panel and choosing a layout.
Finally, you can export your project by navigating to the File menu and choosing Export for Printing, Imposed PDF... as you did earlier.
# Learn more in our complete user guide
We hope you learned something in this incredibly quick overview of making a project, but there is so much more to Phoenix! For example, you can:
- Automate Phoenix with hotfolders, Enfocus Switch, or our REST API
- Create and edit custom marks
- Work with multipage artwork
- Control bleed overlaps
- ...and so much more!
Get a jump start on Phoenix with our demo library and files!
| Demo Library | Download .phxlib (opens new window) |
| Demo Files | Download .zip (opens new window) |
Check out our Phoenix Webinars (opens new window) to see how we use these demo files.