# Keyboard Shortcuts ⌨️
Phoenix is built for speed. This section outlines the many shortcuts in Phoenix that can dramatically cut down the time it takes to build print-ready layouts in Phoenix.
# Toolbars
The tools in the main Toolbar are split into six sections. The different sections can be shown/hidden from the Window -> Toolbars sub-menu or by right clicking on the toolbar and checking the sections to be shown.
To switch between tools, you can click on the corresponding button or you can use the single- stroke hot keys when available.
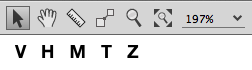
# Toolbox
Some of the most frequently used tools in Phoenix are placed in the Toolbox Toolbar.
| Tool | Hotkey | Tool Overview |
 Selection Selection | v | Main selection tool for selecting items, entering item context, moving items and more |
 Hand Hand | h | Hand tool for moving artboard around and zooming in and out |
 Measure Measure | m | Measure distances between items in artboard |
 Move Move | t | Move one product relative to another by selecting reference points on die lines between the two |
 Zoom Zoom | z | Zoom in and out of the artboard |
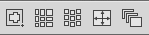
 Fit All in View Fit All in View | ctrl+alt+0 | Fit all items in the current artboard into view |
# Marks
The Marks toolbar contains mark-related tools Place Numbers, Camera mark, and Dimension Mark.

| Tool | Hotkey | Tool Overview |
 Place Number Place Number | n | Place new Product Number Marks directly into Products in Product or Layout View by mouse click |
 Camera Mark Camera Mark | Manually place a camera mark in the layout by clicking mouse in the artboard | |
 Dimension Mark Dimension Mark | d | Manually create a dimension mark by clicking on snap points in Product or Layout View to measure distances |
# Imposition AI
The Imposition AI toolbar is available when the license includes the Imposition AI module.
| Tool | Hotkey | Tool Overview |
 Smart Place Smart Place | s | Select an open area in the layout to find unfulfilled products in the project that can be placed while honoring spacing and media margin constrains |
 Impose Impose | Opens the Imposition AI dialog and runs the Impose tool with the latest settings | |
 Populate Populate | Opens the Imposition AI dialog and runs the Populate tool with the latest settings | |
 Optimize Optimize | Opens the Imposition AI dialog and runs the Optimize tool with the latest settings | |
 Plan Plan | Opens the Imposition AI dialog and runs the Plan tool with the latest settings |
# Alignment
The Alignment toolbar provides tools to quickly align selected items to media or other items.

| Tool | Tool Overview |
 Alignment Target Alignment Target | Select what target the alignment is to be based off |
 Align Left Align Left | Align to the left edge of the alignment target |
 Align Center Horizontal Align Center Horizontal | Align to the horizontal center of the alignment target |
 Align Right Align Right | Align to the right edge of the alignment target |
 Align Bottom Align Bottom | Align to the bottom edge of the alignment target |
 Align Center Vertical Align Center Vertical | Align to the vertical center of the alignment target |
 Align Top Align Top | Align to the top edge of the alignment target |
 Span Horizontally Span Horizontally | Horizontally space the selected items evenly spanning the alignment target by the given gap distance |
 Span Vertically Span Vertically | Vertically space the selected items, evenly spanning the alignment target by the given gap distance |
# Geometry
The Geometry toolbar reports the positions, rotations, and dimensions of selected items and when possible allows you to accurately define new values for them.

| Tool | Tool Overview |
 Reference Point Reference Point | Set the reference point for the item |
 X Position X Position | X position of item relative to the reference point. When possible, item position(s) can be moved by editing this field. |
| Y Position | Y position in layout relative to the reference point. When possible, item position(s) can be moved by editing this field. |
 Item Width Item Width | Item width. When possible, item widths can be changed by editing this field. |
 Item Height Item Height | Item height. When possible, item widths can be changed by editing this field. |
 Item Rotation Item Rotation | Item rotation. When possible, item widths can be changed by editing this field. |
 Lock Items Lock Items | Lock/Unlock items |
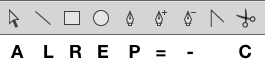
# Drawing
The drawing tools are used for drawing and editing die designs and bleed paths in die edit and bleed edit modes, drawing shape marks to products or layouts in normal mode, or manipulating bleed overlaps in overlaps mode.
| Tool | Hotkey | Tool Overview |
 Direct Selection Direct Selection | a | Select and move individual control points on a path in die edit and bleed edit modes. |
 Line Line | l | Add new lines in die and bleed edit modes. Draw line marks in normal mode. |
 Rect Rect | r | Add new rectangles in die and bleed edit modes. Draw line marks in normal mode. |
 Ellipse Ellipse | e | Add new ellipses in die and bleed edit modes. Draw line marks in normal mode. |
 Pen Pen | p | Draw paths (lines and curves) directly in the shape in die edit and bleed edit modes. |
 Add Anchor Point Add Anchor Point | = | Add anchor points to an existing path in die edit and bleed edit modes. |
 Delete Anchor Point Delete Anchor Point | - | Delete anchor points to an existing path in die edit and bleed edit modes. |
 Anchor Point Tool Anchor Point Tool | shift + c | Select anchor points and manipulate the handles to change the curve shape in die edit and bleed edit modes. |
 Cut Cut | c | Clicking on a path splits the path segment in two in die edit and bleed edit modes. In overlaps mode, drawing a line splits bleed overlaps in two so they can be resolved independently. |
# Delete Multiple Anchors Shortcut
Shortcut: Shift + Delete
Description: Removes all currently selected anchor points in a single action. Available in both Die edit and Bleed edit modes. Selection Tool Shortcuts.
# Selection Tool Shortcuts
Typically, left click is used with Selection Tool (v) to select a given item while right click on an
item will show that item's Content Menu. Left clicking and dragging the mouse in an area
with no items will create a selection area that will select all items inside the rectangle when you release the mouse button. The following additional shortcuts are available:
# Forcing Selection Area
Shortcut: Control + Shift + Left Click + Mouse Drag
Description: Normally selection area gets created when you start Left Click + Mouse Drag in an area with no items. Sometimes you will want to select multiple items with selection area but it is difficult or impossible to start selection area in an empty region. If you hold down the Control and Shift keys, a selection area will be created regardless of whether an item is beneath the cursor or not.
# Multiple Item Selection
Shortcut: Shift
Description: To add more items to your current selection, hold down the Shift key while clicking on the additional items. Similarly, hold Shift key while using Selection Area to add all items in the current mouse selection area to your existing selected item(s).
# Alt+Drag Duplicate
Shortcut: Alt + Left Click Item(s) + Mouse Drag
Description: Holding the Alt key while moving items in the Artboard with your mouse will duplicate the item in the destination instead of moving the items, essentially performing duplicate and move in a single action.
Alt+Drag Duplicate works on single items as well as multiple selected items, giving you the power to duplicate entire groups of items to a specific location in one shot. All relative positions of selected items are preserved during this action.
# Alt+Click
Shortcut: Alt + Left Click when item(s) are selected
Description: This shortcut behaves similarly to Alt + Drag Duplicate. Select item(s) and click anywhere on the artboard to duplicate those items in the location of the mouse click. The new duplicate item(s) will be centered in the cursor position of the click. For multiple item selection, the relative positions of items are preserved.
# Swap Items Shortcut
Shortcut: Control + Left Click Item(s)
Description: You can swap two items or groups of items in the sheet in a single action by selecting an item (source) and click on another item (destination) while holding the Control key. The selected source items will move to the position of the clicked destination item while the destination item will move into the position of the source items. Product items, marks, and groups can all be swapped using this shortcut. If any source or destination items are locked, a dialog will appear explaining the swap action cannot be performed.
The reference point used during Swap Items is controlled by the 9-point selection widget in the Geometry Panel. For example, if the center point is selected in the Geometry Panel, the center source and destination item positions are swapped. If the lower-left corner of the 9-point selector is chosen instead, the lower-left corner positions of source and destination items are swapped.
Multiple destination items can be swapped by holding the Control key and left mouse button while dragging the mouse to create a selection area. Once the mouse button is released, all items in the selection area will be treated as destination swap items. This features allows you to quickly swap entire groups of items without explicitly grouping them beforehand.
# Zooming in Selection Tool
Shortcut: Control + Mouse Scroll Wheel
Description: You can quickly switch to the Zoom Tool to zoom in and out of the Artboard but if your mouse has a scroll wheel it can be even faster to stay in the Selection Tool, hold down the Control key and move the scroll wheel up and down to zoom in and out.
# Scrolling Up and Down in Selection Tool
Shortcut: Mouse Scroll Wheel
Description: To move the Artboard up and down in Selection Tool move your mouse scroll wheel up and down respectively.
# Fit Item in View
Shortcut: Alt + Shift + Left Click
Description: If you hold the Alt and Shift keys and click on an item, the Artboard will automatically zoom in fitting the item in the visible space. For example, if you want to zoom into a specific mark, hold down Alt and Shift and click on the mark in the Selection Tool.
# Entering Item Context
Shortcut: Double Click
Description: If you want to edit child items of another item, such as Repeat Marks within a Repeat or Artwork within a Product, double click on the parent item(s) until you are in the desired context to perform edits.
# Leaving Item Context
Shortcut: Escape
Description: To quickly leave any item context and go back to the global context press the Escape key. Note this also works for leaving Overlaps Tool Mode, Output Preview Mode and other context-based tool modes.
# Hand Tool Shortcuts
Hand Tool (h) works normally by holding down the left mouse button and dragging to move the Artboard around. This is at times the most efficient way to move around.
# Zooming in Hand Tool
Shortcut: Mouse Scroll Wheel
Description: You can quickly switch to the Zoom Tool to zoom in and out of the Artboard but if your mouse has a scroll wheel you can also zoom in and out by moving the scroll wheel up and down.
# Spacebar Shortcut
Shortcut: Hold down Spacebar key
Description: Hold down the spacebar at any time to temporarily switch to the Hand Tool. Once the spacebar is released the previous tool will be restored. This shortcut allows you to pop into Hand Tool to do fast navigation before continuing with your current tool without having to switch back and forth.
# Measure Tool Shortcuts
Measure Tool (m) works normally by holding down the left mouse button to start measuring, dragging the cursor to the desired location and releasing the button to take a measurement at any angle. When starting a measurement, the Measure Panel will appear automatically if not visible.
# Forcing Horizontal or Vertical Measurements
Shortcut: Shift + Left Click + Mouse Drag
Description: Holding down the Shift key while taking measurements forces the measurement line to be either horizontal or vertical depending on current cursor position. This is useful for measuring the distance in a single dimension only.
# Cut Overlap Tool Shortcuts
Cut Overlap Tool (c) works in Overlap Tool Mode by drawing a line bisecting a given overlap. Start the cut by holding the left mouse button and moving the cursor to the desired endpoint. Releasing the left mouse button will perform the cut on the overlap closest to the start point of the line drawn.
# Cutting All Same Overlaps at Once
Shortcut: Control + Left Click + Mouse Drag
Description: Holding down the Shift key while drawing the bisection line will cause the overlap cut to extend to all other identical overlaps in the layout. For example if you have the cartons with the same flaps overlapping 20 times that all need to be cut before resolving, holding the Control key during overlap cut will perform all 20 cuts at once.
# Zoom Tool Shortcuts
Zoom Tool (z) will zoom into the Artboard when left mouse button is clicked. Also you can zoom into a defined area by holding down left mouse button, dragging the mouse to define the desired zoom area and releasing the mouse button.
# Zooming Out in Zoom Tool
Shortcut: Control + Left Click
Description: Holding down the Control key while clicking will zoom out slightly instead of zoom in.
# Creating Products from Artwork Shortcut
You can create new products from artwork files by using the File menu and selecting "New Product from Artwork…" or by selecting the same action from the Products Panel action menu in the upper left corner of panel.
Shortcut: Drag and Drop Artwork File
Description: Another way to quickly create a product from artwork is to drag and drop the artwork file externally into Phoenix. A new product will be created with default values and die design set to the Trim Box of the artwork. Also, if the artwork file contains exactly two pages, the second page is automatically set to the back side artwork of the new product.
# Import Die Template Shortcuts
Die layouts can be imported normally by using the File menu and selecting "Import Die Template…" to use the default import preset for the given CAD format defined in Preferences -> Die Import.
They can also be imported and placed into the current layout in a single action by selecting "Place Die Template…" instead.
You can also import die layouts using the interactive Die Import Wizard to confirm line mappings, choose a different import preset or define a new preset. To do this normally, select the "Import using Die Import Wizard" and "Place using Die Import Wizard" options from the File menu.
Import actions are also accessible from the action menu in the Files panel (upper left corner).
# Place Die Template Shortcut
Shortcut: Drag and Drop CAD File
Description: Dropping a die layout CAD file directly into Phoenix while in Layout View will import the layout as a die template using the default import preset for the given CAD format and place it in the current layout being viewed. If no default import preset is defined for the CAD format the Die Import Wizard is launched.
# Place Using Die Import Wizard Shortcut
Shortcut: Control + Drag and Drop CAD File
Description: To force the Die Import Wizard to be used to import and place the CAD file, hold down the Control key while dropping the file into Phoenix.
# Autosnap Shortcut
Autosnapping artwork into a product die or die template is one of the most powerful features in Phoenix. Autosnap handles a wide range of scenarios such as mismatched rotation, non-centered artwork, incorrect Trim Box sizes, etc., providing perfect placement of artwork in the product die for a vast majority of cases.
The normal way to autosnap artwork into a die is by clicking on the Choose Artwork button in the Product View or Layout View toolbar.
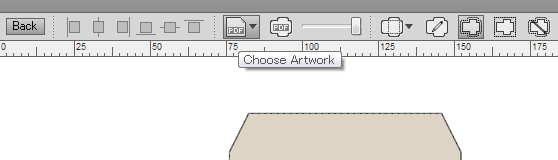
Shortcut: Control + Drag and Drop Artwork File
Description: A shortcut for snapping artwork into the die is to hold down the Control key while drag and dropping the artwork file into the desired side (Front or Back) in Product View or in Layout View. If Control key is not held down a new product will be created from the artwork.
When in Layout View, the artwork being dropped into Phoenix will be snapped into all selected product or die template items in the Artboard. If all instances of a product are selected, artwork will be snapped into the existing product. In cases where a subset of all product's instances are selected, the following steps take place automatically:
- A new product will be created using the name of the artwork file by duplicating the existing product.
- The artwork will be autosnapped into this new product.
- Selected product or template items in the Artboard will be replaced by instances of this new product.
If you are drilled into the context of a product instance in Layout View, you are editing the product itself and behavior is the same as in Product View.
Also note, if you are snapping to the Front of the product or template item and the given artwork has two pages, the first page automatically snaps into the Front of the product while the second page snaps to the Back of the same product. If you need to snap different pages of the artwork file to the given side(s) of a product, click on the Choose Artwork button down arrow to open the Page Mapping dialog.
# Creating New Empty Product Shortcut
Shortcut: Control + Shift + N
Description: This shortcut opens the New Empty Product dialog where you can create a new product by specifying width and height.
# Creating Non-Rectangular Product from Artwork Shortcut
Shortcut: Alt + Drag and Drop Artwork File
Description: In Phoenix, you can create products directly from artwork files. Additionally, in Product View you can use the "Die Design from Inks…" or "Die Design from Layers…" option to create the product die design directly from paths in the artwork.
Alternatively, you can perform both steps in one action by holding down the Alt key while dropping artwork into Phoenix. As with normal drag and drop, a new product will be created from the artwork using the file name as product name. The shortcut also causes the artwork spot ink and PDF layers to be matched with line types using the Line Type Mappings defined in Preferences to create the die design from the artwork, with inks and layers matching line types in the Cut category used to define the die design shape.
# Assigning Product Group Marks Shortcut
By default, dropping a Group or Product Mark from the Marks Panel into Layout View will apply that mark to all Group or Products in the current side of the layout respectively. You can assign a Group or Product Mark to a specific Repeat item or specific Product by holding down the Control key.
Shortcut: Control + Drag and Drop Mark Item (in Layout View)
Description: Dropping Group or Product Marks into Layout View applies that mark globally to the project. This means that mark will be in all current and future Groups/Products unless removed or hidden explicitly within them. By using the Control key shortcut you can apply the smart mark to the specific Repeat the cursor is under when releasing the mouse button in the case of Group Smart Marks or, in the case of Product Smart Marks, you can apply the mark to the product that a product item belongs too under the cursor. The mark will appear only in instances of the given product in the project.
# Assigning Product Mark to Single Product Item Shortcut
You can assign a Product Mark to one specific instance of a Product in a given layout by holding the Alt key while dropping the mark into Layout View.
Shortcut: Alt + Drag and Drop Mark Item (in Layout View)
Description: When the Alt key is held down while dropping a smart Product Mark into the Artboard it will apply the mark only to the product item under the cursor. The mark will not be visible in other product items belonging to the same product and is not applied to other products in the project.
This shortcut works by applying the mark to the product but turning on visibility of the mark only in the single product item in the Artboard. This means you can turn visibility of that mark on in other product items at any time. Note: Non-visible items are not included at export time.
This shortcut differs from the Assigning Product/Group Marks Shortcut where the mark becomes visible across all product items in the project, not just the single item under cursor.
# Copying Library Items Shortcut
If you would like to make a copy of a library item (Press, Plate, Mark, Mark Set) you can right click on the item and select "Duplicate". This makes a copy of the item in the same folder as the original. Now if you want to move the copy to a different folder you can drag and drop the new item into the folder.
Shortcut: Control + Drag and Drop Item (into same panel)
Description: Pressing Control while dragging and dropping the original item will keep that item in place while making a copy of the item. If you want to make a copy in the same folder make sure to keep the cursor position within that folder. You can also move the cursor into a different folder to make the copy directly into that destination folder.
# Rotate Items Shortcuts
Rotate Items Shortcuts will rotate currently selected items in Layout View and Product View. When multiple items are selected they will all be rotated in place.
Alt + Left Arrow Key (rotate 90 degrees counter-clockwise)
Alt + Right Arrow Key (rotate 90 degrees clockwise)
Alt + Up Arrow Key (rotate 180 degrees)
Alt + Down Arrow Key (rotate 180 degrees)
# Mark Inspection Mode Shortcut
Shortcuts: Control + Shift + M
Description: Enters Mark Inspection mode, which will highlight all the marks in Layout View, providing a clear way to verify mark placement.