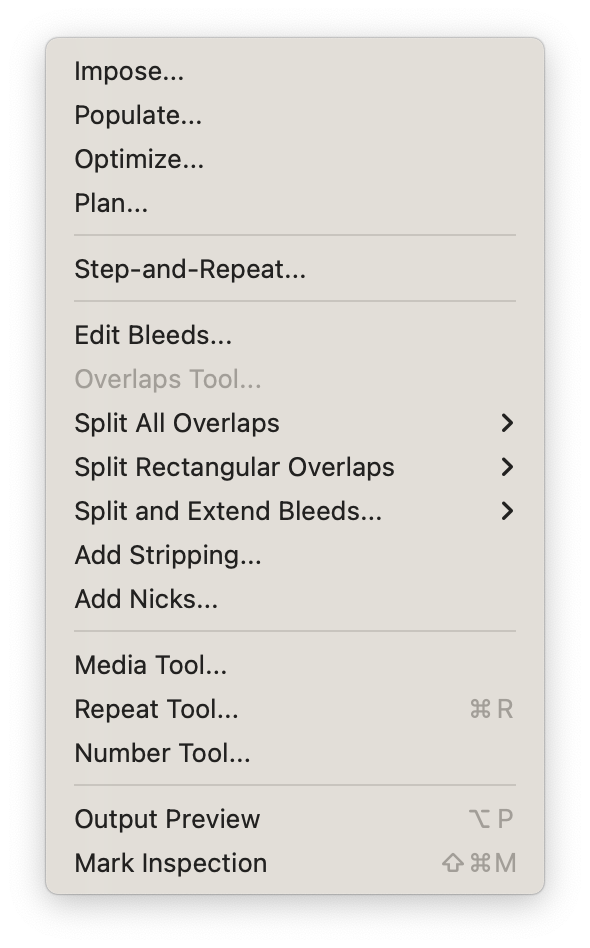
# Tools
Phoenix has a number of tools available to make creating and editing layouts fast, efficient, and easy. These tools can be accessed from the Tools menu at the top of the window on Windows, or in the Tools dropdown in the menu bar on a Mac.
# Imposition AI
The dropdown options for Impose, Populate, Optimize, and Plan are shortcuts to open Imposition AI to each mode. You can read more about Imposition AI here
# Step and Repeat Tool
The Step and Repeat tool allows you to easily build a Step and Repeat grid from a selected product. To use the Step and Repeat tool, you must have a product placed in a layout and selected, otherwise the tool will appear grayed out.
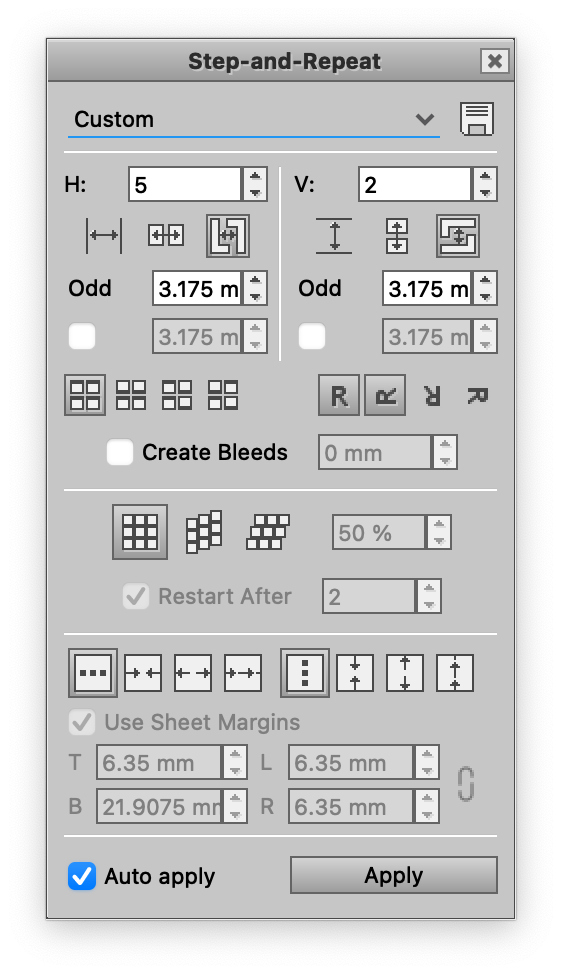
With a product selected, the tool becomes editable and shows the current settings for the given product's step and repeat grid. The easiest way to see how the Step and Repeat tool works, enable the Auto apply option which will show all changes to the Step and Repeat grid as you edit the settings.
At the top of the tool, you can select or save a step and repeat preset. To save, click the floppy disk save icon
| Icon or field | Description |
|---|---|
 | Save preset |
| H | Horizontal Repeat Count |
| V | Vertical Repeat Count |
 | Set the horizontal gap based on the product edges, not including product width |
 | Sets the horizontal gap based on the center of the product, including product width |
 | Sets the horizontal gap based on the die lines |
| Odd | Gap distance for odd numbered gaps in the repeat |
| Checkbox | Optionally specify a different gap distance for even gaps in the repeat |
 | Set the vertical gap based on the product edges, not including product height |
 | Sets the vertical gap based on the center of the product, including product height |
 | Sets the vertical gap based on the die lines |
| Odd | Gap distance for odd numbered gaps in the repeat |
| Checkbox | Optionally specify a different gap distance for even gaps in the repeat |
 | No head turn |
 | Head turn on rows |
 | Head turn on columns |
 | Head turn on columns and rows |
 | No product rotation |
 | 90° product rotation |
 | 180° product rotation |
 | 270° product rotation |
| Create Bleeds | Whether or not to add product bleed |
 | Set no stagger |
 | Stagger on columns |
 | Stagger on rows |
| Stagger Amount | How much to stagger, can be set in percentages or absolute values with units |
| Restart After | When to restart the stagger back to the start |
 | Do not automatically place products horizontally |
 | Automatically pack products horizontally |
 | Automatically expand products horizontally |
 | Automatically wrap products horizontally |
 | Do not automatically place products vertically |
 | Automatically pack products vertically |
 | Automatically expand products vertically |
 | Automatically wrap products vertically |
| Use Sheet Margins | When automatically creating the step and repeat grid, whether or not to use the sheet margins. If not using the sheet margins, specify custom margins. |
# Edit Bleed Tool
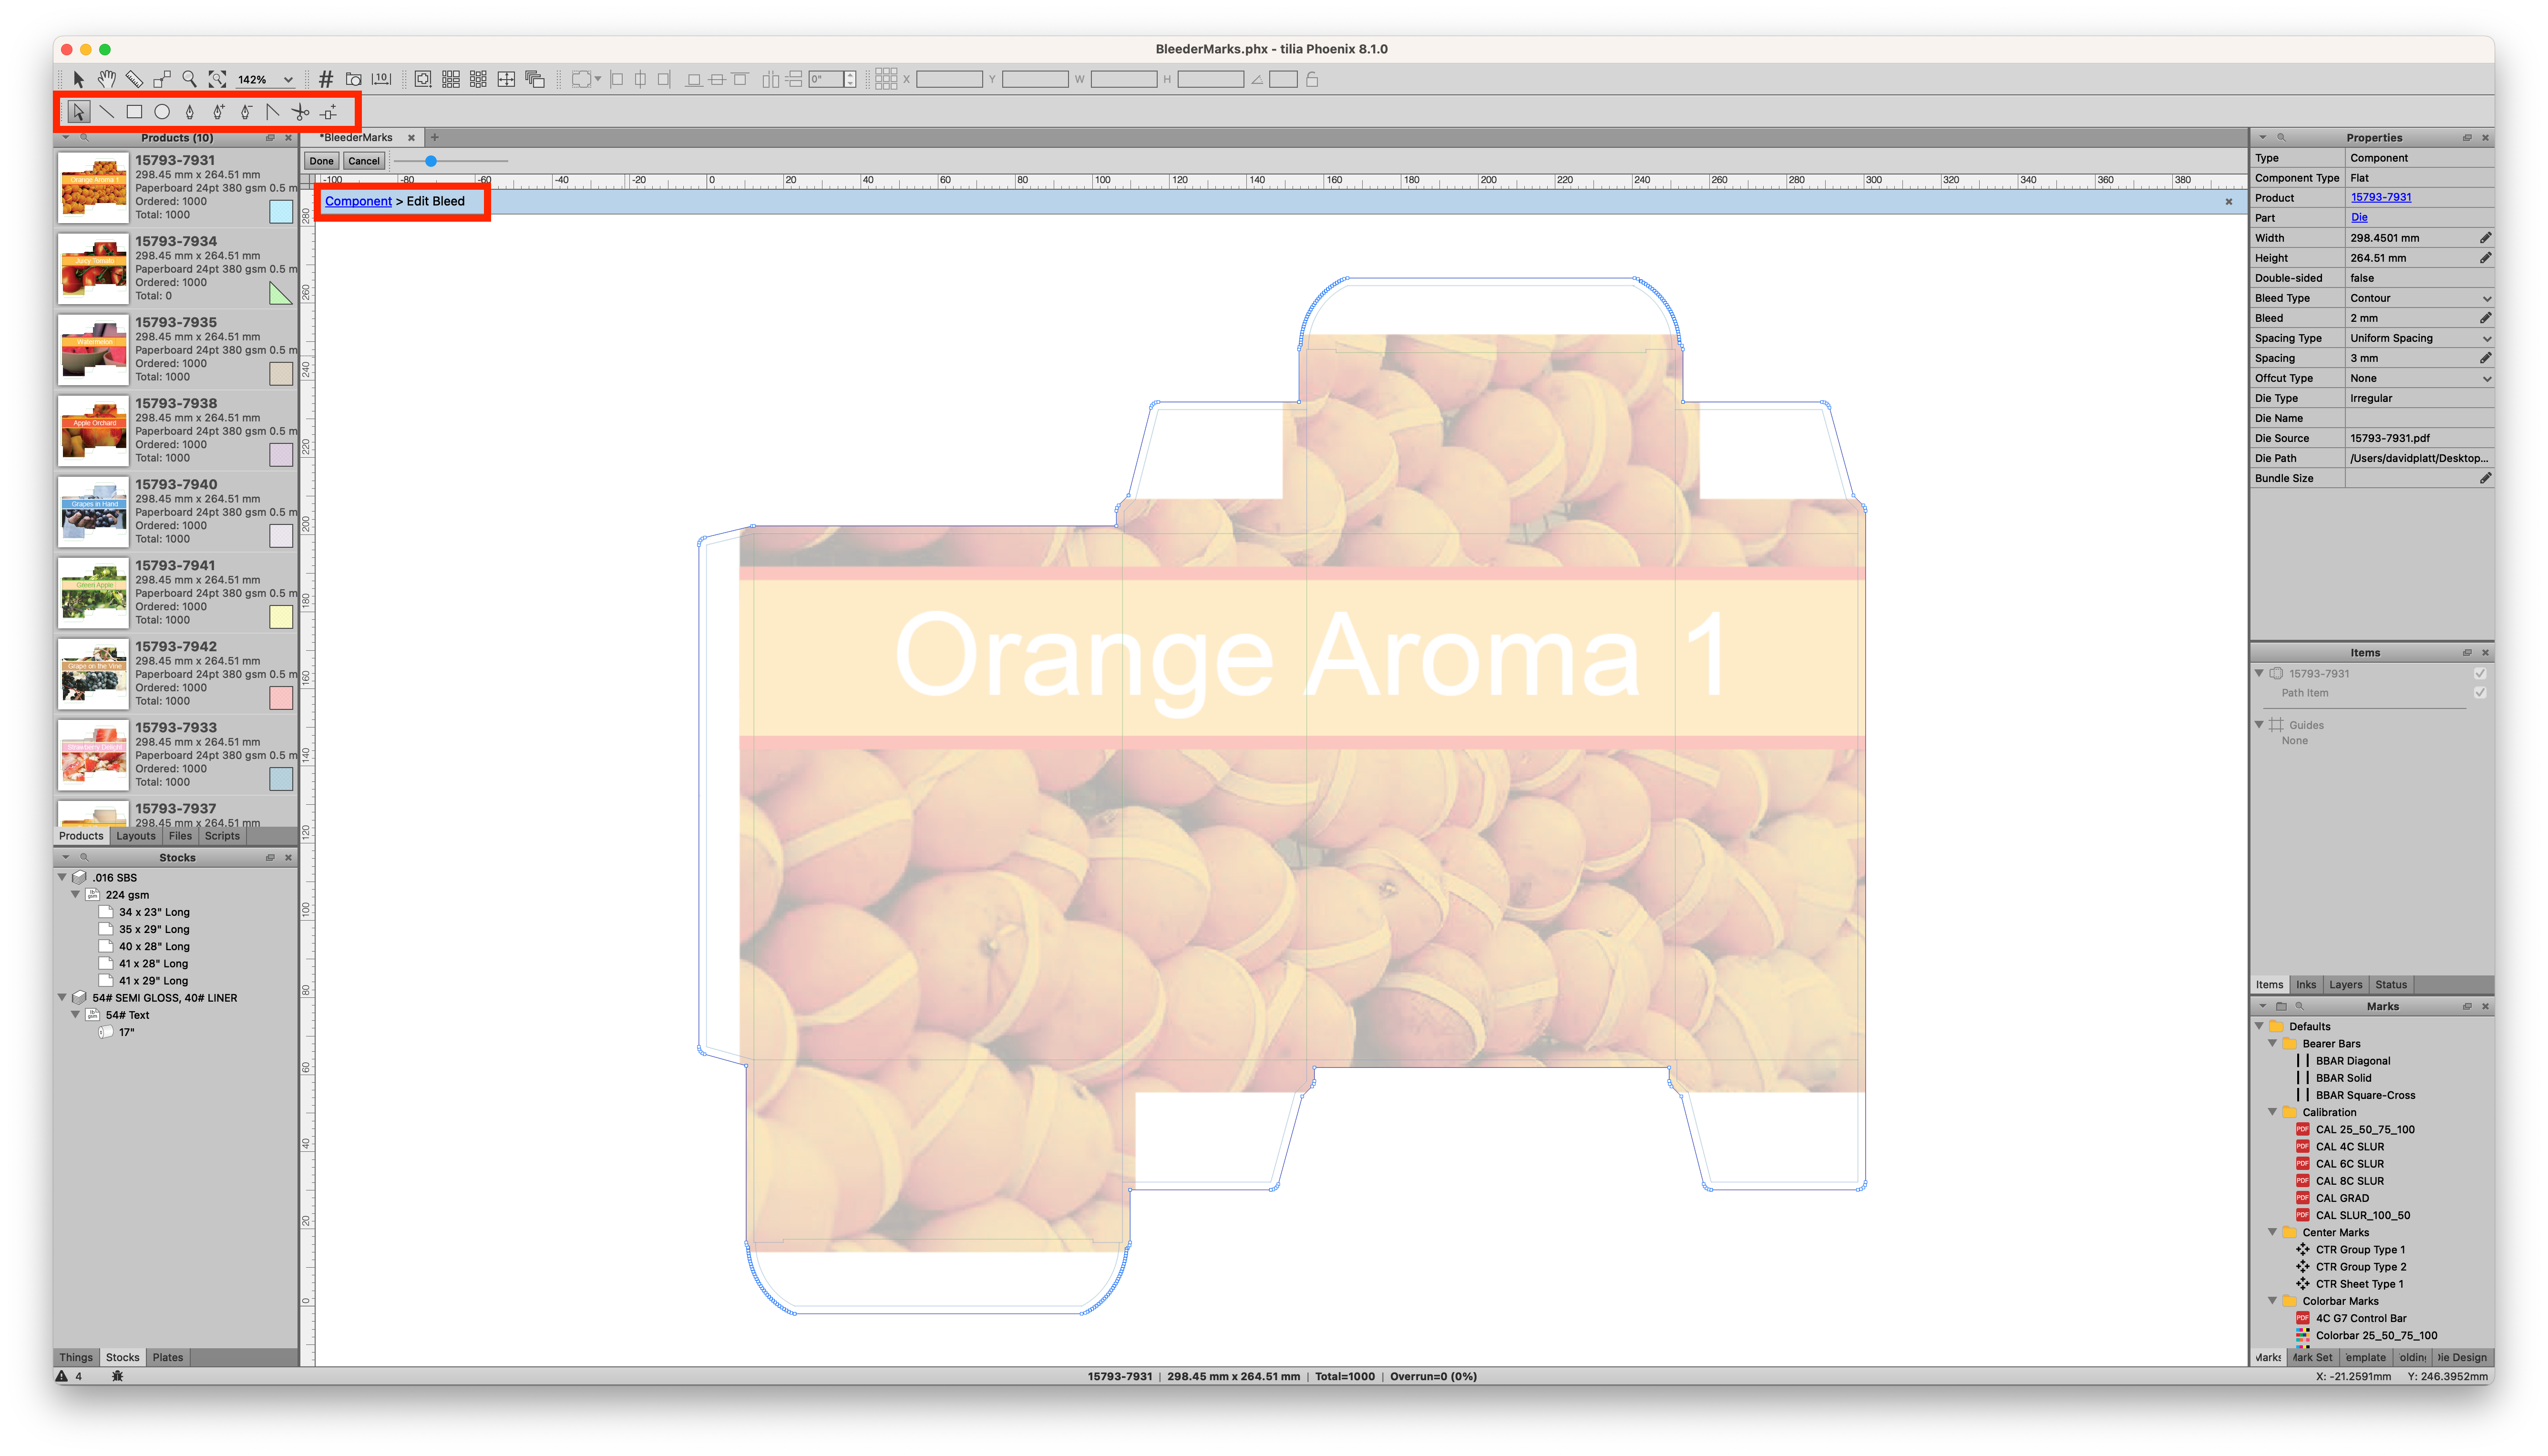
In the product view, the Edit Bleeds... tool will highlight the bleed path of the product and allow you to edit the bleed path using the Drawing tools. While in the Edit Bleeds mode, you can go to Window > Toolbars > Drawing, and use the tools to manipulate the bleed. You'll notice that the artwork is greyed out and the bleed path becomes clickable. You can make the artwork more or less visable with the slider just below the project tab next to the Done and Cancel buttons. When you're done editing, click the Done button.
# Overlaps Tool

The overlaps tool will analyze the layout for any instances of a product overlapping another product. If there are any overlaps, you will see a view similar to the screenshot above. Overlaps are highlighted in a light red, and you can click on any individual overlap to highlight it. When you do, you'll see the two products overlapping will get labeled "A" and "B", which then lets you make the decision on how the overlap should be treated. You can split the overlap down the middle, choose A over B, or B over A. At this point, you can choose whether or not this choice is applied to both sides of the layout, and then can click Resolve to apply the selection, or Resolve Same if there are multiple instances of this same overlap, which can occur in a step and repeat grid for example. You can toggle between the overlaps by clicking the arrow keys, and you can also split all overlaps with the Split all button.
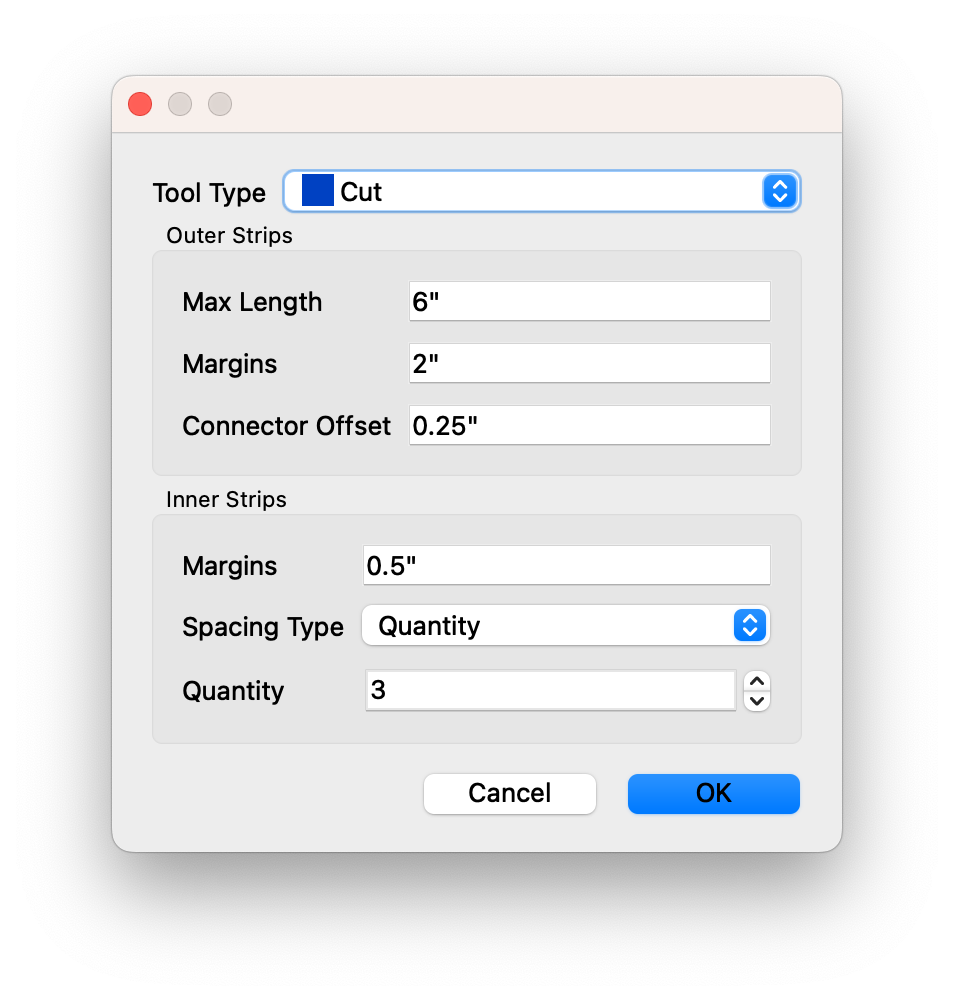
# Strips Tool
The Strips Tool adds strips for die cutting to break down the waste by adding additional cut paths to a layout. With a layout selected, go to Tools > Add Strips to display the Strips Tool.
| Field | Description |
|---|---|
| Tool Type | Choose the tool to use for the strips that will be addded |
| Max Length | Specify the maximum length that an outer strip may be |
| Margins | Specify the margins between outer strips |
| Connector Offset | Specify the offset from products that a connector line between strips must be |
| Margins | Set the margins between inner strips |
| Spacing Type | Decide how inner strips will be spaced |
| Quantity/Spacing | If quantity, determine the number of inner strips. If spacing, decide the min/max distance between strips |
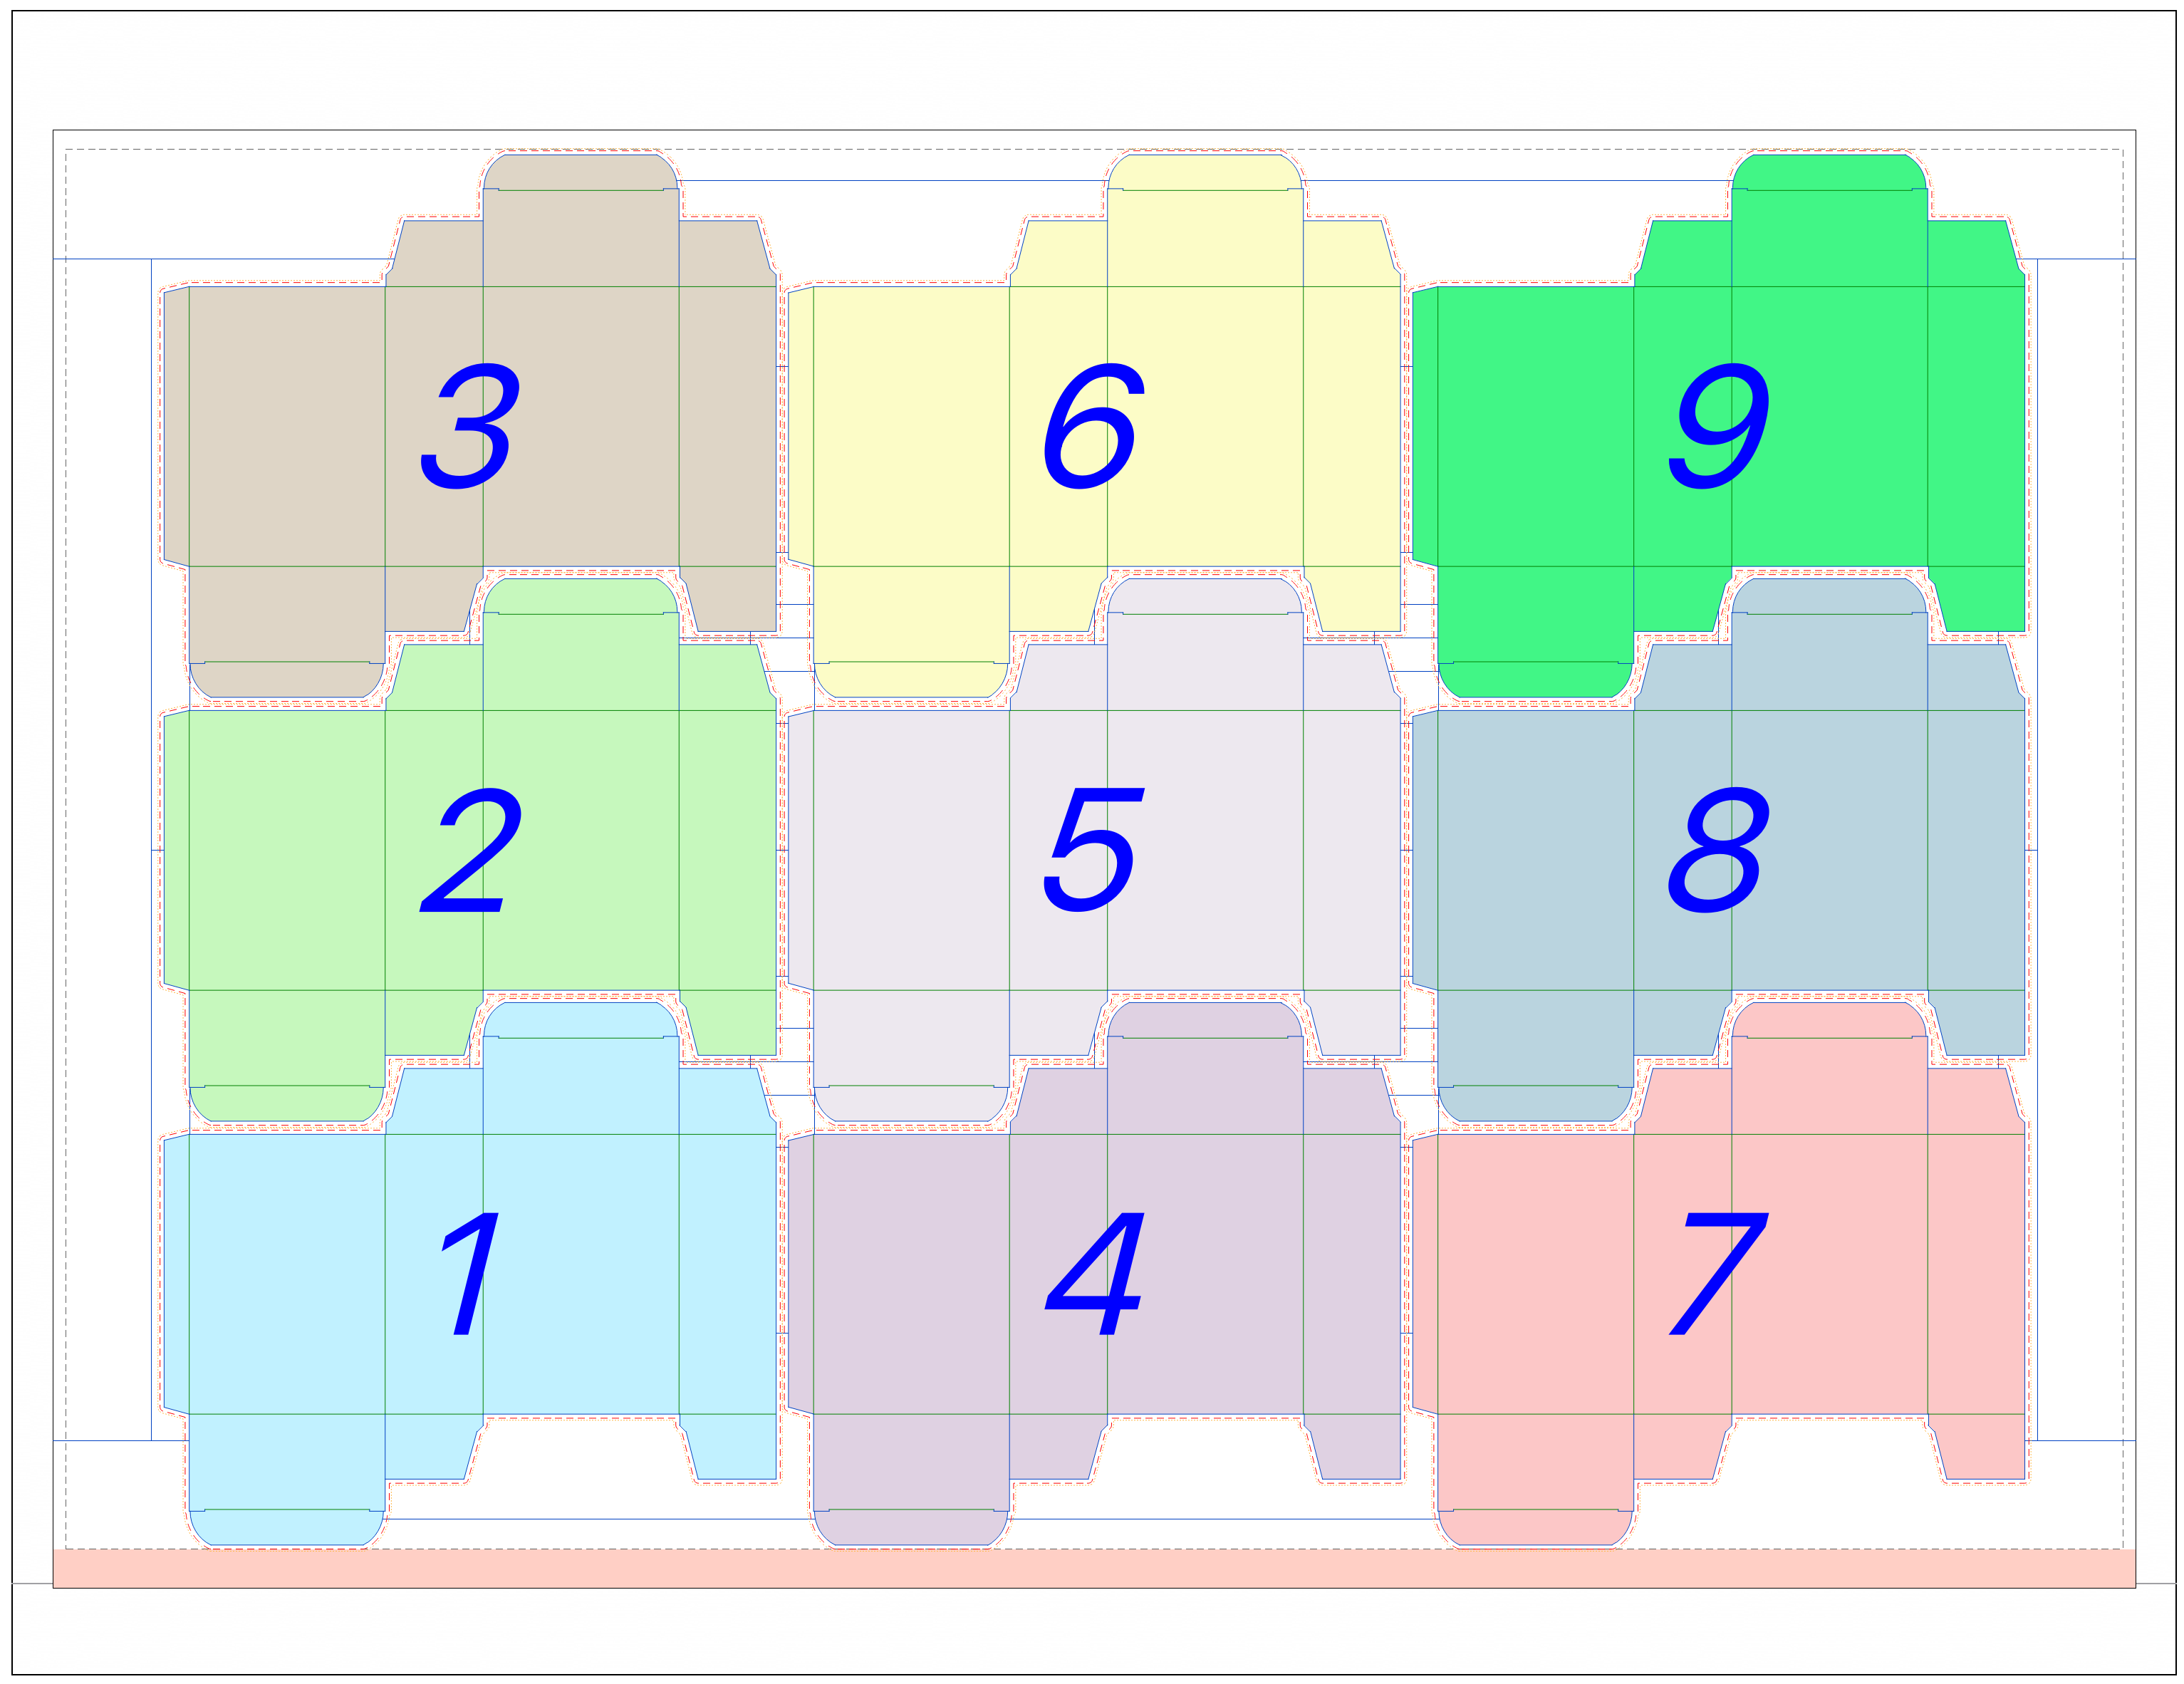
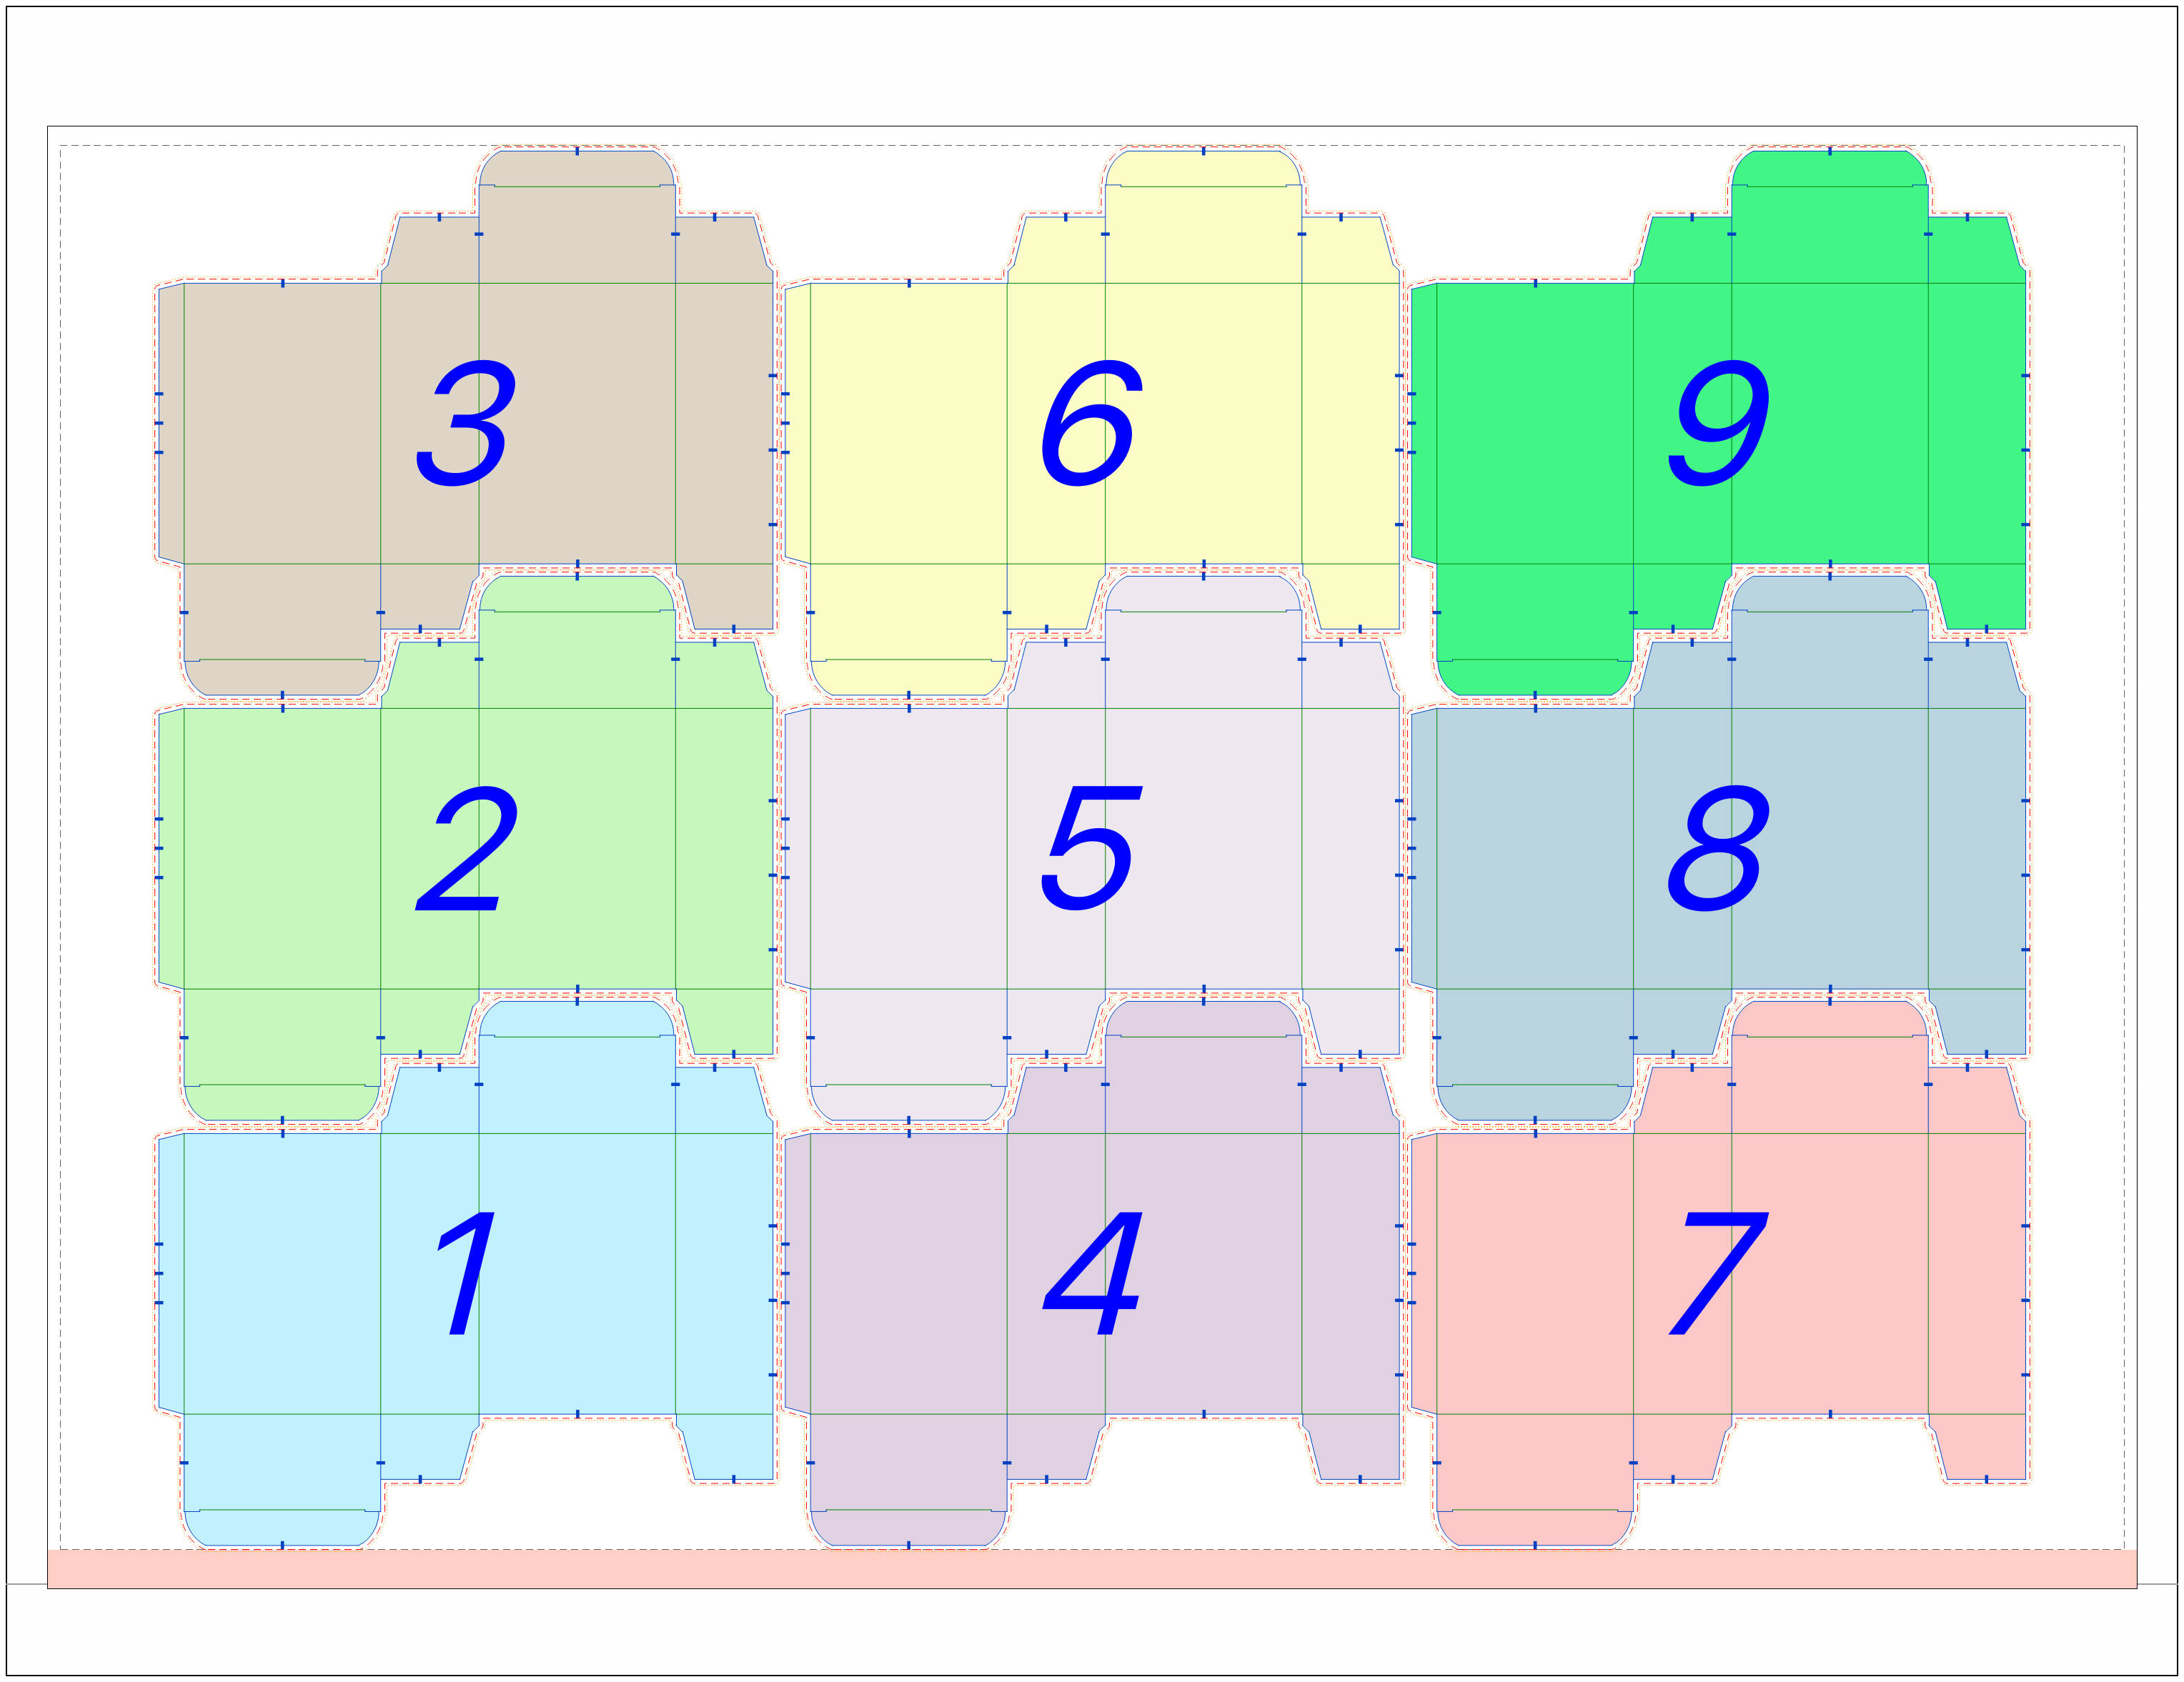
# Nicks Tool
The Nicks Tool adds nicks to the die to create a small gap so that die-cut pieces remain connected to the waste material. With a layout selected, go to Tools > Add Nicks to display the Nicks Tool.
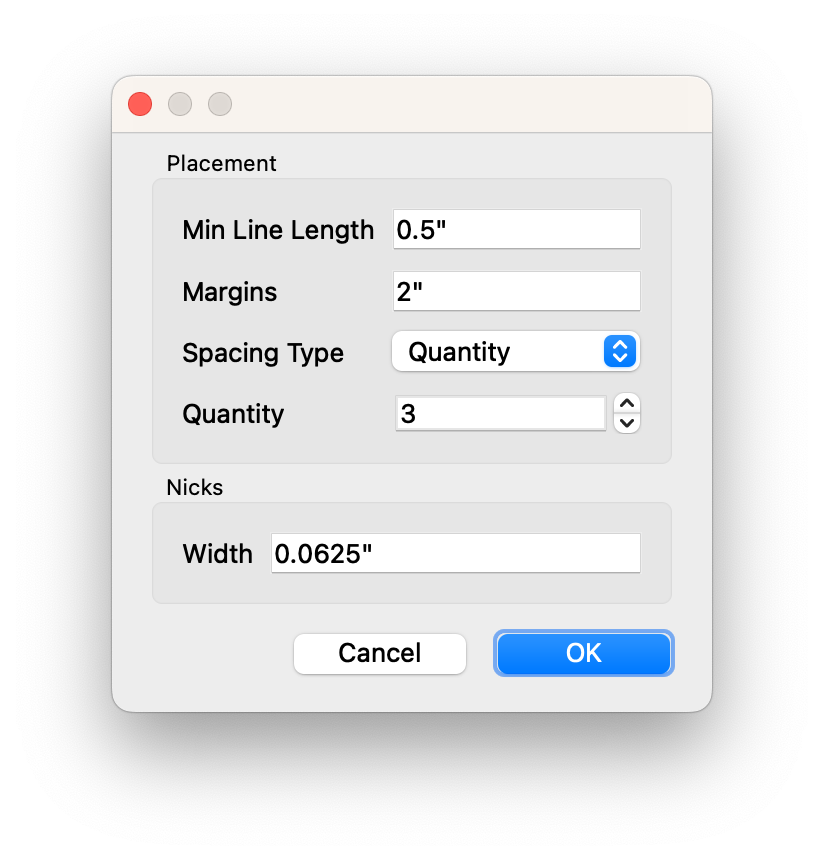
| Field | Description |
|---|---|
| Min Line Length | Sets the minimum line length in the layout to add a nick |
| Margins | Specify the distance between nicks |
| Spacing Type | Decide how nicks should be spaced out |
| Quantity/Spacing | If quantity, determine the number of nicks. If spacing, decide the min/max distance between nicks |
| Width | Determine how wide each nick should be |
# Media Tool
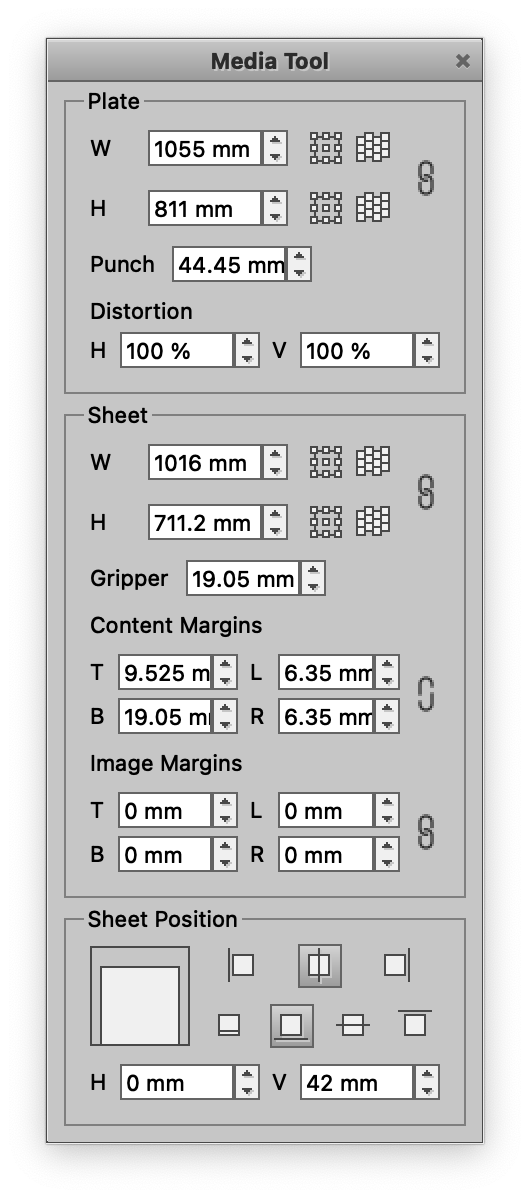
The Media Tool allows you to easily set the sizes and margins for a layout. You can specify the width/height of the plate and sheet, as well as use the  button to fit the sheet/plate to the size of the current selection in the layout or the
  button to fit the sheet/plate to the products in the layout. You can click the link icon to lock the ratio of width to height.
You can also set the Content and Image Margins, and set the Sheet position on the plate.
# Repeat Tool
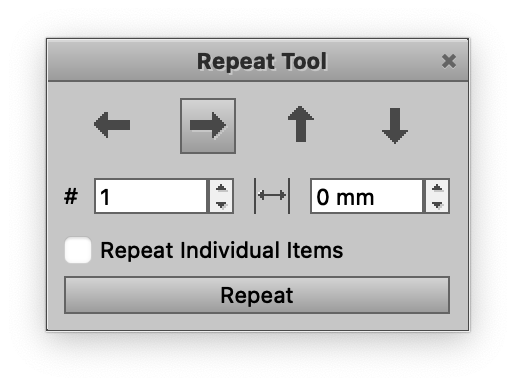
The Repeat Tool is an easy way to repeat an item on a layout. Choose the direction you want to repeat by clicking the appropriate arrow button, set the number you want to repeat in the # field, and the product gap in the field.
# Number Tool
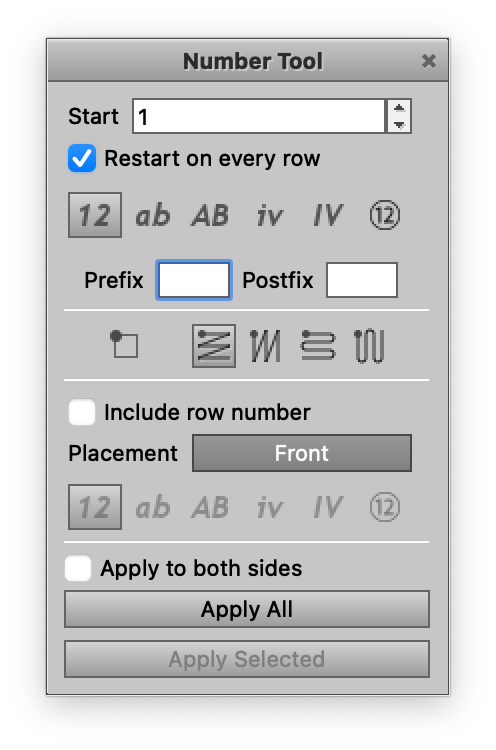
The Number Tool lets you customize the product numbering on a given layout. This does not print the number, but lets you customize it for use with keywords.
To use the tool, enter in the starting number, and whether or not the number should restart at this value on each row. Then select the number style from numbers, letters, roman numerals, and the various formatting options. You can specify a pre- or post-fix for the number. Then specify the start corner and the direction of ordering. You can include the row number (and if so, whether that row number should be relative to the number, front or back) as well as the format of the back number. Finally choose if you'd like to apply the numbering to both sides if you have a two-sided layout, and whether to apply numbers to all products or only selected products.
# Output Preview
The Output Preview tool provides an output preview of your layout, similar to how Adobe Acrobat or Illustrator can.
# Mark Inspection Tool
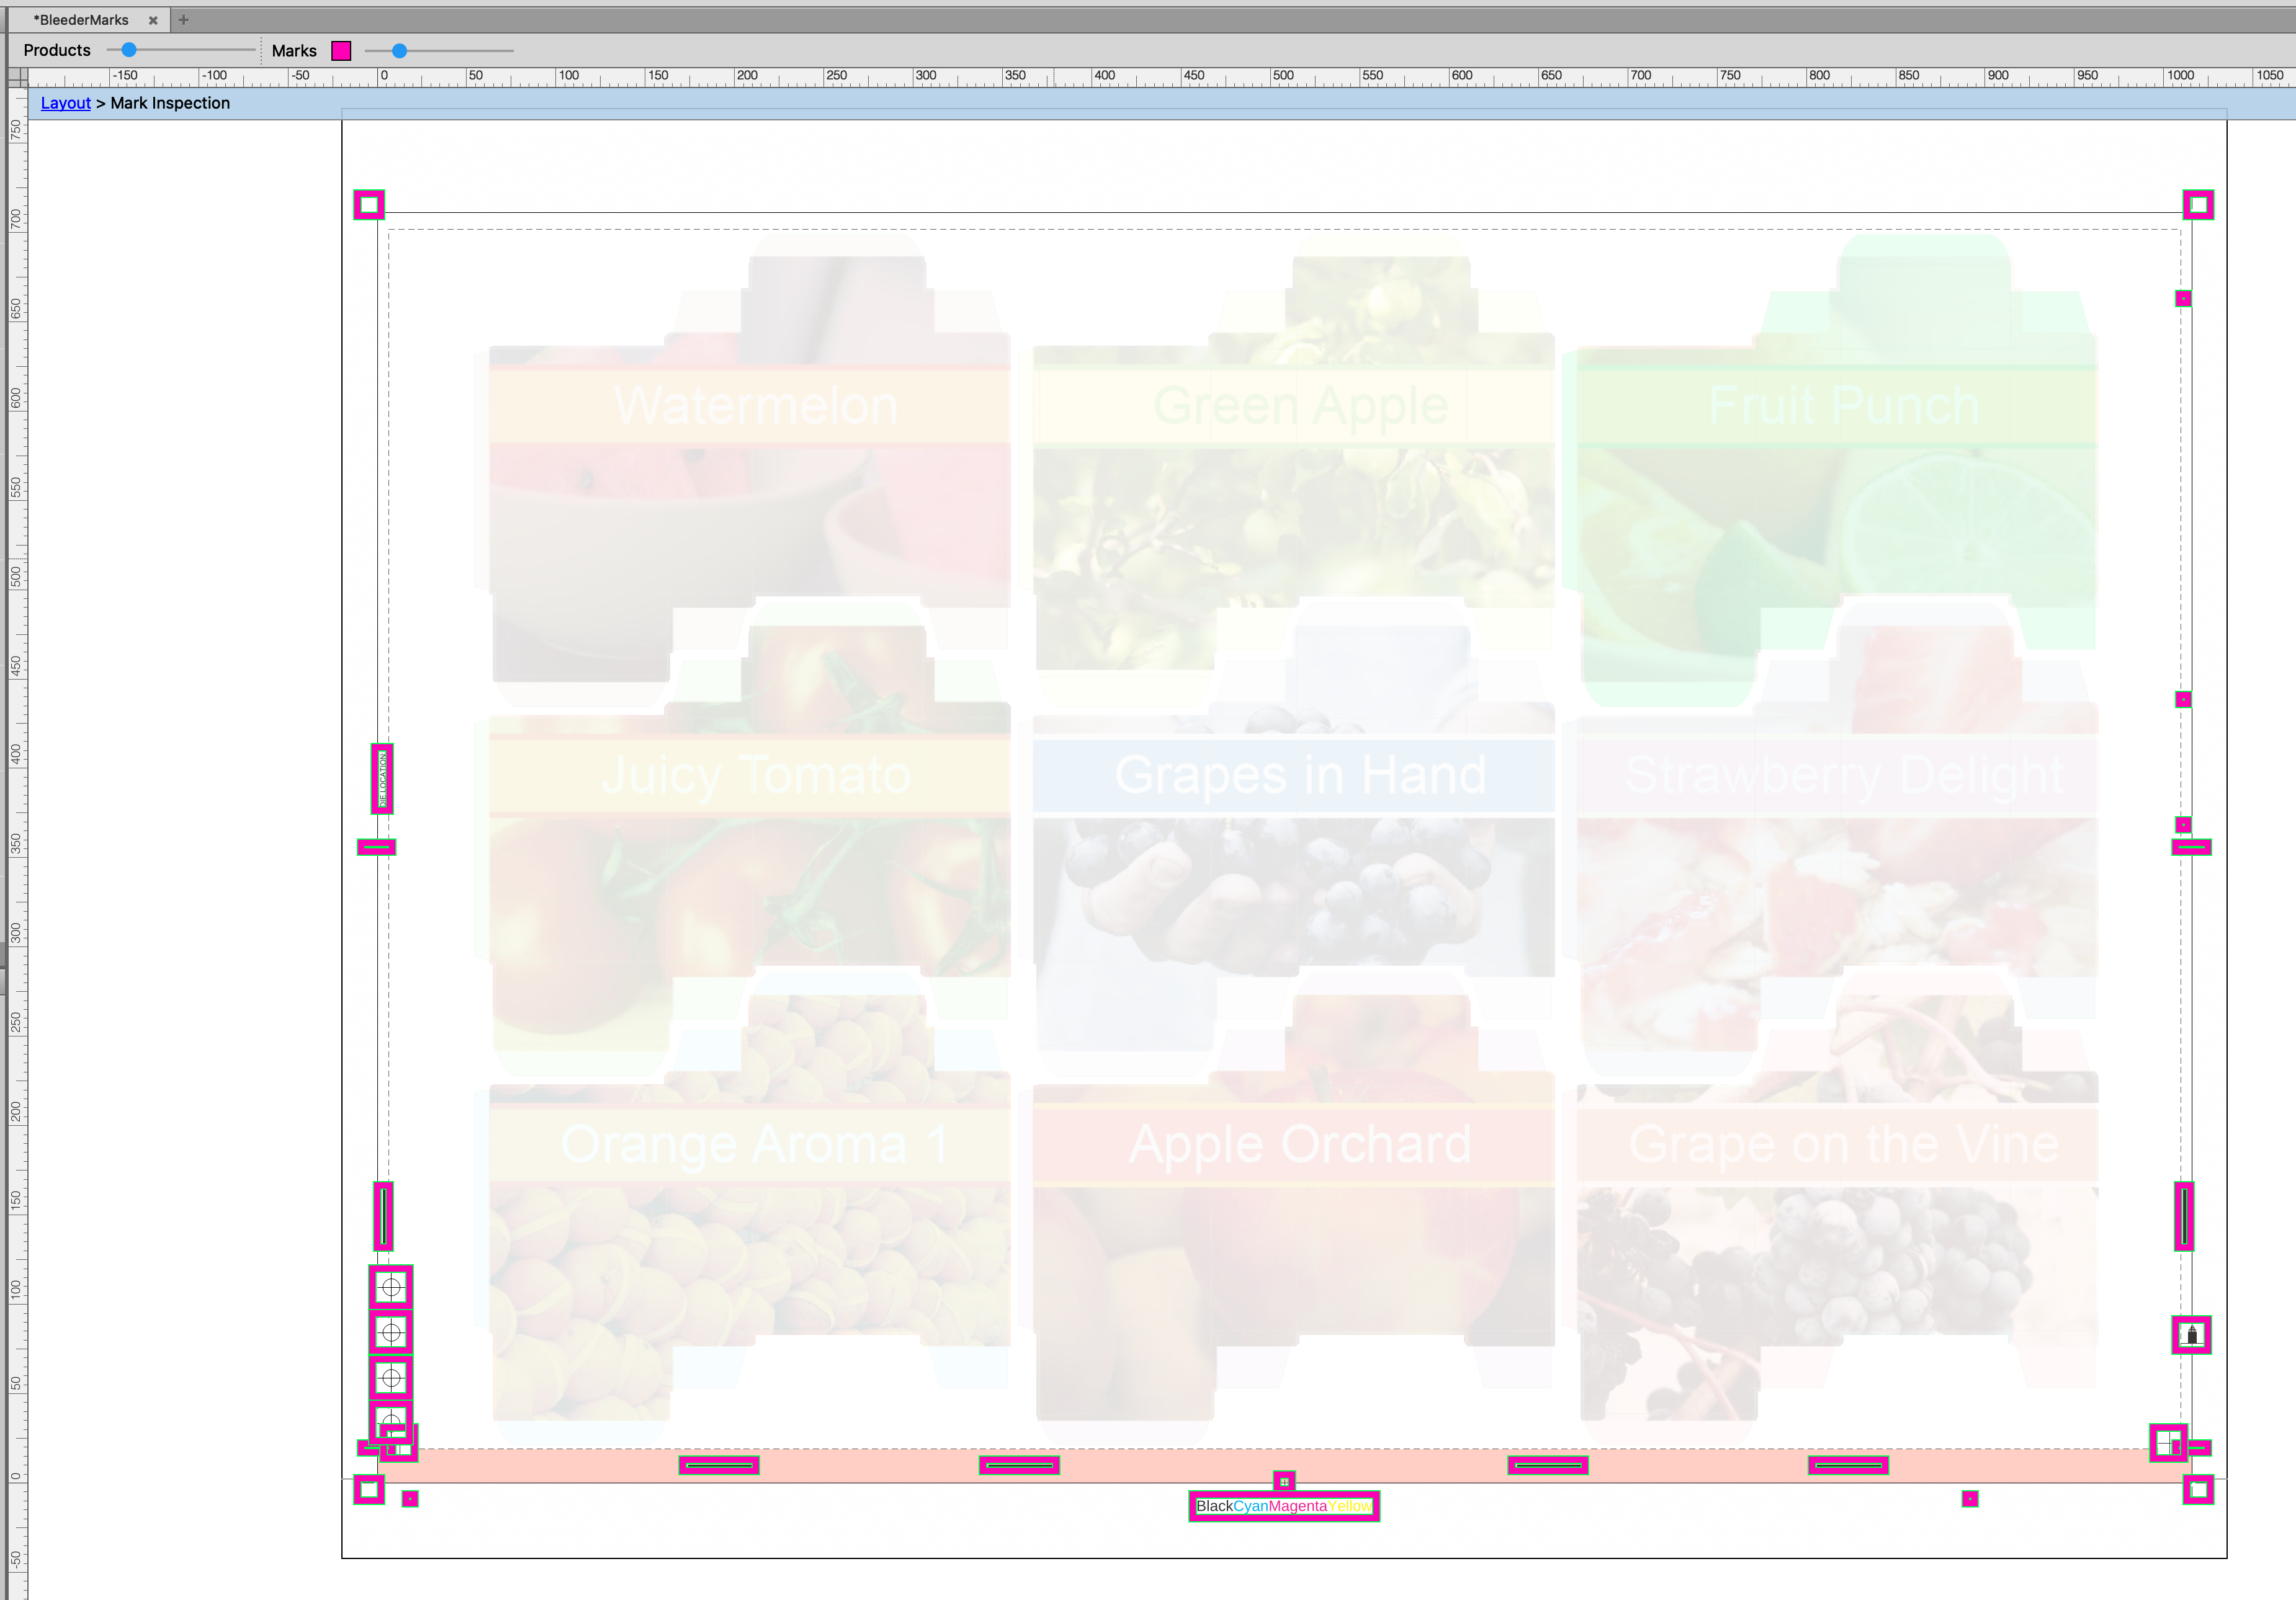
The Mark Inspection Tool will highlight all marks on the layout to make it easier to see before generating output. You can choose the color of the highlighting box as well as the visibility of products by dragging the slider at the top of the layout.