# Things
In Phoenix, a 'Thing' (or plural 'things') is a physical object or process that is used in a production flow when transforming a product part and/or component into a final product. A 'Thing' could be a piece of equipment such as a digital press or a die-cutting device, or it could be a manual resource that would perform a task such as diemaking or hemming/sewing a banner.
# Presses
A Press represents the physical press. For most types of work in Phoenix, Presses are technically optional as Sheets and Plates can be used directly, but they are strongly recommended, especially for use with Imposition AI. Presses consist of the following:
- Speed and cost information used by estimation + ganging
- Min/max sheet constraints used by ganging
- Media template (optional)
- Gripper, sheet placement, content and image margins
- Press-specific marks (optional)
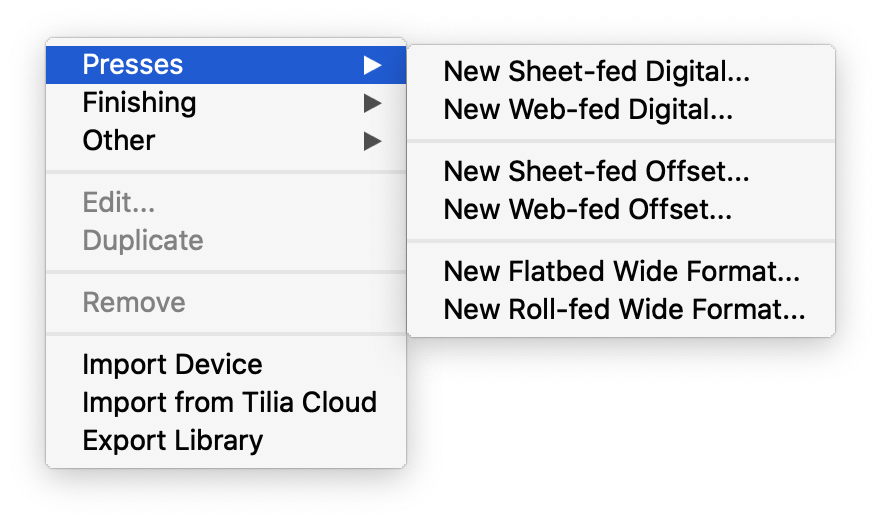
There are different types of Presses available within Phoenix:
- Digital, both Sheet-fed and Web-fed
- Offset, both Sheet-fed and Web-fed
- Wide Format, both Flatbed and Roll-fed
To add a new press, click the dropdown in the top left of the Things panel, and select the type of press you want to add.
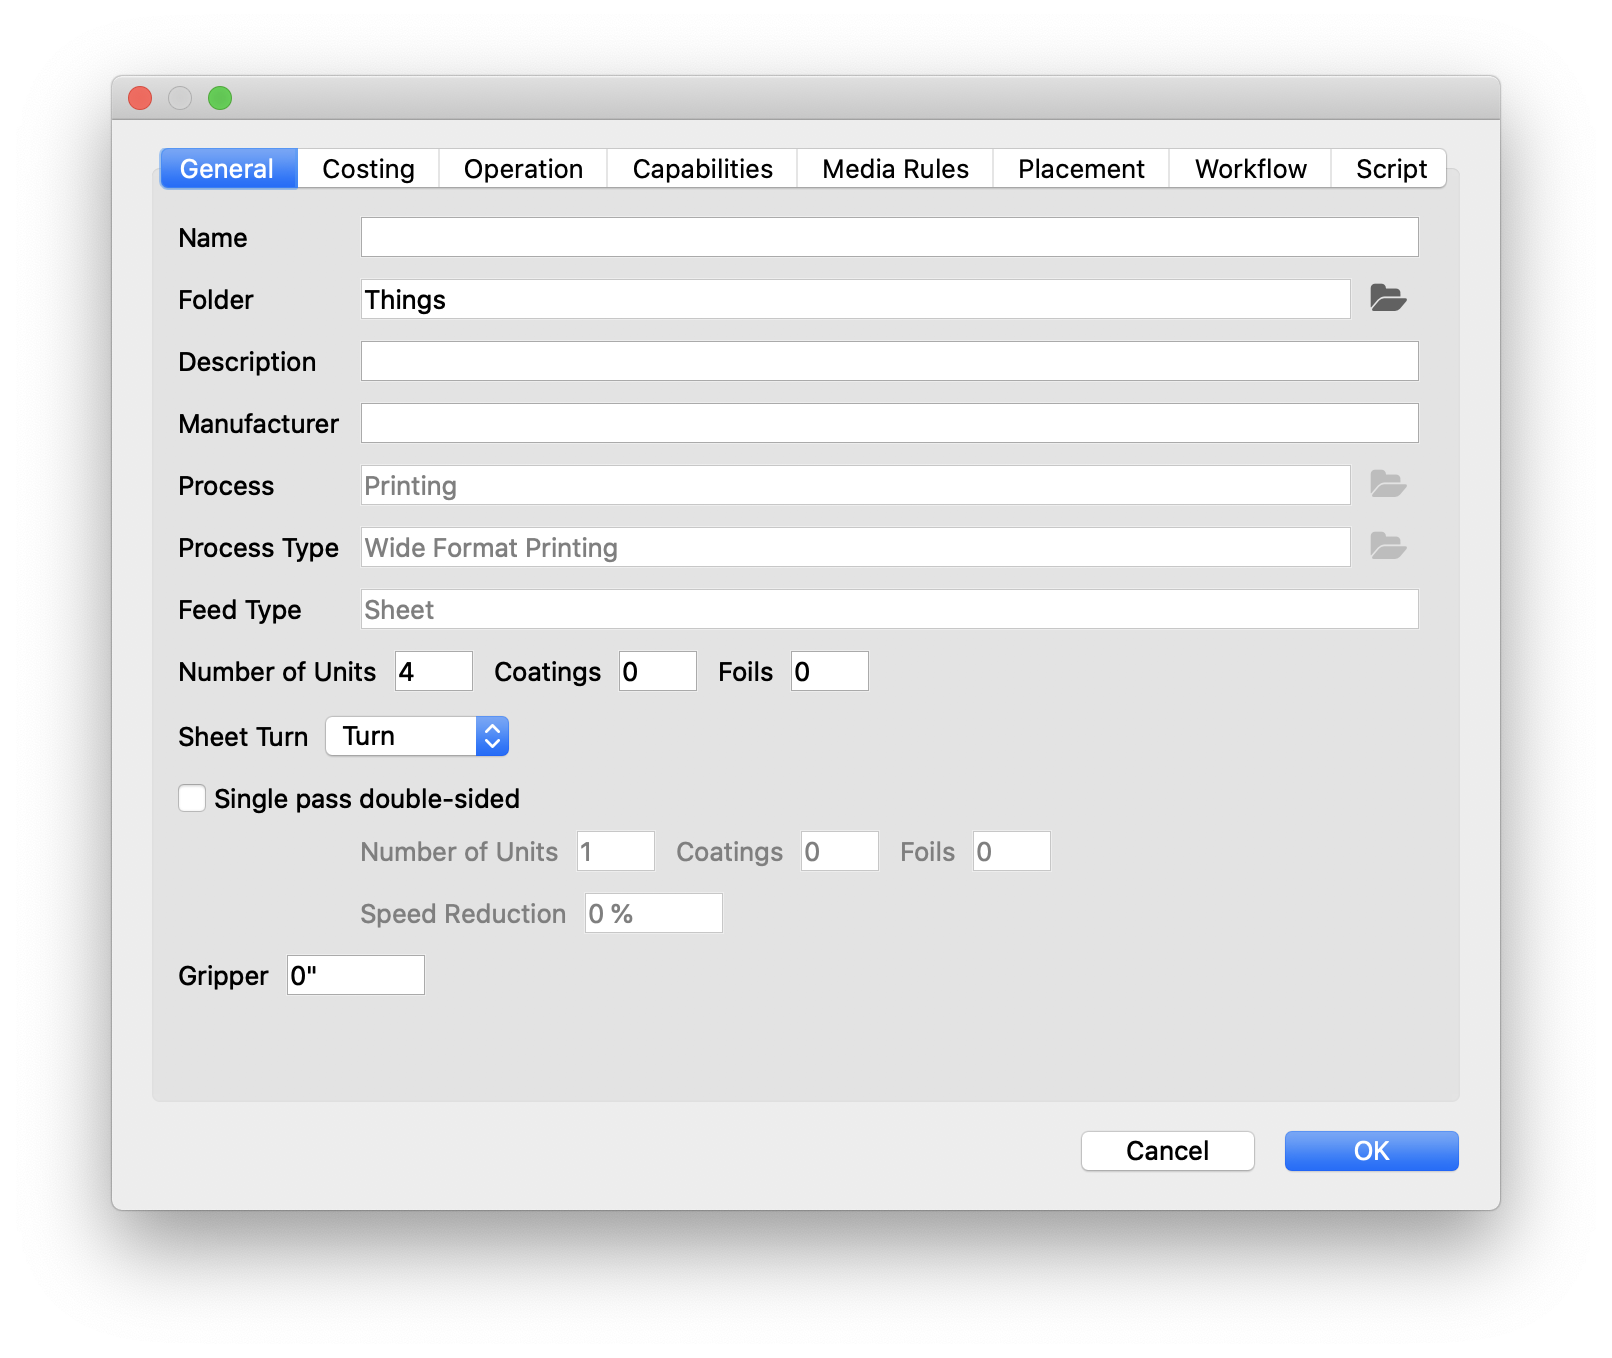
Once you select a press type, the Press Configuration window will appear. The settings vary slightly based on what press type you select, but they all consist of the following tabs:
- General
- Costing
- Operation
- Capabilities
- Media Rules
- Placement
- Workflow
- Script
# General Properties
| Field | Description |
|---|---|
| Name | Name of the press |
| Folder | Folder to organize the press in Phoenix. You can click the folder icon to choose from existing folders, or drag and drop in the Devices panel after creation. |
| Description | Press Description |
| Manufacturer | Press Manufacturer |
| Process | What this device does. For Presses, this will always be “Printing” |
| Process Type | What type of Printing Press this press is, based on the type of press you selected. |
| Feed Type | How stocks are fed into the press |
| Number of Units | Total number of printing units on the press |
| Coatings | Max number of coatings on the press |
| Foils | Max number of foils possible on the press |
| Sheet Turn | Workstyle of the press. Either turn or tumble. *Only available for sheet-based presses |
| Single pass double-sided | Checkbox to enable whether this press can perform single pass double-sided printing |
| Number of Units | If Single pass double-sided is enabled, the number of printing units for the backside. See Note below. |
| Coatings | If Single pass double-sided is enabled, the number of coatings possible for the backside |
| Foils | If Single pass double-sided is enabled, the number of foils possible for the backside |
| Speed Reduction | Percentage of speed reduction when doing single-pass double sided printing |
| Gripper | Gripper distance from the bottom of sheet |
Note
If using the "Single pass double-sided" option, the Number of Units for the back side will subtract from the total Number of Units specified above.
This means that if you have a press with 6 stations, and four of these stations allow for single pass double sided printing, you would specify the total Number of Units as 10, and single pass double-sided Number of Units as 4.
In the above example, Phoenix would understand that to mean that the press can handle layouts with up to 6 front inks and up to 4 back inks.
Note
In Phoenix 7.0, the option for multiple passes has been moved to the Imposition AI profile rather than in the Press settings
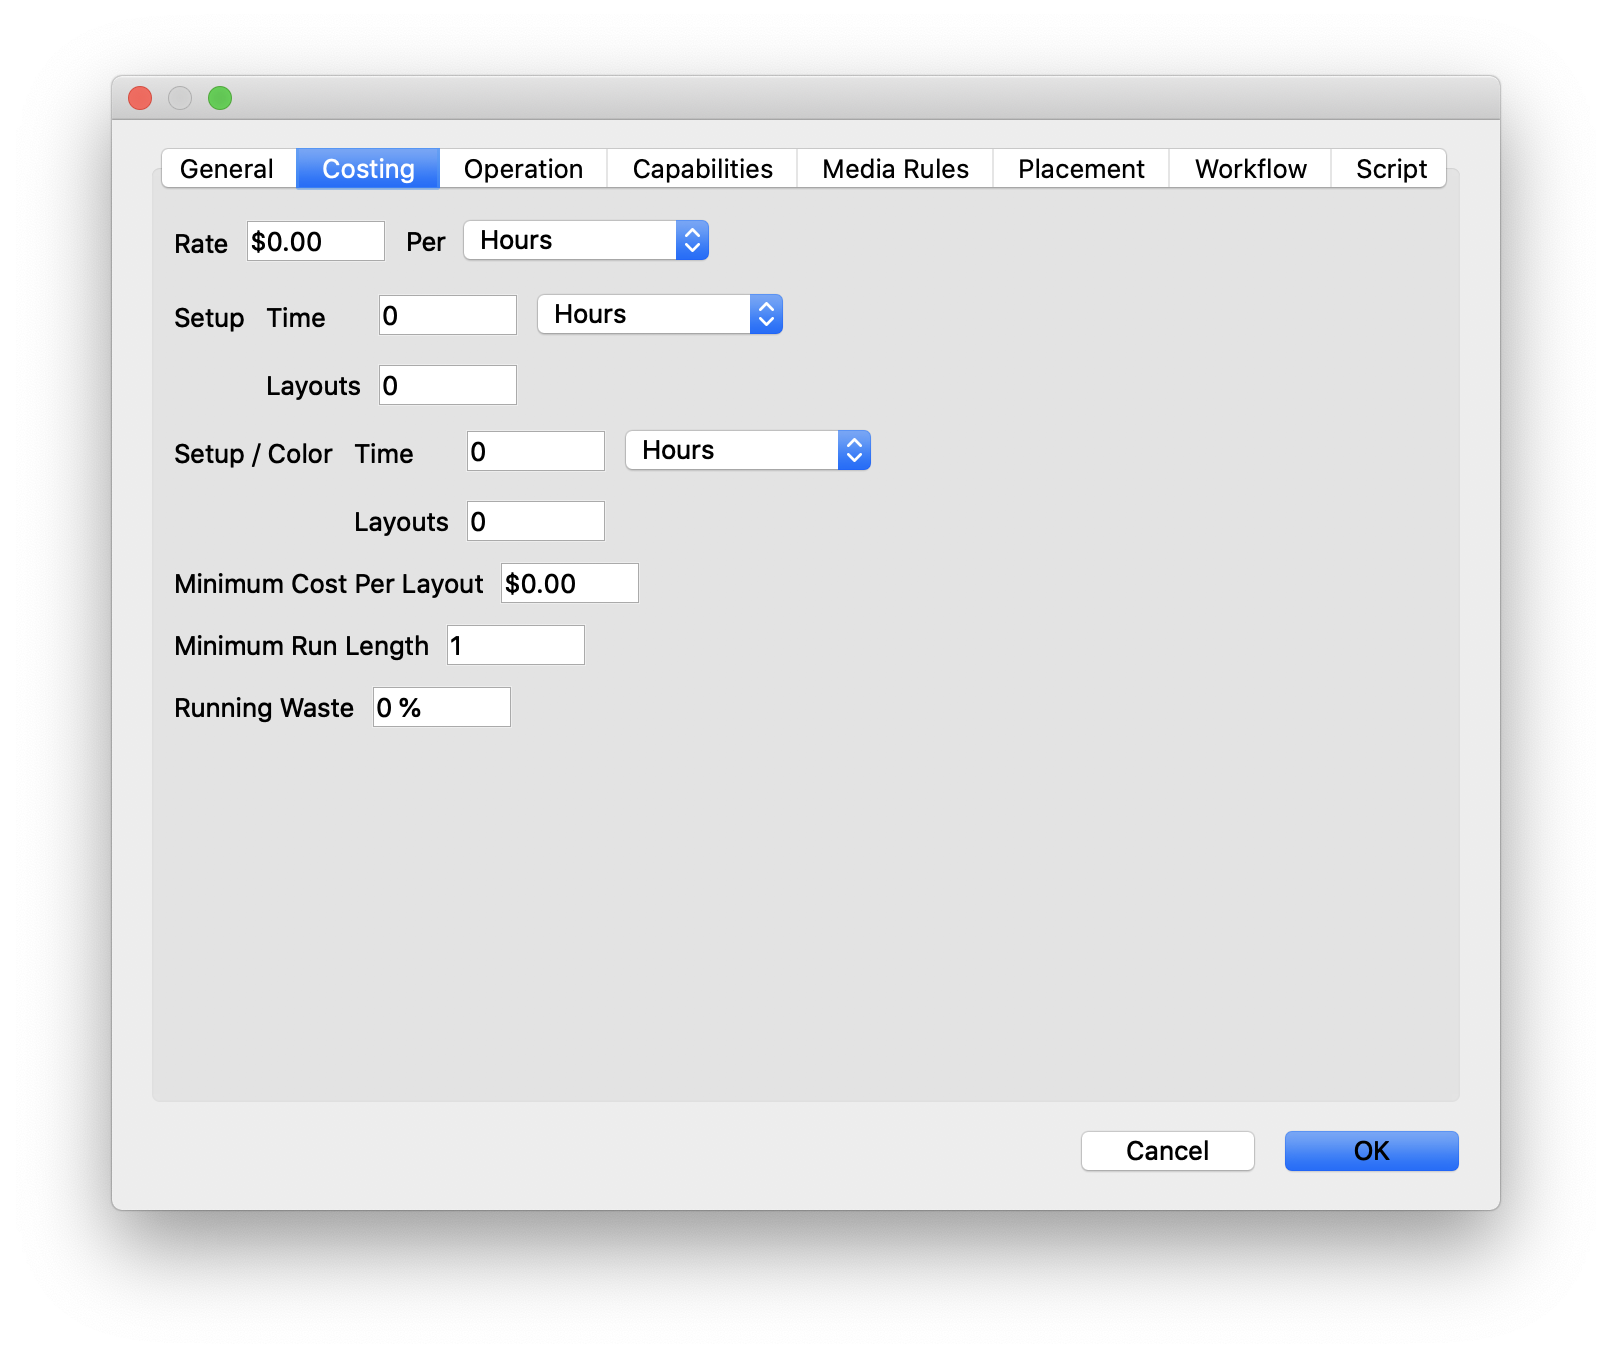
# Costing Properties
| Field | Description |
|---|---|
| Rate | Cost to operate this press, per time unit specified |
| Setup Time | How long it takes to setup the device, per time unit specified |
| Setup Layouts | How many layouts (sheets) the device requires for make-ready |
| Setup / Color Time | Per-color make ready time |
| Setup / Color Layouts | How many layouts (sheets) per color are required for make-ready |
| Minimum Cost Per Layout | Minimum cost required per layout |
| Minimum Run Length | Minimum run length allowed for layouts |
| Running Waste | Percentage of project assumed to be waste. Phoenix will compensate for this value. |
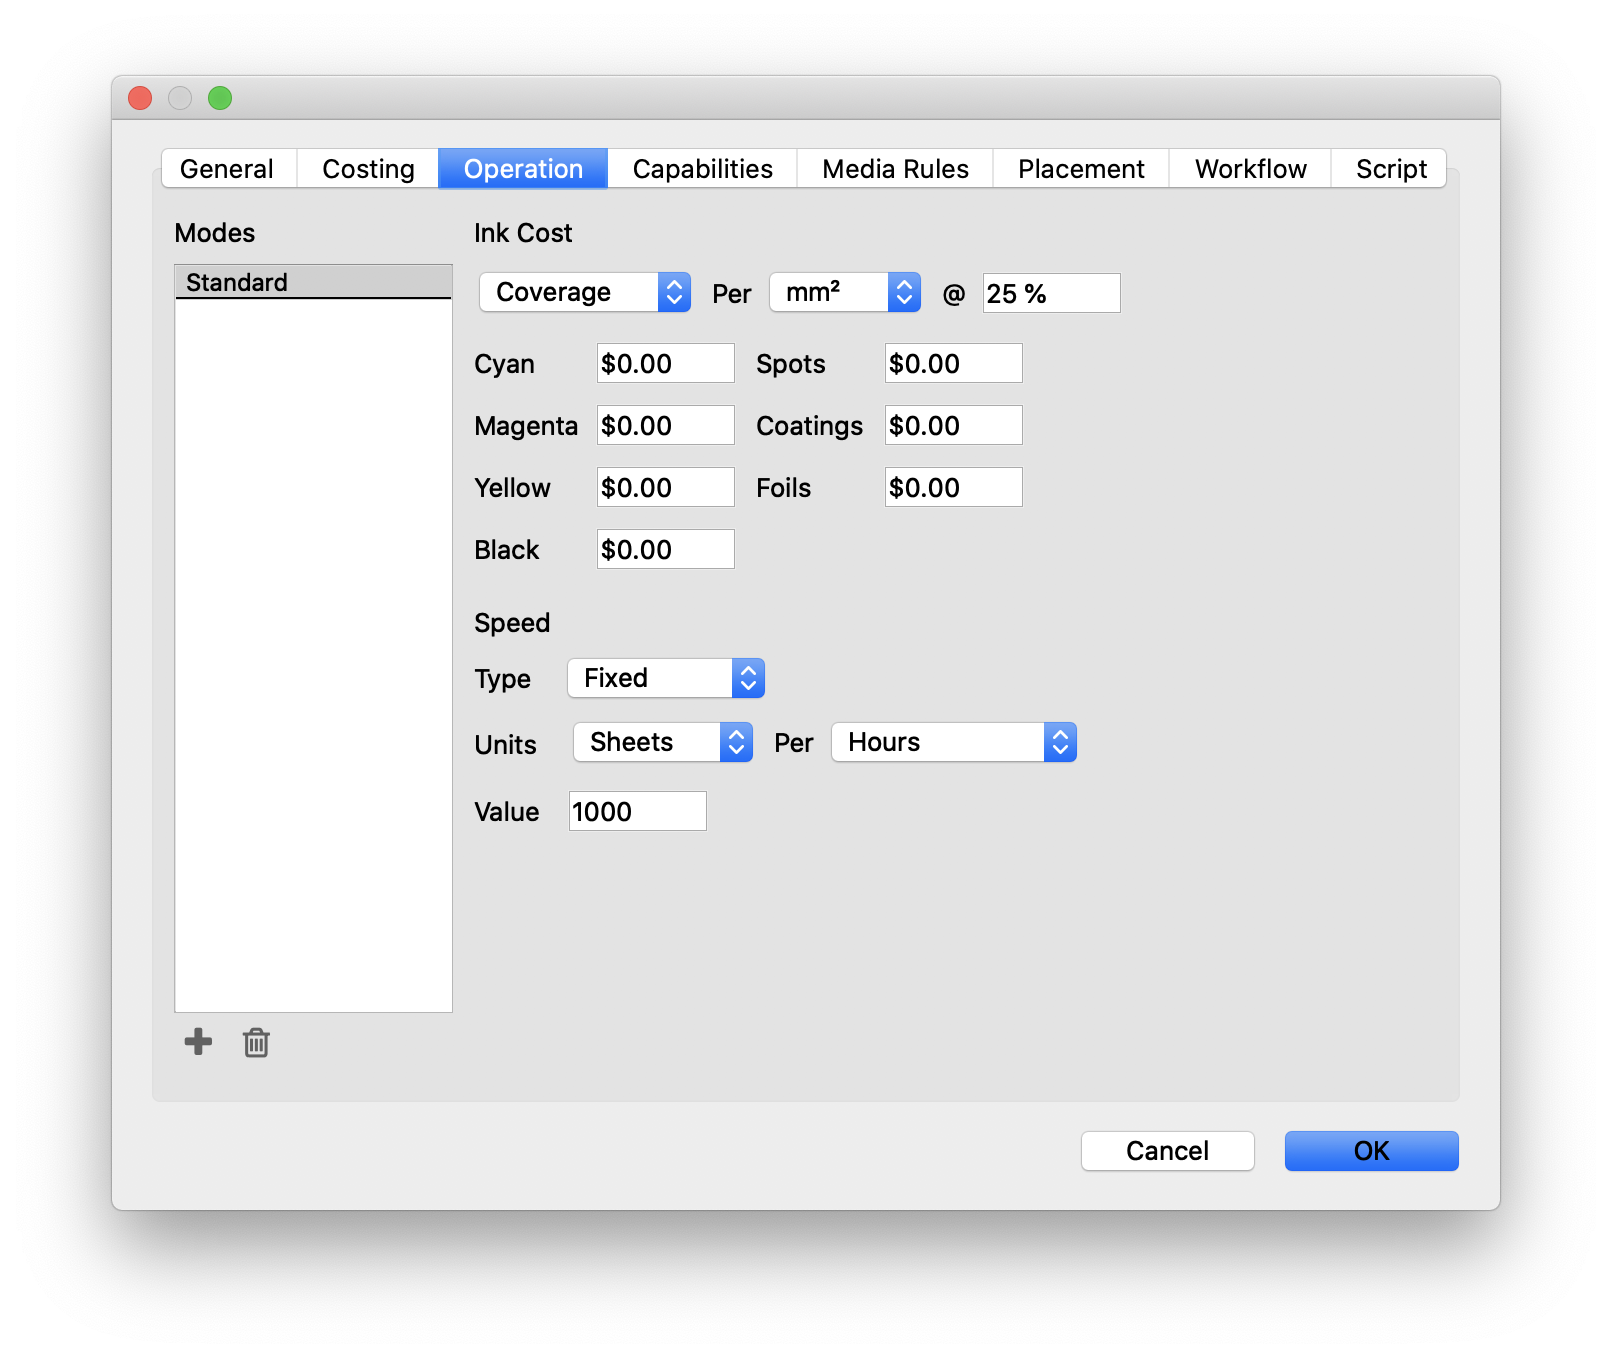
# Operation Properties
| Field | Description |
|---|---|
| Modes | Some devices can run in a specific mode, such as high quality print mode, or efficiency modes. The Modes option allows you to choose the operating costs and speeds for each mode. Modes are described in more detail under the Estimating section of the Preferences page. |
| Ink Cost | Define how inks are costed. Choose between click count or ink coverage per area and percent coverage |
| Speed Type | Define whether the press runs at a fixed speed, or a stepped speed |
| Speed Units | Choose the units and time for the press speed |
| Value | Set the speed value |
# Capabilities Properties
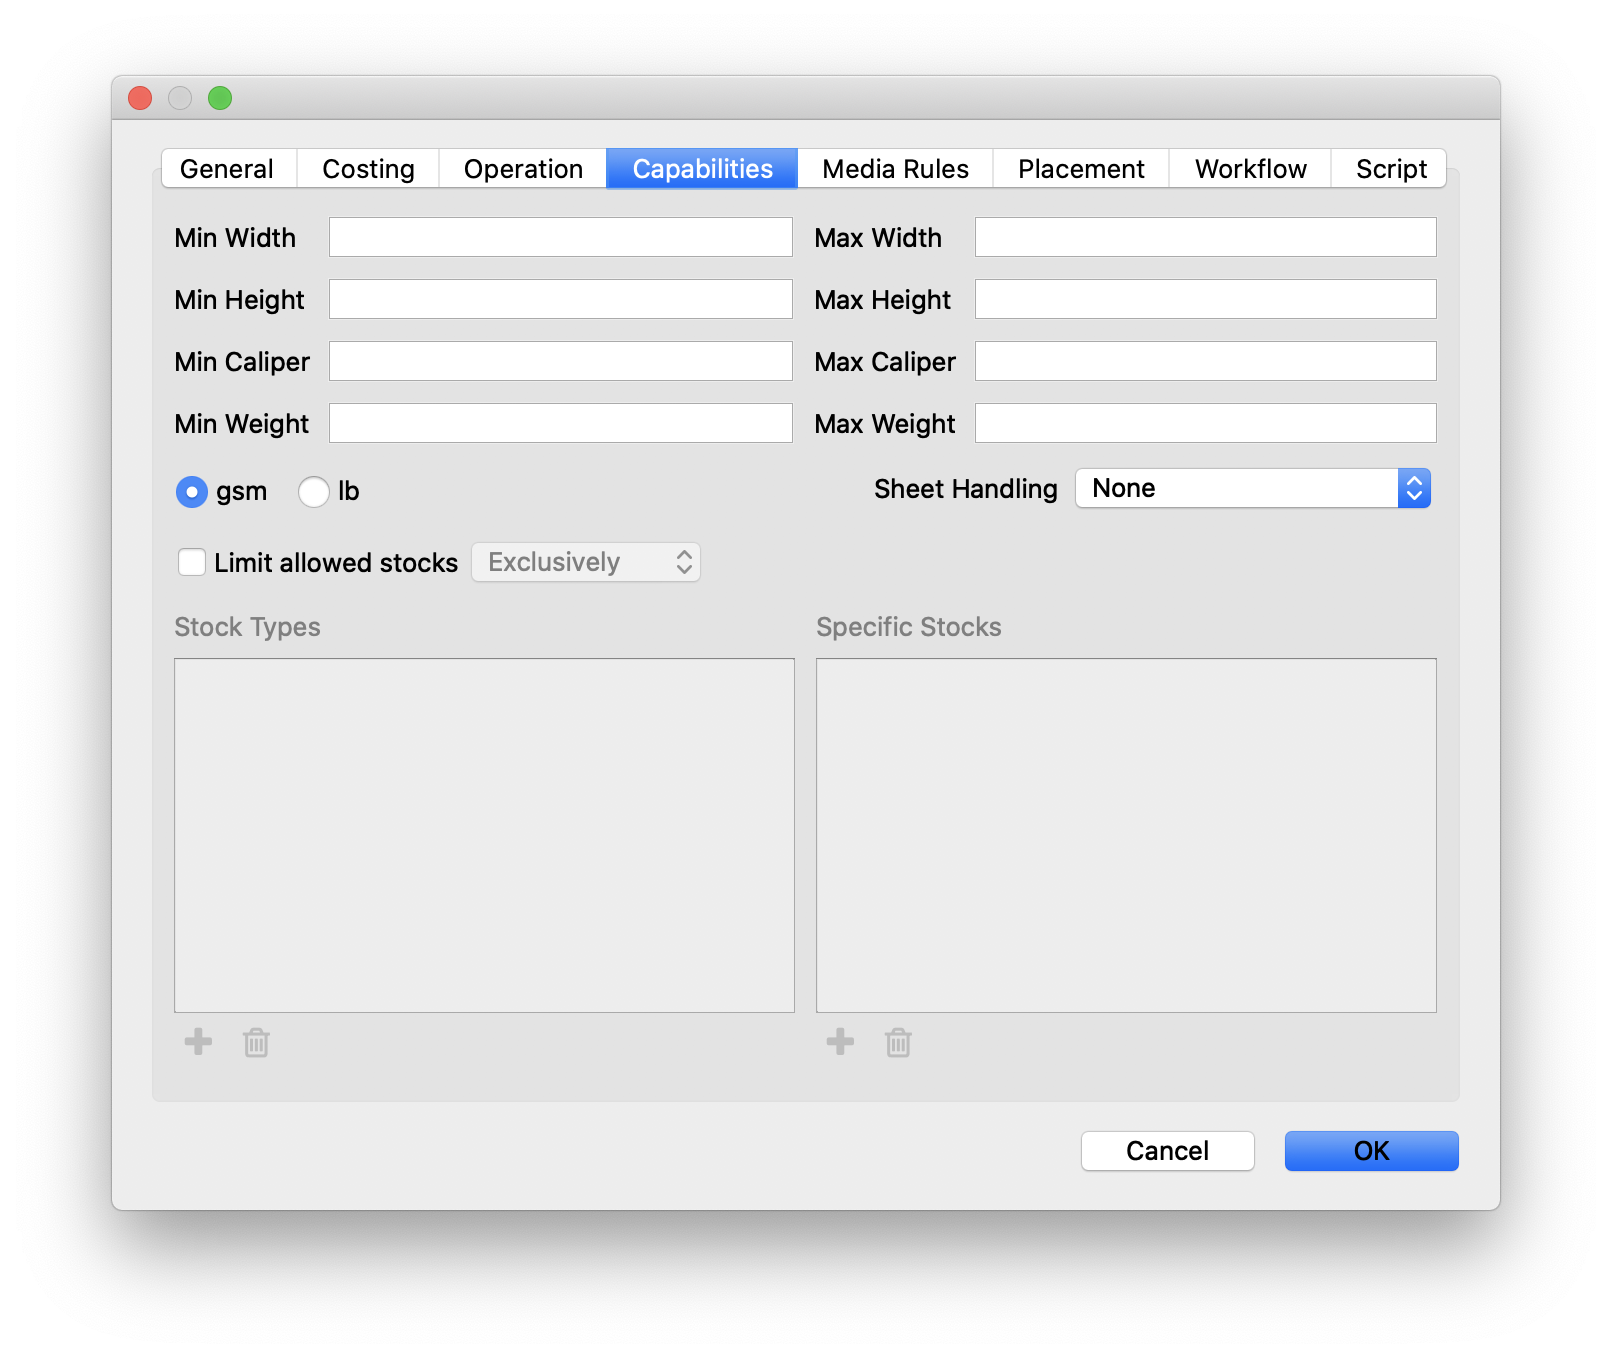
| Field | Description |
|---|---|
| Width | Set the min and max stock width for the press |
| Height | Set the min and max stock height for the press |
| Caliper | Set the min and max stock caliper for the press |
| Weight | Set the min and max stock weight for the press |
| Units | Choose which weight to use for the stock weight |
| Sheet Handling | Set how the press handles sheets, either Long Edge Horizontal, Long Edge Vertical, or None |
| Limit allowed Stocks | Enable if the press should limit which stocks can be run on this press, either Exclusively or Inclusively |
| Stock Types | Define entire types of stocks to be excluded or included from this press |
| Specific Stocks | Define specific stocks to be excluded or included from this press |
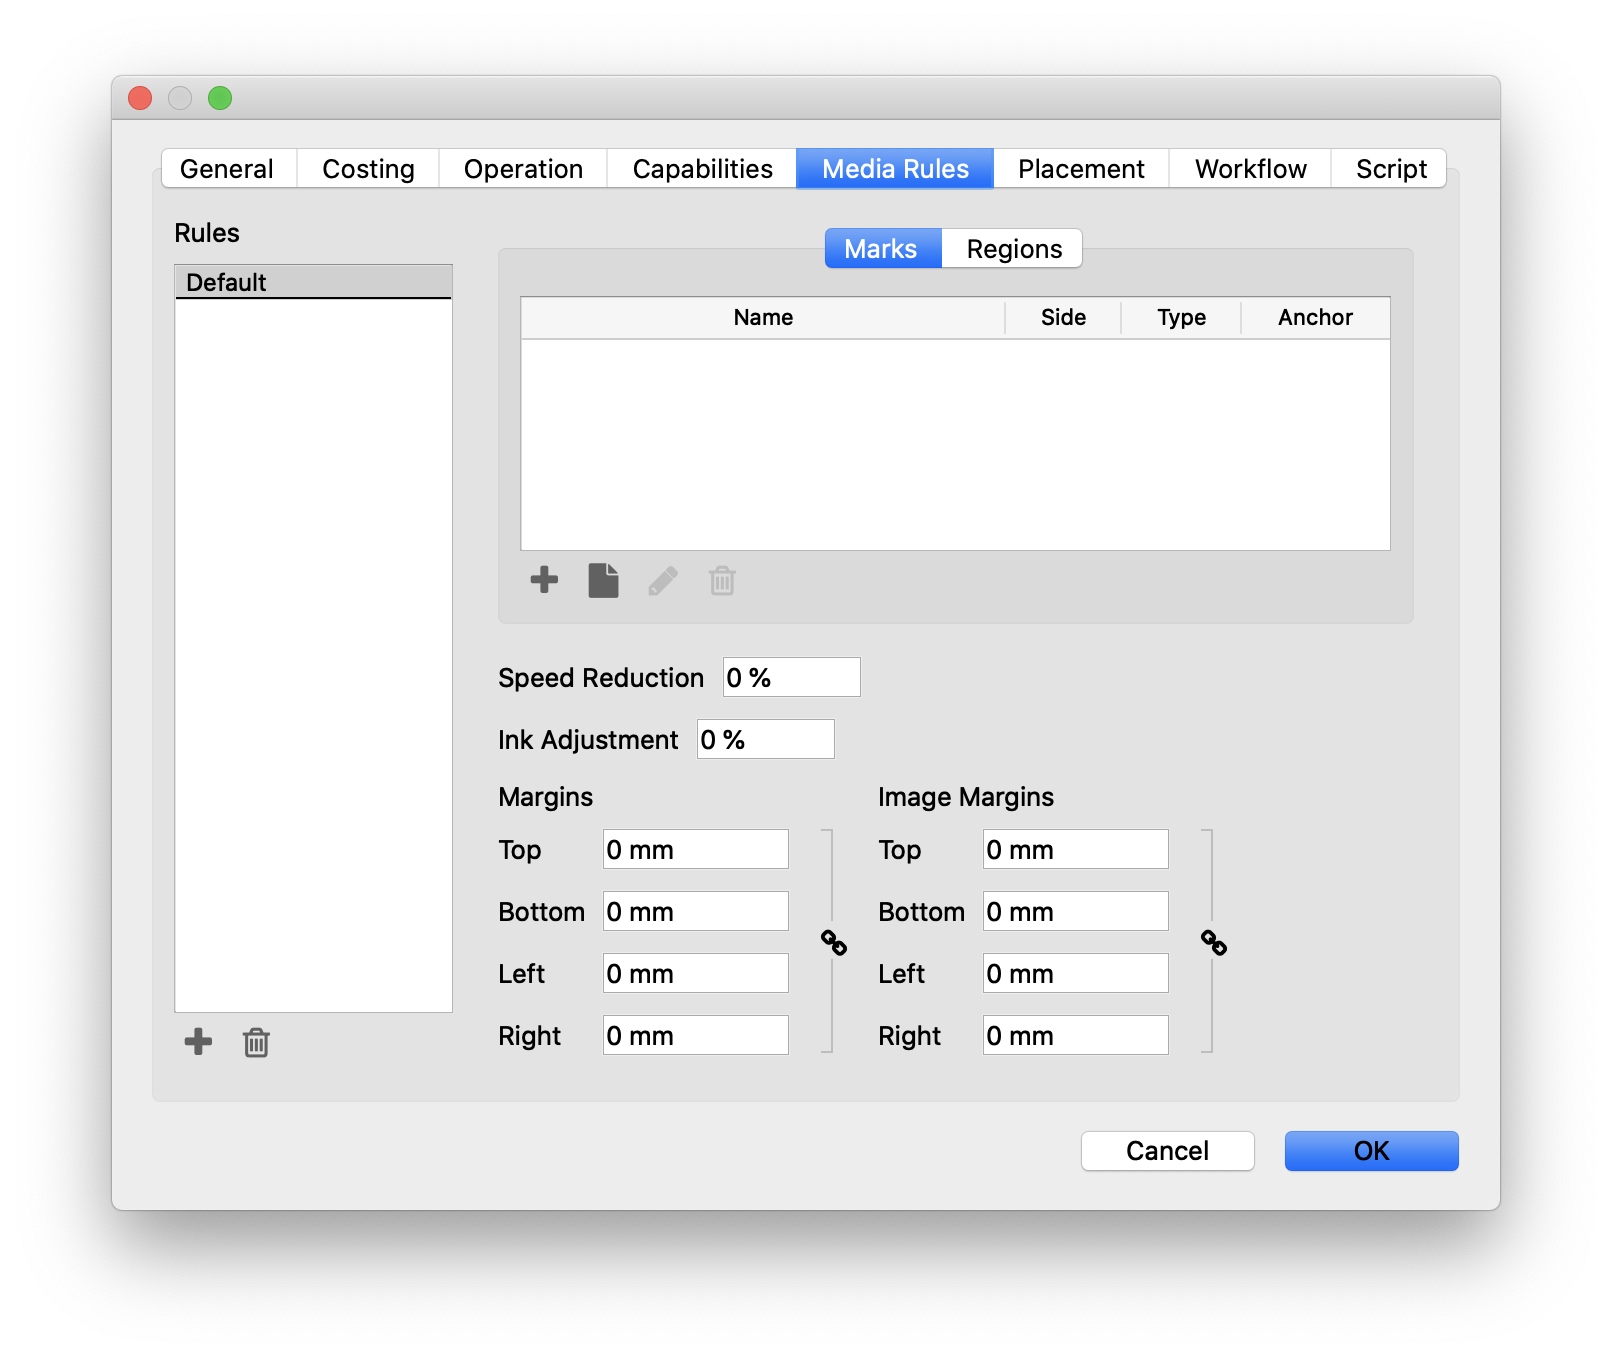
# Media Rules Properties
Media Rules allows you to define press settings based on the stock used. The rules column on the left side of the window allows you to select a stock (or the default), and then define the settings for that stock. To set the parameters for your press and media, first add or select the desired stock on the left side, and then define the settings for that stock.
| Field | Description |
|---|---|
| Rules | Add or remove a media rule based on the stocks in your stocks library |
| Marks | Define marks to be used on this press when the selected stock is used. Once a mark is selected, you can choose which side(s) of the layout it should be applied to - Front, Back, or Both. |
| Regions | Define regions on the stock where items won't be placed. Regions are defined by Direction (Vertical or Horizontal), Position (Left, Right, or Center), Offset, Size, and when they are Applied (Always or only for Perfecting layouts). These regions can be shown in a layout by enabling the option "Show Regions" |
| Speed Reduction | Define any possible speed reduction for this media rule |
| Ink Adjustment | If the selected media requires an adjustment of ink, set it here. For example, a particular stock may require 25% more ink then a different stock based on it's ink absorbing qualities. |
| Margins | Define the margin where for the media. Margin is the area along the edge of the sheet or roll where no product dieline can be placed. Note that product bleed can extend into the margin, depending on the Image Margins defined. |
| Image Margins | Define the image margins. Image Margins are the area around the sheet or roll where no image can be printed, regardless of whether or not it is bleed. The Image Margin should always be less than or equal to the Margin value. |
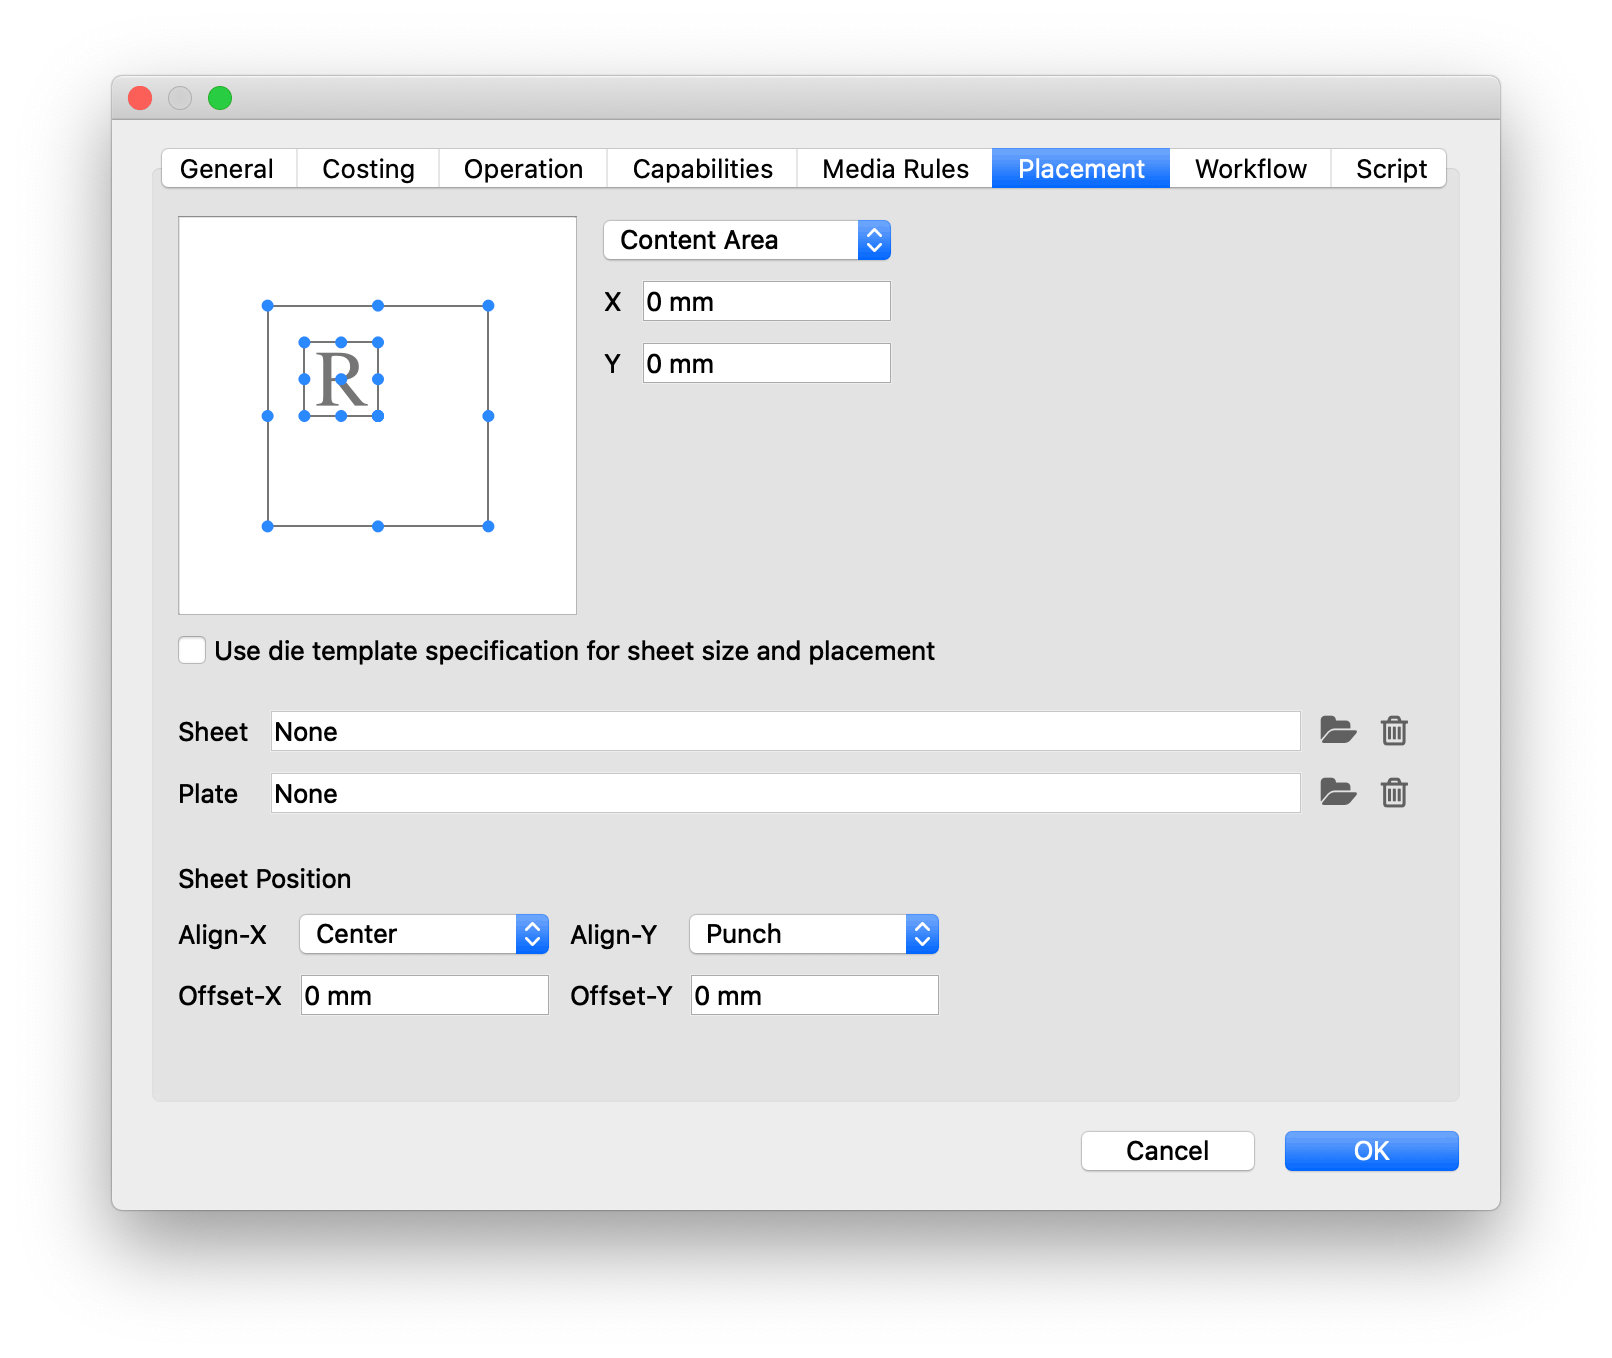
# Placement Properties
Note
Only the relevant parameters will be available for any given press type. There may be certain parameters that appear in screenshots that do not appear for every press type.
| Field | Description |
|---|---|
| 9-Point Selector | The 9-Point Selector is an easy way to visually define placement. The smaller box with the "R" represents the corners and center of the bounds of the sheet, while the outer box represents the corners and bounds of the context area. Click and drag the smaller box to set one of the anchor points of the sheet to an anchor point on the context area. This anchor point is where the sheet will be placed relative to the context area. |
| Context | Dropdown selection for where the placement is based off of - the Plate, the Sheet, or Content Area (default) |
| X, Y | Define an x & y offset from the selected location |
| Use die template specification for sheet size and placement | Option to use the sheet and placement saved in a die template to specify the location of the sheet (if available) instead of manually setting it. The template needs to have a sheet defined in it for this feature to work. |
| Sheet | Optionally select a default sheet for the press. This will automatically assign the selected sheet when the press is brought into a new layout. |
| Plate | Optionally select a default plate for the press. This will automatically assign the selected plate when the press is brought into a new layout. |
| Sheet Position | For offset presses, define the sheet alignment and offset |
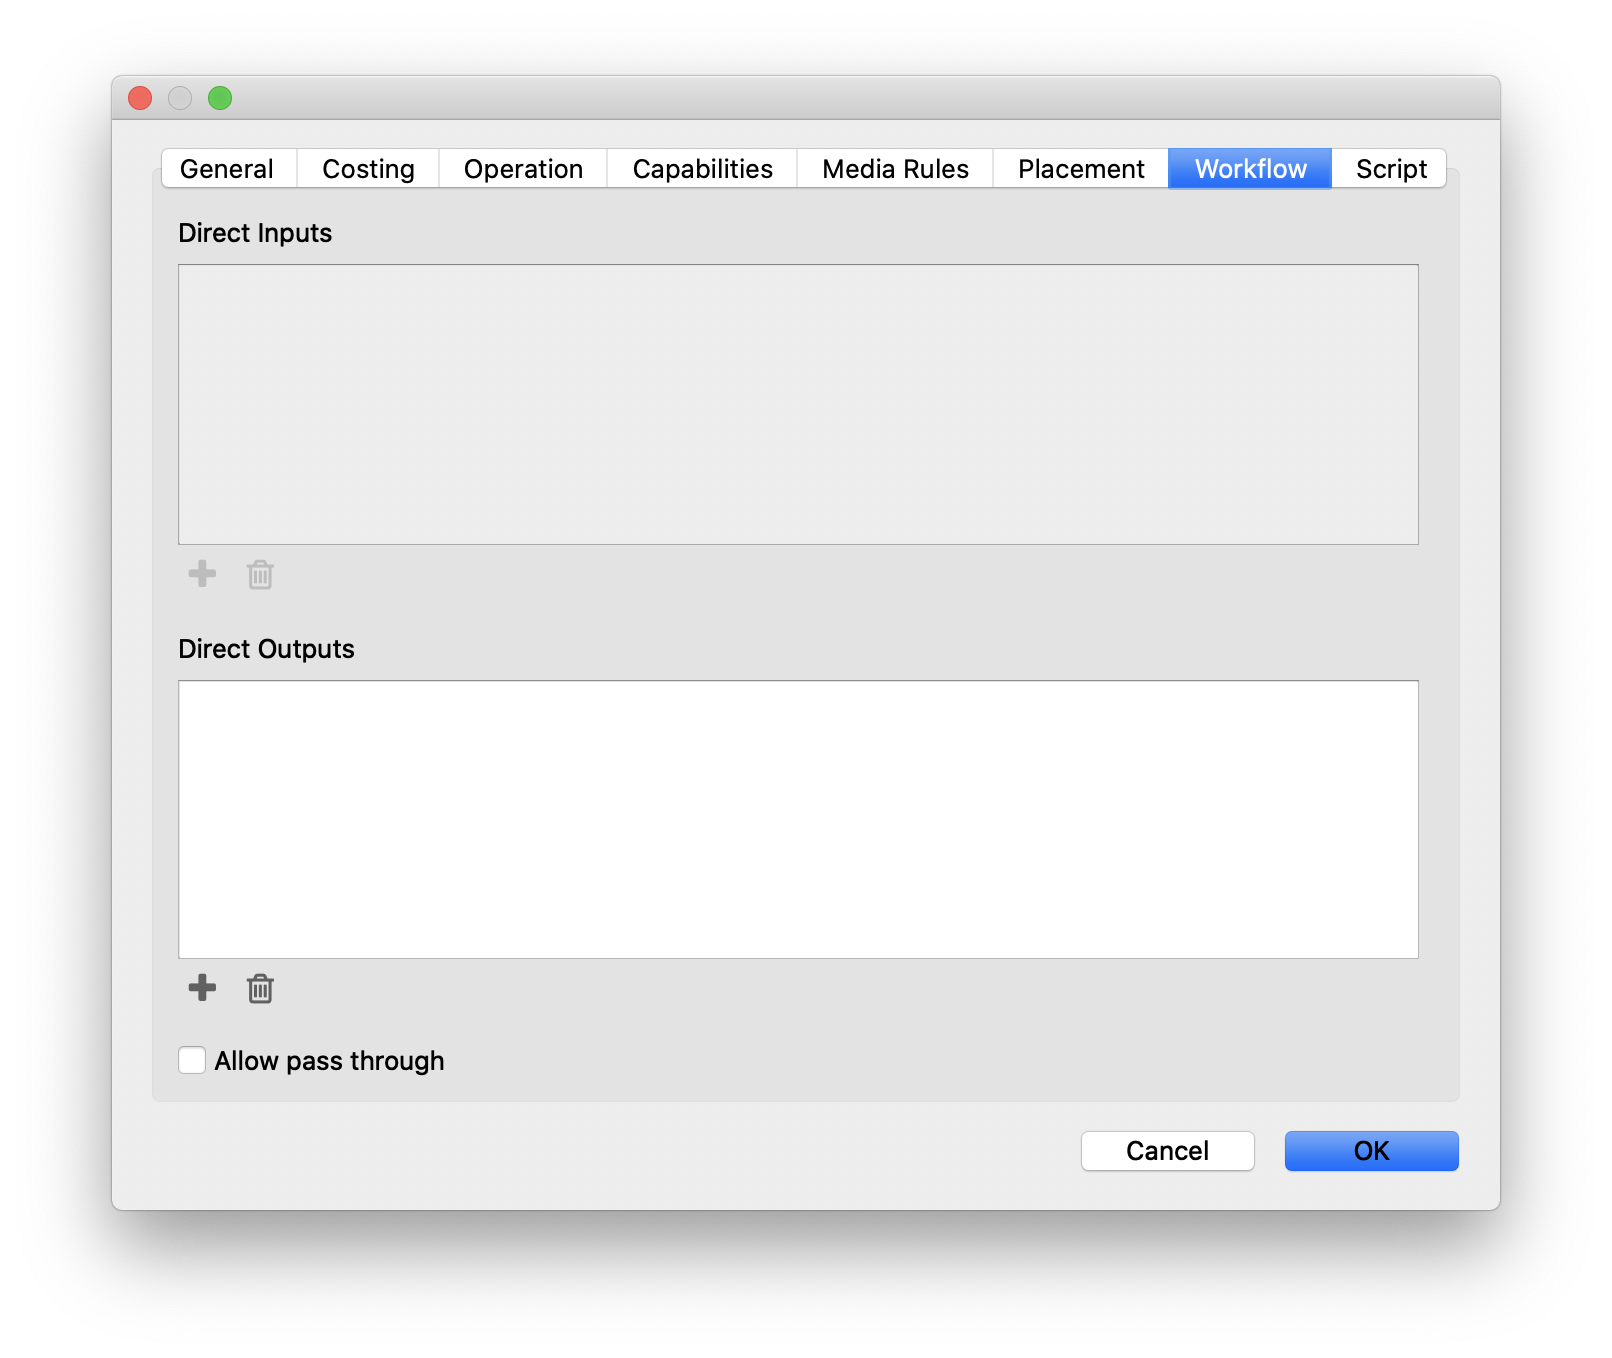
# Workflow Properties
Workflow properties per device can be used to emulate your production workflow within Phoenix. Every process in the print production workflow requires input resources starting with the client’s files or artwork and ending with the final bound, packaged and labeled print product. For example, before you can print, you need paper, ink and plates, and before you can send a document to a die cutter line, you need printed sheets and physical die (or the creation of a die).
| Field | Description |
|---|---|
| Direct Inputs | Displays all 'Things' which have this particular 'Thing' defined as a 'Direct Output'. This field is read-only. |
| Direct Outputs | Specify a list of valid ouputs to be used after a product/component has finished this proccessing step. For example, a direct output for a 'Die Making Process' thing is a Flatbed Die Cutter thing. Defining specific Direct Outputs forces Phoenix to evaluate many routing options when printing/finishing a product. |
| Allow pass through | Allow passthrough means a thing can be part of a workflow but does not have to take part in it's cost/time/etc. Example: Attaching a coater to a press inline. If allow passthrough is on then coater would be ignored if there wasn't any coating process on the products going through it. |
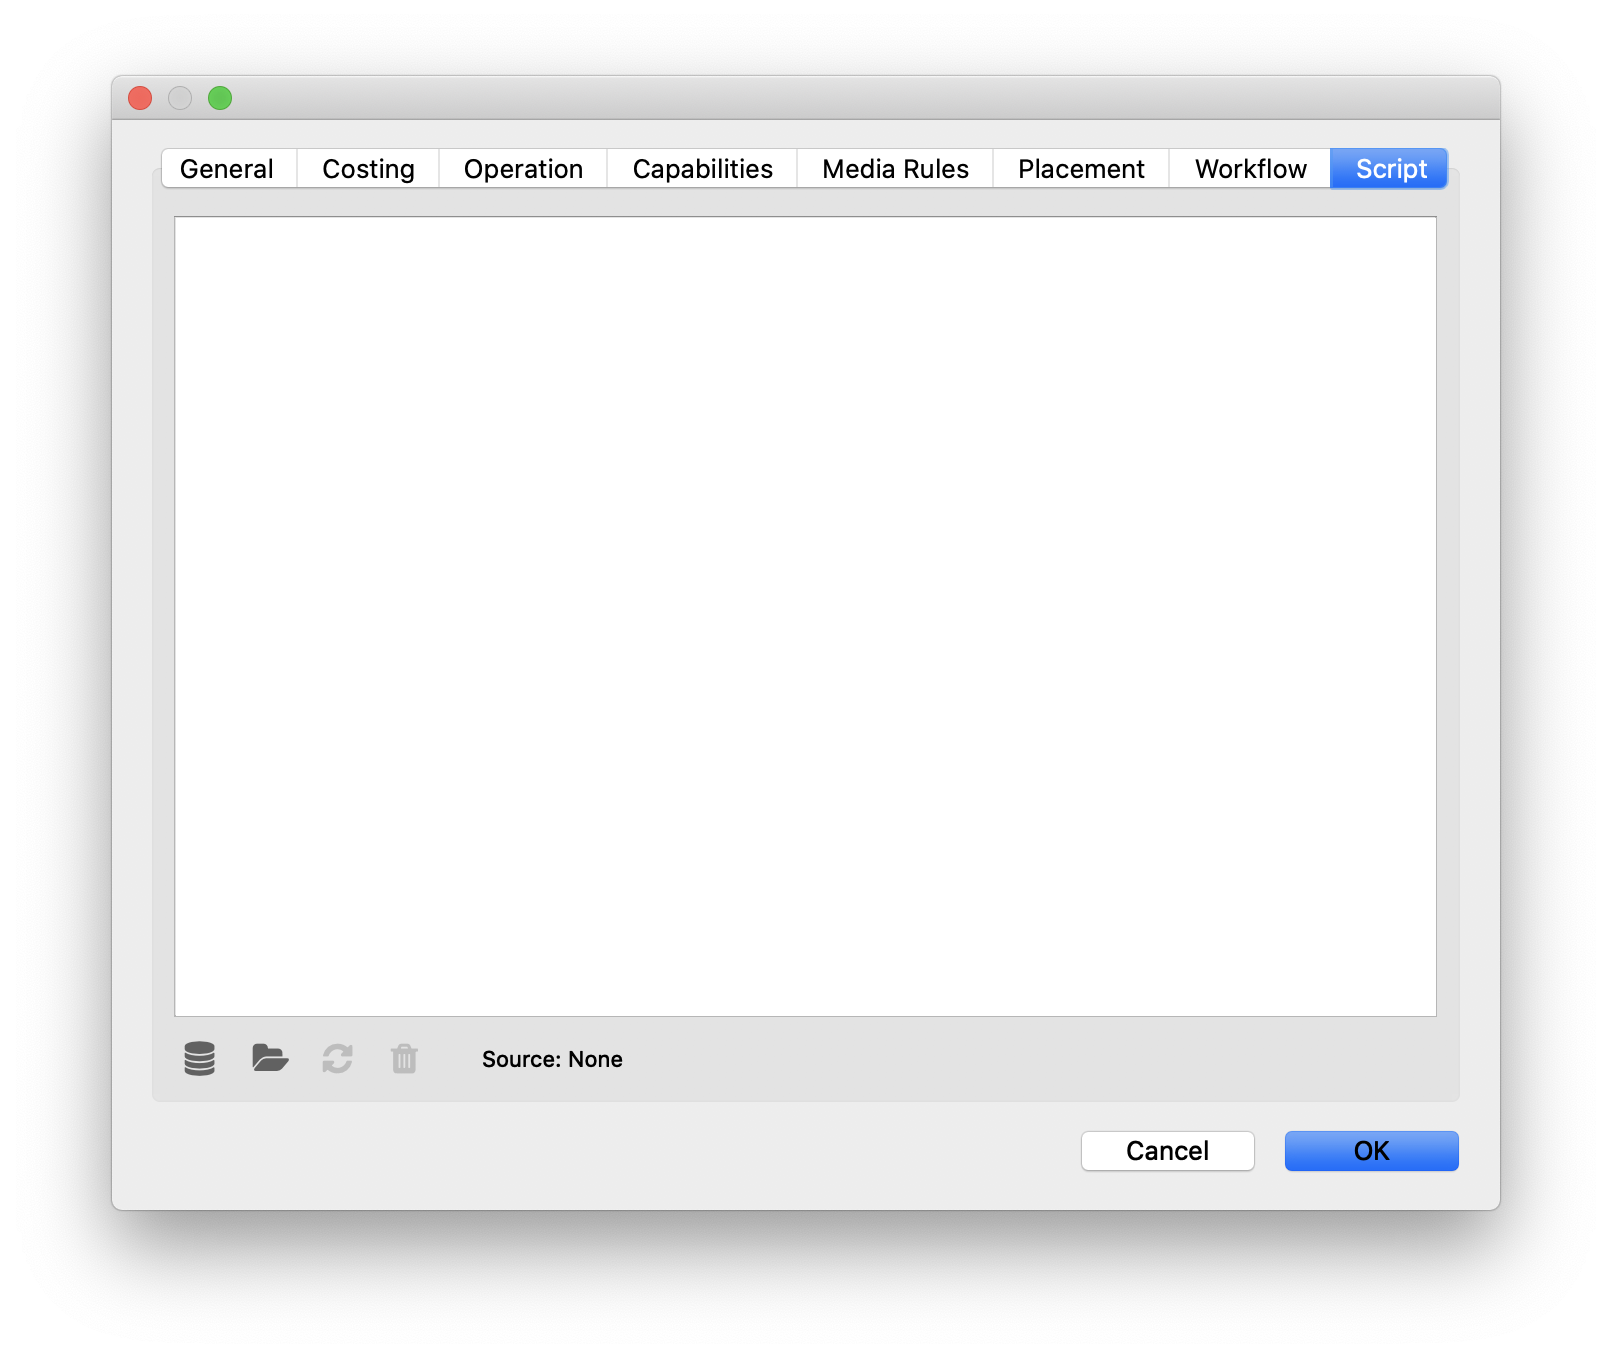
# Script Properties
# Finishing Devices
In Phoenix, a 'Finishing Device' is a physical object which performs activities on printed material after printing. This includes binding, the fastening of individual sheets together, die-cutting, and decorative processes such as die-stamping, embossing, foiling or laminating.
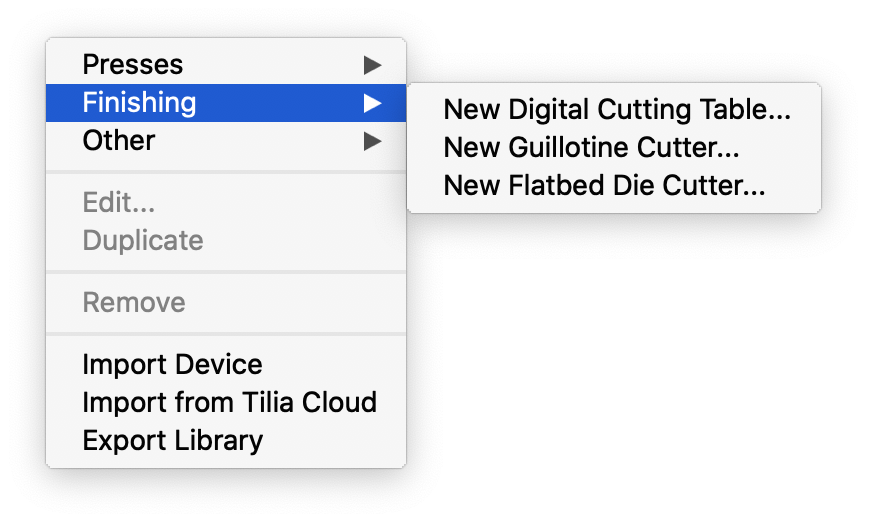
There are currently three different types of Finishing Devices available within Phoenix:
- Digital Cutting Table
- Guillotine Cutter
- Flatbed Die Cutter Cutter
To add a new finishing device, click the dropdown in the top left of the Things panel, and select the type of finishing device you want to add.
Once you select a finishing device, the Finishing Device Configuration window will appear. The settings vary slightly based on what device is selected.
Note
The finishing devices have many of the same settings as the presses, described above. Any configuration tabs or settings that are duplicated in finishing devices can be found in the Press section, above.
# Digital Cutting Table
A digital cutting table is a CAD/CAM device such as a Zund or Kongsberg digital cutting table that uses a moving head to drive a tool across a substrate in multiple dimensions (typically x, y, and z). It has the following settings:
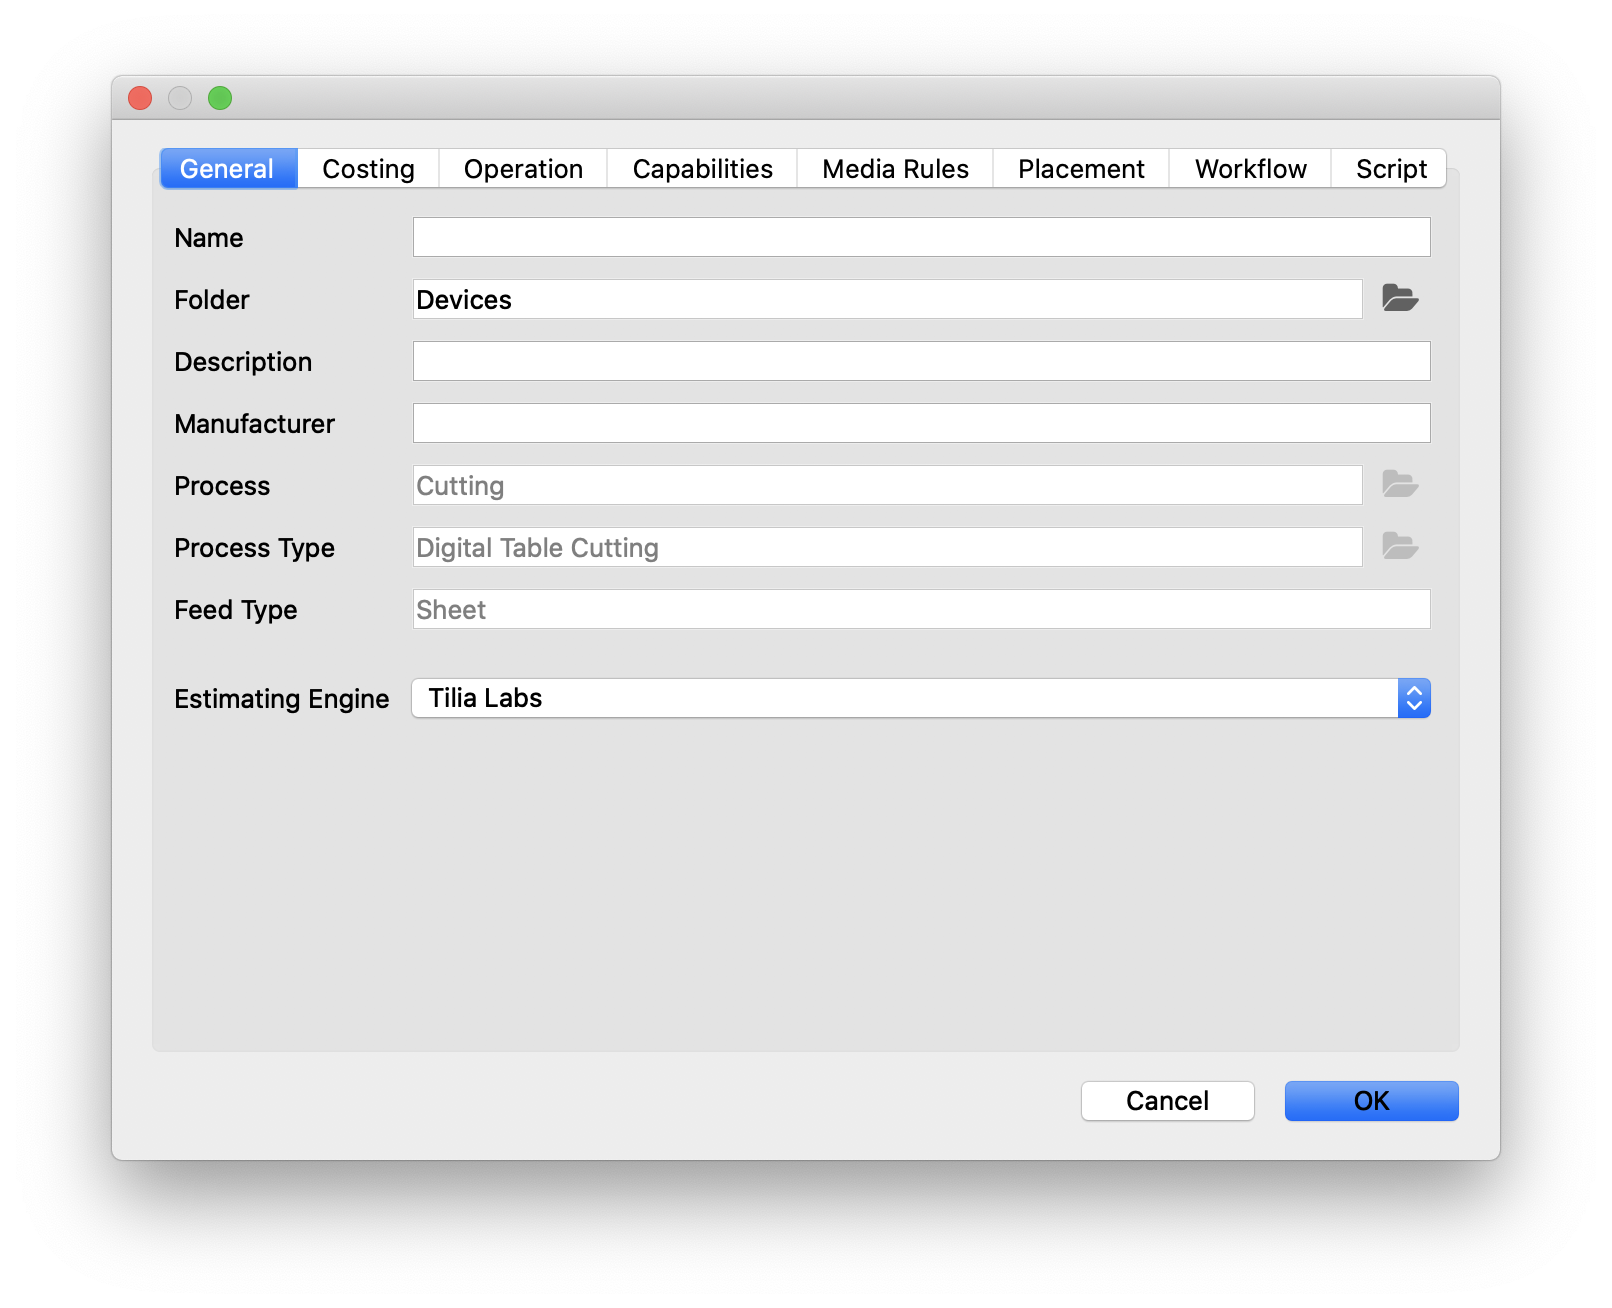
# Digital Cutting Table - General
| Field | Description |
|---|---|
| Estimating Engine | Select the estimating engine for costing. You can choose from Tilia Labs estimating engine, or Zund Cut Center. If using Zund Cut Center, you will also need to specify the hostname and port of the computer running Zund Cut Center. In addition, you can specify a timeout if no connection is established with Zund Cut Center. |
# Digital Cutting Table - Operation
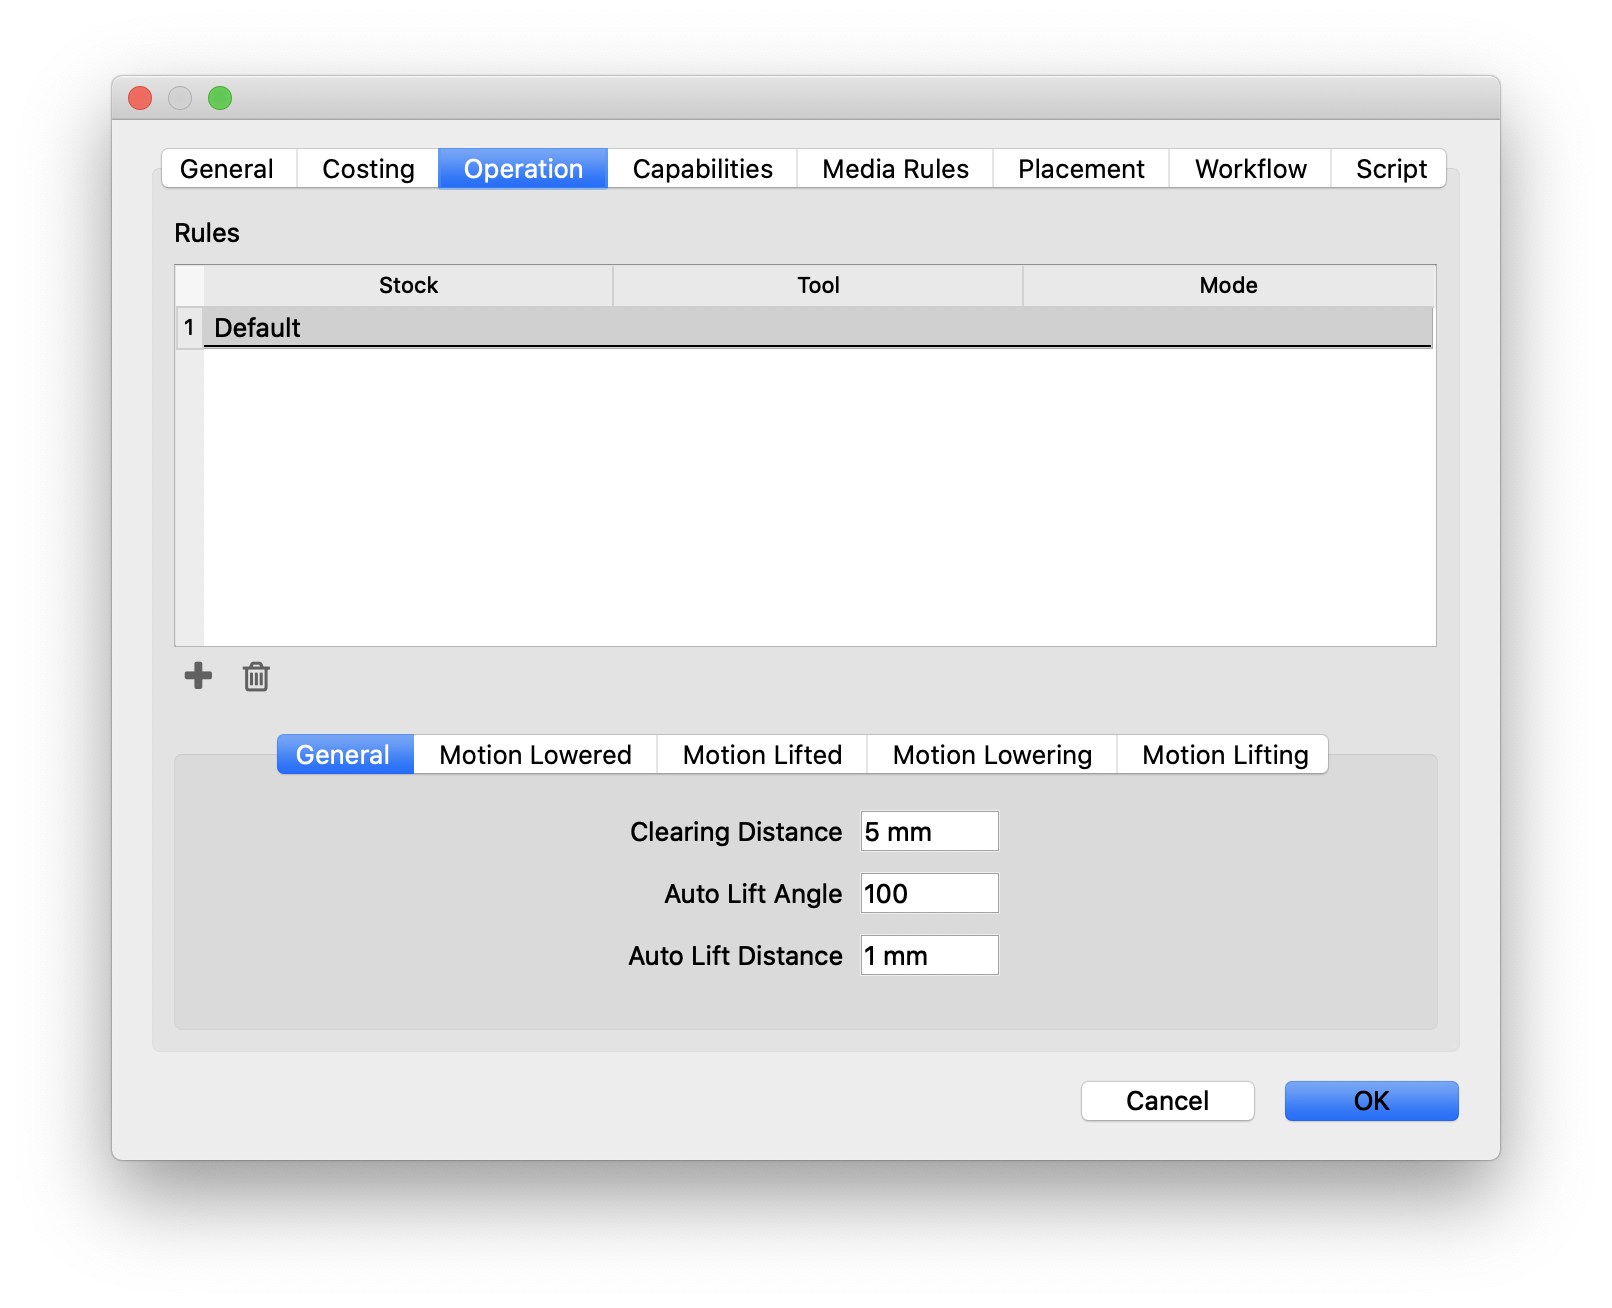
# General
| Field | Description |
|---|---|
| Clearing Distance | The full lifting height of the tool when the traverse is moving between disconnected path segments. |
| Auto Lift Angle | For most CAD/CAM tables, you can set the angle for automatic corner lifting for a tool (typically around 40 degrees). If a direction change of more than the specified value is detected during the cutting process, the table will raise the tool, turn the tool into the cutting direction, and lower again to finish cutting. |
| Auto Lift Distance | This is the total amount of z-axis lift when the tool is lifting during the auto lift activity. |
# Additional Settings
# Guillotine Cutter
A guillotine cutter is used to make a single guillotine cut at a time.
# Guillotine Cutter - Costing
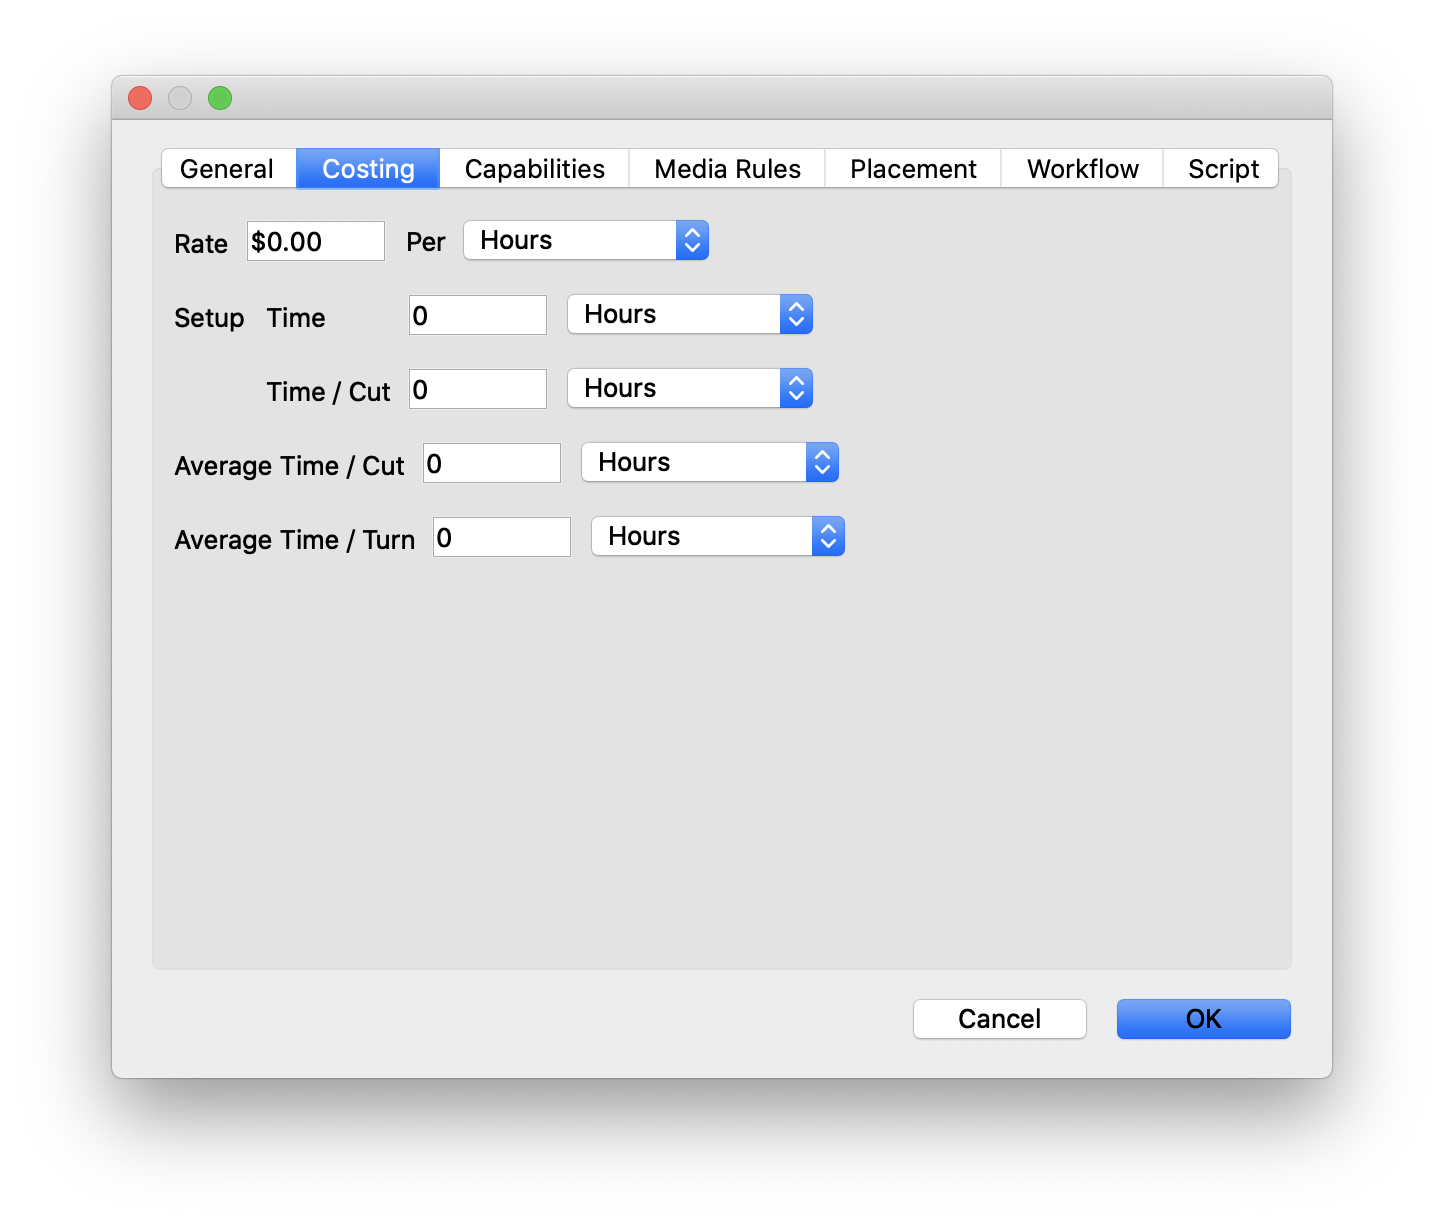
| Field | Description |
|---|---|
| Setup Time | General setup time per layout |
| Setup Time / Cut | Setup time for each cut |
| Average Time / Cut | Average amount of time per cut through the stack of material |
| Average Time / Turn | Average amount of time to turn the stack of material |
# Flatbed Die Cutter
A Flatbed Die Cutter is used (in conjuction with a die template) to cut or perforate products of a desired shape out of material using a hydraulic flatbed press.
# Flatbed Die Cutter - Costing
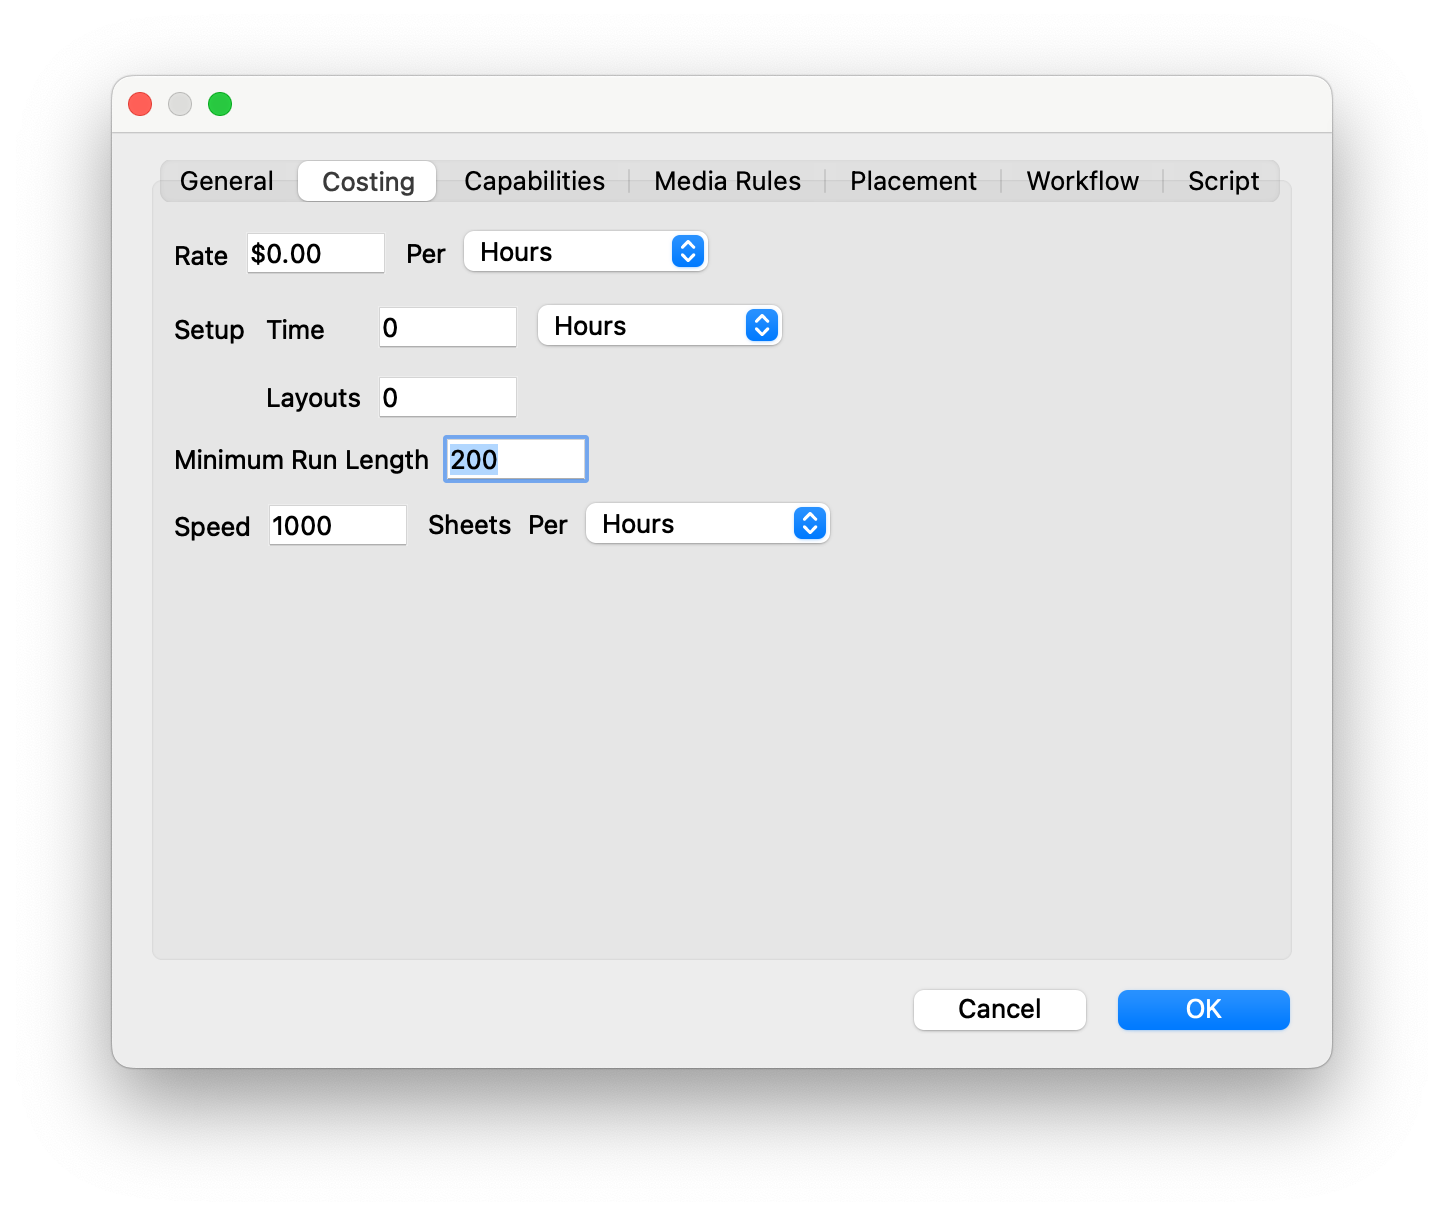
| Field | Description |
|---|---|
| Minimum Run Length | Sets the minimum run length needed to use this Die Cutter |
| Speed | Speed of the die cutter |
| Speed Units | Speed units |
# Other Settings
The remaining device configuration tabs are the same as the press tabs defined above
# Die Making
The Die Making Process describes the production of tools for a die cutter (e.g., in a die maker shop).
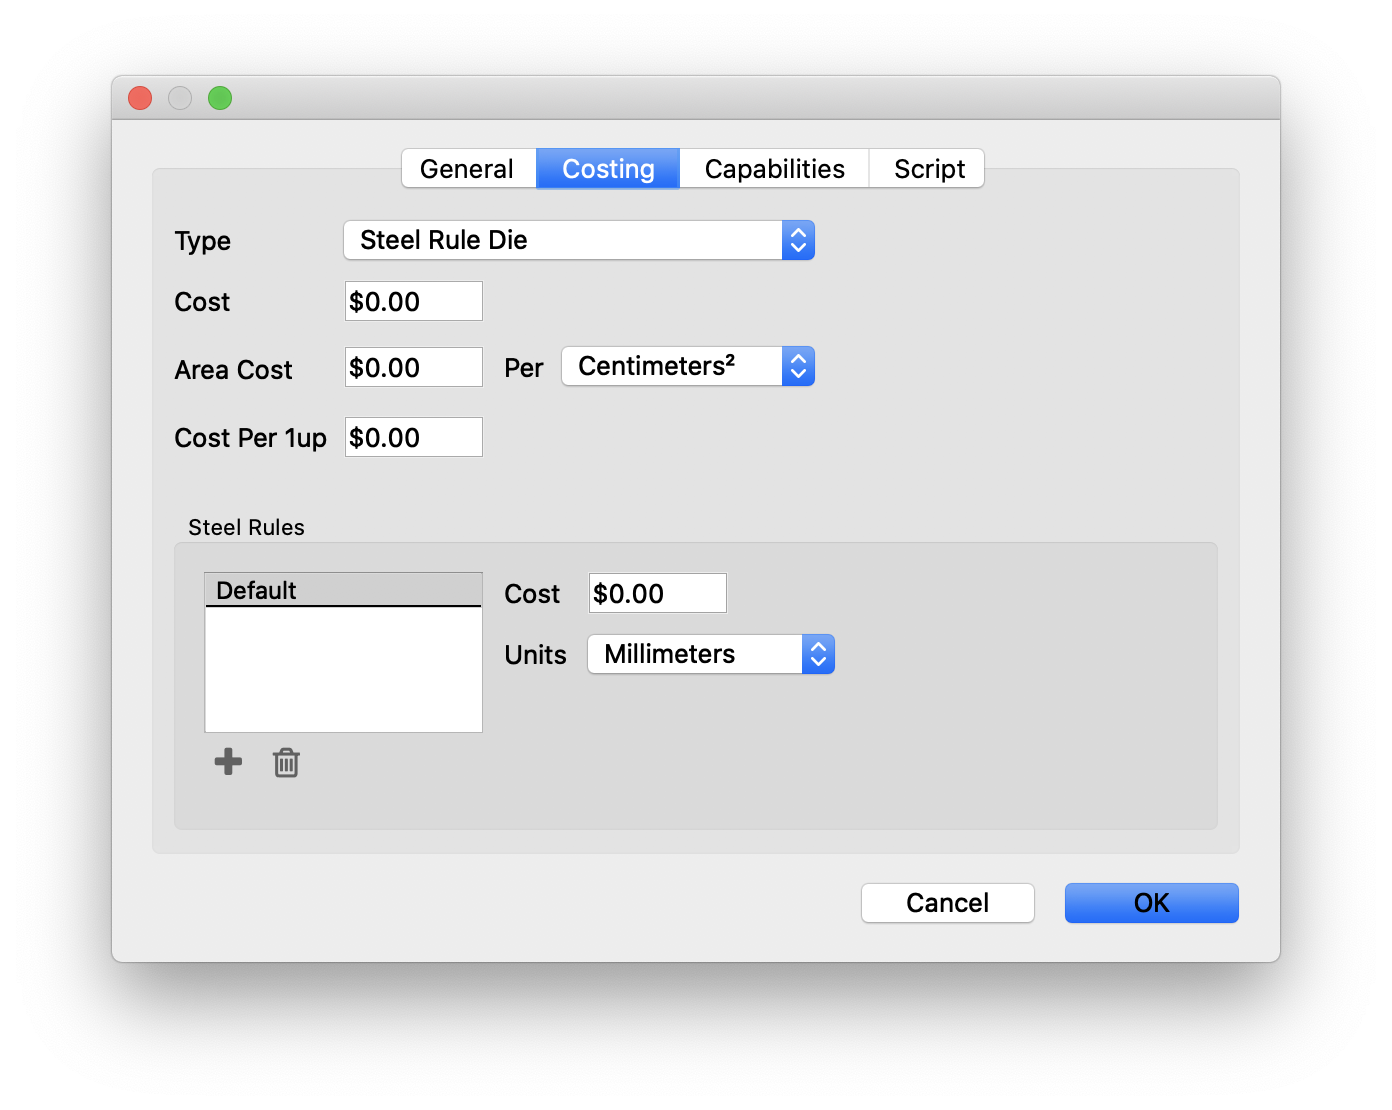
| Field | Description |
|---|---|
| Type | Specify the type of die - Steel Rule, Solid, or Flexible |
| Cost | Define the cost of each die |
| Area Cost | If the die is costed by area, specify the cost here. |
| Cost Per 1up | If the die is costed per 1-up, specify that cost here. |
| Steel Rules | For Steel Rule dies, define a linear cost per tool type, or specify a default cost. |
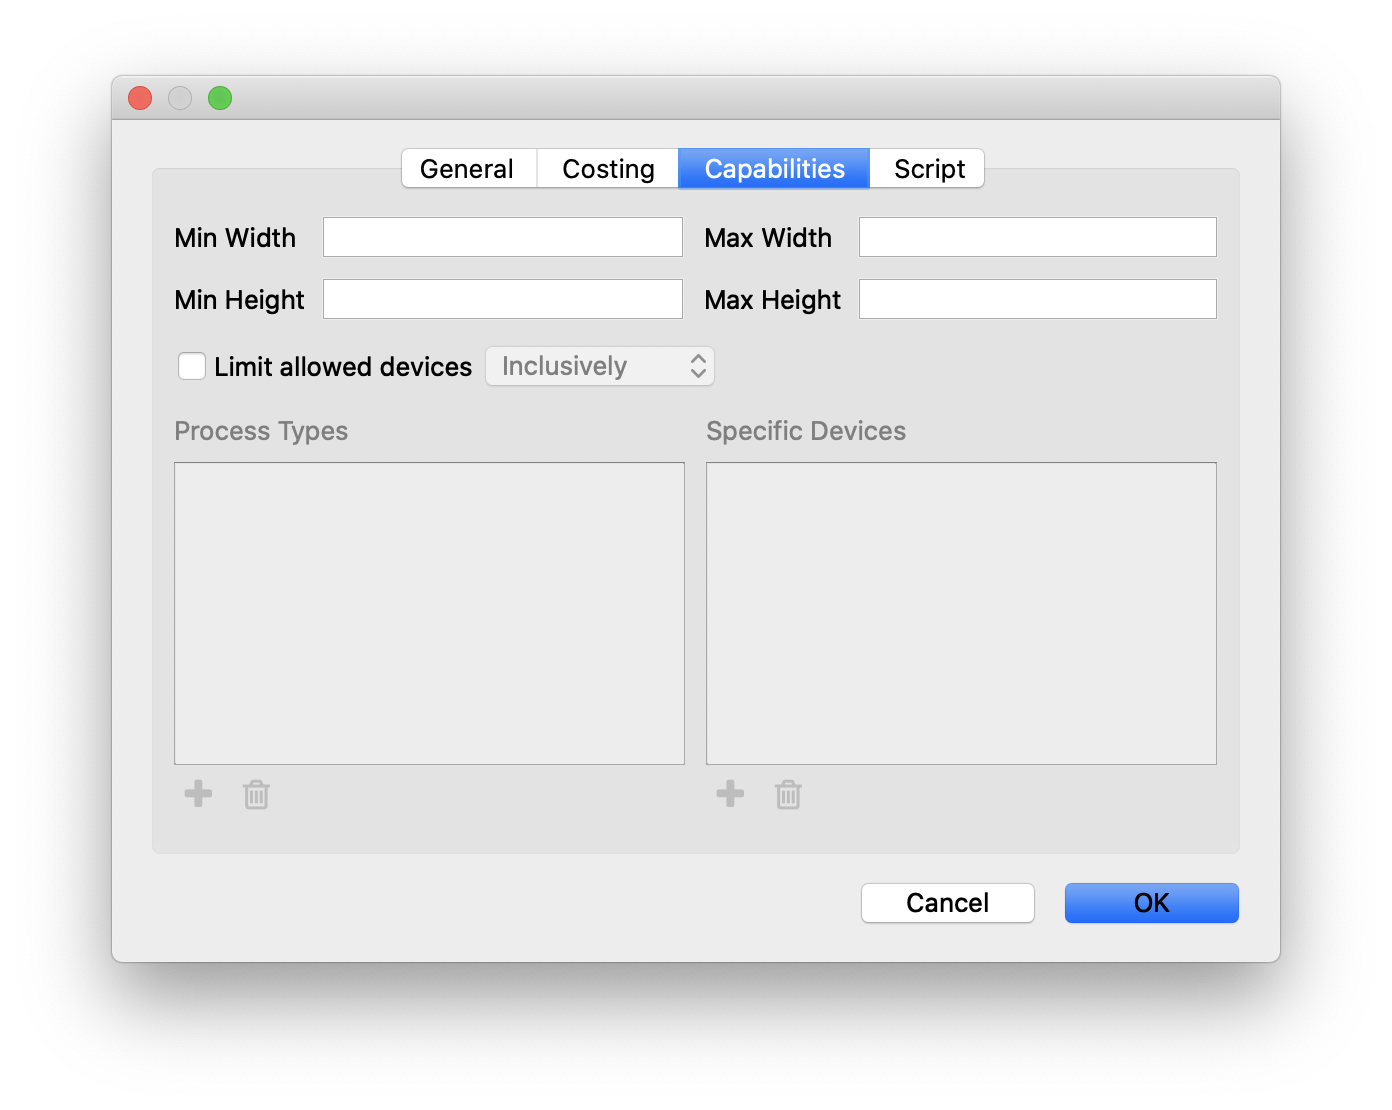
| Field | Description |
|---|---|
| Width and Height | Specify the max and min width and height for dies created with this device |
| Limit Allowed Devices | Optionally limit what process types or devices can or cannot be used with this device. Inclusively means that only selected process types or devices below can be used with this device. Exclusively means that this device will not work with any selected process types or devices selected below. |
# Importing Things from Tilia Cloud
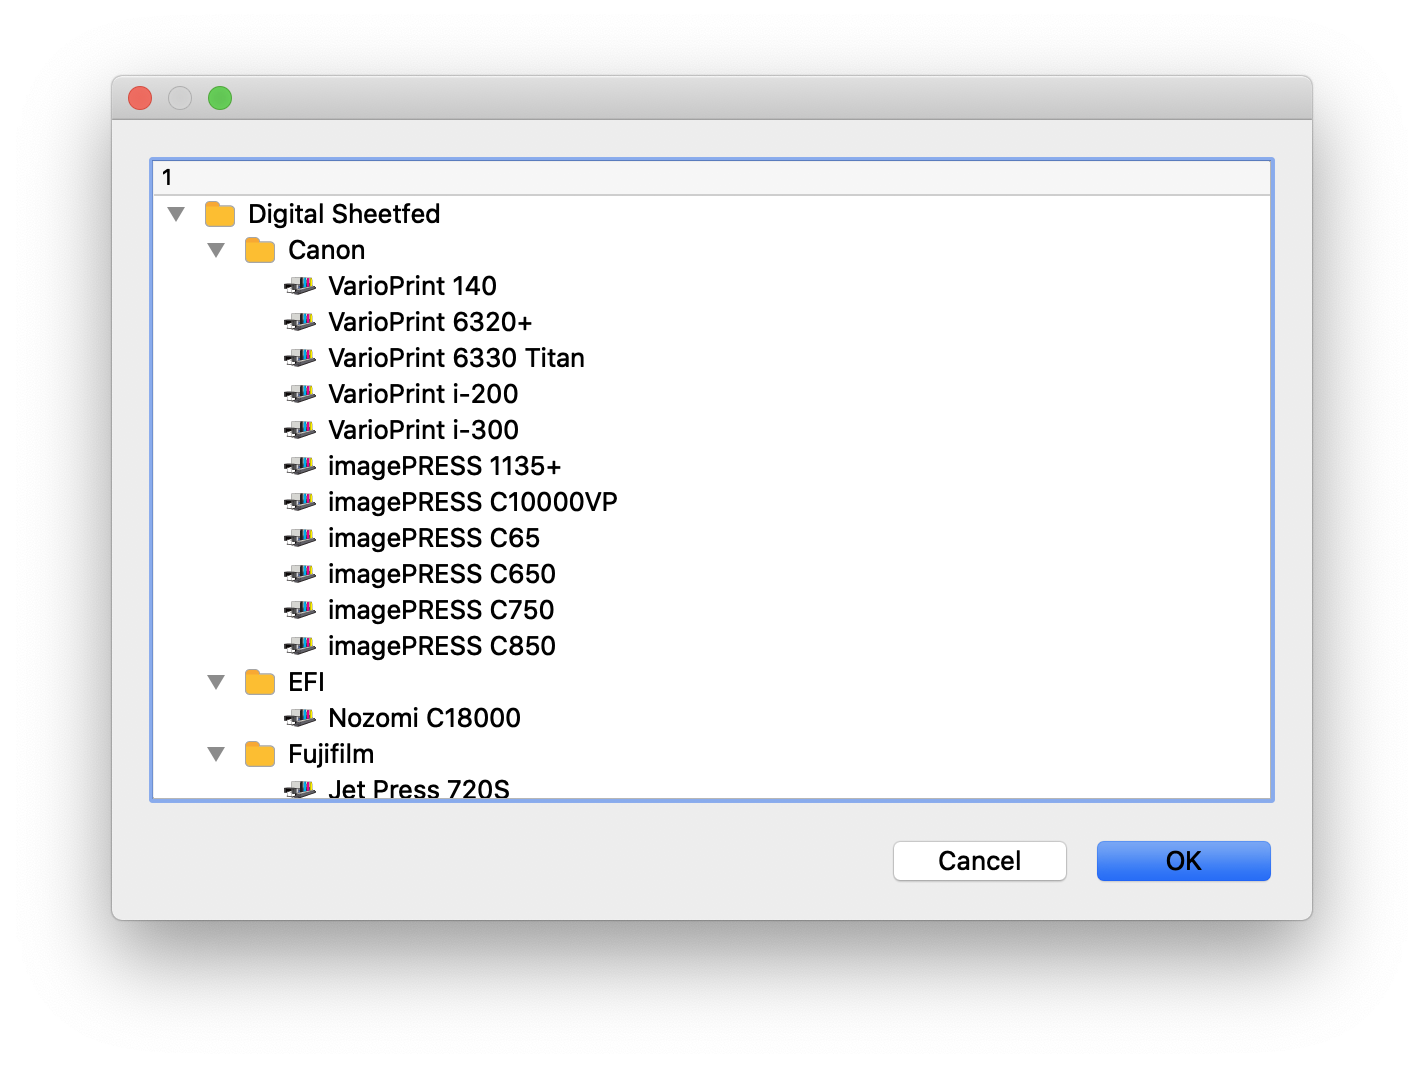
You can import things that have been preconfigured via Tilia Cloud. Click the dropdown in the top left of the Things panel, and choose "Import from Tilia Cloud". This will bring up the dialog shown above, which allows you to search the Tilia Cloud library for hundreds of common devices.
This is a good place to start to add things to your library. Keep in mind that the things in Tilia Cloud have been configured to the manufacturer's specifications and do not include costs, so you may need to adjust the capabilities and parameters to suit your exact environment.