# Working with tilia Griffin
# Start Window
When you first start tilia Griffin you are presented with the Start Window:
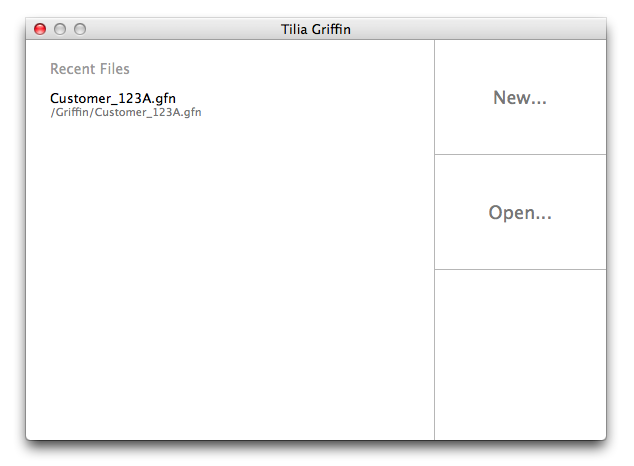
This window gives you a list of recent jobs and buttons for creating a new job or opening an existing job from the file system. The Start Window will close once a new or existing job is opened and reappear when all Job Windows are closed.
# Job Windows
Job Windows are where all your work building layouts is done. New and existing jobs are opened in their own Job Window. tilia Griffin allows multiple Job Windows to be open so you can work on different jobs at the same time.
The diagram below shows the sections that make up a Job Window:
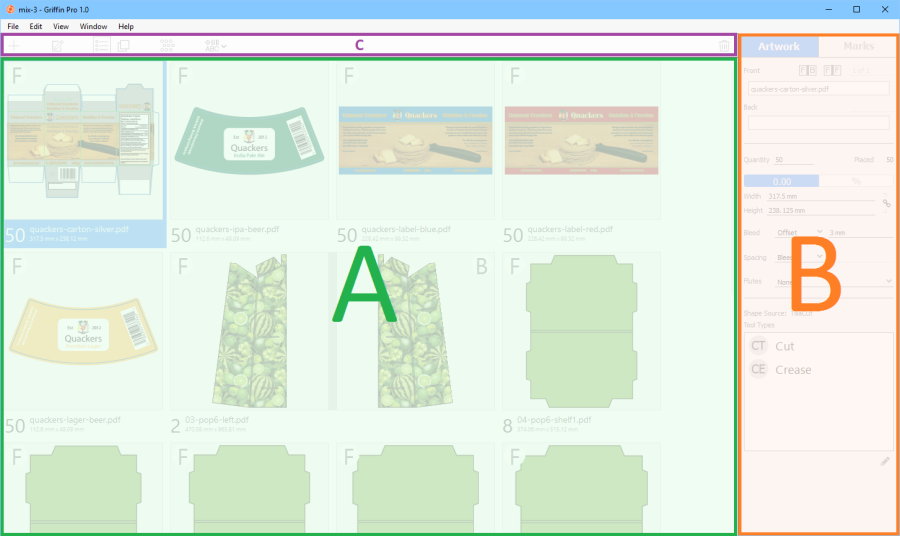
# Main View (A)
The green section labeled 'A' is the Main View. The Main View takes up most of the Job Window and displays the list of artwork or layout items in the job depending on what view you are in. You can also drill into a specific artwork or layout item to interact directly with items, change zoom, and more.
# Sidebar (B)
The orange section labeled 'B' on the right-hand side of the Job Window is the Sidebar. The Sidebar is where you can view and edit properties for the currently selected item(s) in the Main View.
# Toolbar (C)
The purple section labeled 'C' above the Main View is the Toolbar. The toolbar lets you switch between Artwork List and Layout List. It also lets you edit the job properties, launch the Nesting tool, add marks, and add or remove artwork and layout items. More actions are available when you drill into a specific artwork or layout item such as tool path edit tools and zoom controls.
Here is the toolbar and the buttons, from left to right:

Add Artwork – Add new artwork to the job (Artwork List only).
Job Properties – Edit job properties.
Artwork/Layout List – Toggle between Artwork List and Layout List.
Nesting – Launch the Nesting Tool to generate layouts.
Marks – Add new marks to the selected artwork(s) or layout(s).
Remove Artwork/Layout - Remove all selected artwork or layout items from the job.
# View modes
One of the most important concepts in Griffin is the current view mode. In the Job Window, you are always working with either artwork or layout items, and for each there are two modes: List mode and View mode. When the Job Window first appears, it will be in Artwork List where you manage the artwork items in your job. Layout List, on the other hand, lets you manage the layout items in your job. Artwork View and Layout View are detailed views of a specific artwork or layout item respectively.
To switch between Artwork List and Layout List, click on the respective icons in the Toolbar.
Artwork List

Layout List

# Artwork List and Artwork View modes
Artwork List is where you can see a list of your current artwork as well as add, remove, edit, and drill into individual artwork items.
When you first open a new Job Window you will be in Artwork List mode which displays a list of artwork items in the current job. To add new artwork item, click on the '+' icon in the Toolbar or drag and drop artwork files in from your desktop.
You can select multiple artwork items and edit their properties at the same time in the Sidebar. You can also click on the Marks icon in the Toolbar to add marks to selected artwork.
If you want to view or edit an artwork item in more detail, double click on the artwork item in the list to enter Artwork View for the given artwork item. The Main View will now contain an interactive view of the artwork item and the Toolbar will change to the following set of actions.

Return to List – Go back to the list of all artwork items in the job.
Select Tool – Select artwork marks in the Main View.
Zoom Tool – Click + drag to zoom into a specific area of the artwork in the Main View.
Hand Tool – Click + drag to move around the Main View and scroll in/out to zoom.
Marks – Select a mark type from the dropdown menu to add a mark to the artwork.
Edit Tool Paths – Edit the tool paths of the artwork directly (see Section 6 for details).
Zoom % - Select from the drop down to change zoom amount in the Main View.
View Front/Back – Toggle between viewing the front and back of the artwork.
# Layout List and Layout View modes
Layout List and Layout View operate in the same way as their artwork counterparts. When you click on the Layout List button in the Toolbar you are presented with a list of all current layout items in the job. Before running the Nesting tool this list will be empty. Once you have generated layouts, you can select them to edit properties in the Sidebar or double click on one to enter Layout View for that specific layout item. In Layout View, the Toolbar will change as it does in Artwork View. You are given the same set of actions minus the Edit Tool Path action. Using the select tool, you can move artwork and marks directly in Layout View around by clicking and dragging. The shift key works as a modifier while moving artwork in the layout view to lock movement only in a horizontal or vertical direction.

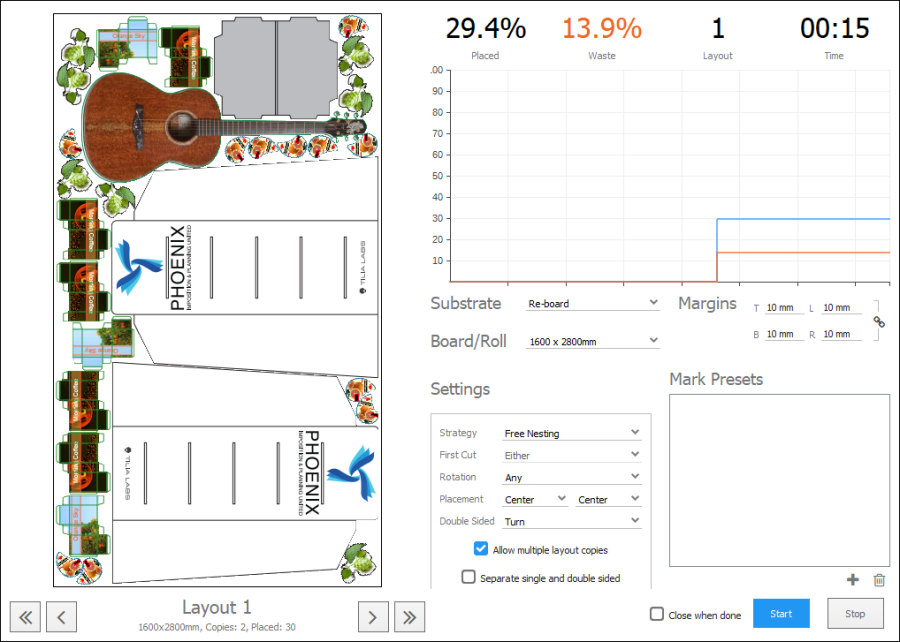
# Nesting Tool
The other major component of Griffin is the Nesting Tool. This tool automatically creates efficient, nested layouts from the artwork in your job for either roll- or sheet-fed environments.
To launch the Nesting Tool, click on the Nesting icon in the Toolbar while you are in Artwork List or Layout List mode.
Once the Nesting Tool is opened, you can select the substrate you want to nest artwork onto, change nesting settings if needed, and add mark presets that will be applied to the generated layouts. Next simply click 'Start' and let Griffin go to work.
Note
While you can have multiple Job Windows open at a given time, tilia Griffin only allows you to run one Nesting Tool session at a time.
# Menus
Menus are the other way of interacting with tilia Griffin. On Windows, the menu bar appears at the top of each window of the application, while on Mac the standard Mac menu bar at the top of the desktop is utilized.
The following menus are available:
File – Create, open, and close jobs. Import artwork. Export printing and cutting files.
Edit – Undo/redo, cut/copy/paste, remove, select/deselect, and launch Preferences (on Windows).
View – Fit in view, zoom, show rulers, show bleed paths.
Window – Manage Substrates, Tool Types, Mark Presets, and Tiling Presets. Minimize. Switch windows.
Help – Licensing, user guide, About page (on Windows).
# Closing Griffin
To close Griffin on Mac and Windows, go to the File menu and select "Exit". You will be prompted if any Job Windows contain unsaved jobs.
Closing all the Job Windows in Griffin will pull up the Start Window again. On Windows, if you close the Start Window, the application will close down. On Mac, the application will remain open when the Start Window is closed. Griffin is still accessible at that point from the standard Mac menu bar.